Crochet Lace Bell: An Elegant Holiday Ornament

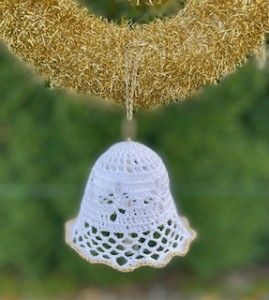
Add a touch of elegance and charm to your Christmas tree or wreath with a beautifully crafted Crochet Lace Bell. This delicate ornament will instantly elevate the festive ambiance of your holiday decor. Handmade with love and attention to detail, each bell is meticulously crocheted using fine thread and a delicate lace pattern. The intricate design creates a stunning visual effect, with the bell's intricate lacework casting intricate shadows when illuminated by twinkling Christmas lights. Hang it on your tree or wreath, and watch as it becomes the centerpiece of attention, captivating everyone with its intricate beauty. The bell's timeless design ensures that it will be cherished for years to come, becoming a cherished family heirloom that is passed down from generation to generation. Whether you're a crochet enthusiast or simply appreciate the artistry of handmade crafts, the Crochet Lace Bell is a must-have addition to your Christmas decor collection.
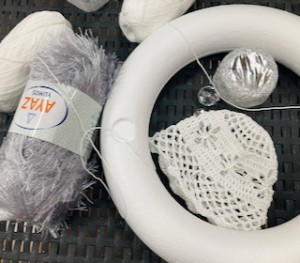
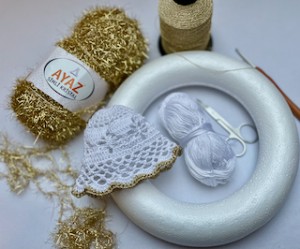
Materials Required
Yarn: I chose yarn Alize Miss, this one I love to use for lace crochet.
- Alize Miss: 50 g / 280 m / 100% cotton
- Or Yarn Alize Forever: 50 g / 280 m / 100% mikroacrylic
For bottom ending I used:
- Metallic Thread Cone: 100 g / 1000 m / 100% lurex
For this pattern you will need:
- 1.5 mm crochet hook
- Scissors
- Sewing/Embroidery and yarn needle/tapestry needle for sewing pieces together and weaving in ends
- Markers
- Bead
Difficulty Level
Difficulty Level: Level 2 – for advanced beginners
US Crochet Terms
- SlSt – slip stitch
- CH/s – chain/s
- SC - single crochet
- DC - double crochet
- TR - treble
- SK - skip
- T - turn
- ST/s - stitch(es)
REP – repeat
Pattern Notes
- A ch1 at the beginning of the row DOESN'T count as a stitch.
- A ch3 at the beginning of the row COUNTS as a stitch.
- Magic ring = the starting point for crocheting in a spiral. Use whichever method you prefer. Then work in closed rounds.
- The number of stitches that should be in a completed round/row are placed in brackets at the end of that round's/row's instructions.
- The Bell is crocheted as a one part.
- This Lace Bell measures:
- 7.5 cm / 3 inches high
- 9 cm / 3.5 inches wide
- The finished size will depend on what yarn you use, as well as your tension and hook.
- Measurements are taken from the garment lying flat, before the yarn has stretched out/dropped.
- You can make the Lace Bell bigger with a thicker yarn or smaller with a thinner yarn.
Written Pattern Instructions
Crochet Hook
1.5 mm crochet hook
Work in closed rounds, closing the round with a slip stitch in the 3rd chain from the beginning.
Make a magic ring.
If you keep the longer end, you will use it for a hanging eyelet or to tie a bead (not necessary, the yarn can be tied after the bell is finished).
Pattern Rounds
R1: ch3 (dc), 23dc in magic ring (24 dc)
R2: ch3 (dc), ch1 *1dc in next st, ch1* repeat from * to * till end of row, close the row with a slip st in 3rd ch from beg (24 dc and ch1 between them)
R3: ch3 (dc), ch2 *1dc in next st, ch2* repeat from * to * till end of row, close the row with a slip st in 3rd ch from beg (24 dc and ch2 between them)
R4: ch3 (dc), 2dc in ch2space *1dc in next st, 2dc in next ch2space* repeat from * to * till end of row, close the row with a slip st in 3rd ch from beg (72 dc)
R5: ch3 (dc), 1dc in next 9 st, ch5, skip 2 st *1dc in next 10 st, ch5, skip 2 dc* repeat from * to * till end of row, last ch5sp work like this: ch2, 1dc in 3rd ch from beginning of row (6 repetitions of (10dc and ch5sp))
R6: *ch4, skip 2 dc, 1dc in next 6 st, ch4, skip 2 st, sl st in 3rd ch of ch5sp* repeat from * to * till end of row, close the row with a slip st in 1st ch from beginning.
R7: *ch6, skip 2 dc, 1dc in next 2 st, ch6, skip 2 st, sl st in sl st* repeat from * to * till end of row, close the row with a slip st in 1st ch from beginning.
R8: *ch4, skip ch4, 1dc in next 2 ch, 1dc in next 2 st, 1dc in next 2 ch, ch4, sl st in sl st* repeat from * to * till end of row, last ch4 work like this: tr in 1st ch from beginning.
R9: ch3, 1dc in next ch, ch2, skip ch4, 1dc in next 2 ch, 1dc in next 6 st *1dc in next 2 ch, ch2, skip ch4, 1dc in next 2 ch, 1dc in next 6 st* repeat from * to * till end of row, close the row with a slip st in 3rd ch from beginning.
R10: ch3, 1dc in next st, 2dc in ch2space, 1dc in next 8 st *1dc in next 2 st, 2dc in ch2space, 1dc in next 8 st* repeat from * to * till end of row, close the row with a slip st in 3rd ch from beginning (72 dc)

R11: ch1, 1sc in 1st st, ch5, skip 2 st, *1sc in next st, ch5, skip 2 st* repeat from * to * till end of row, last ch5 work like this: ch2, 1dc in 1st st at beginning of row (24 loops)
R12: ch1, 1sc in chspace, ch5, *1sc in next chspace, ch5* repeat from * to * till end of row, last ch5 work like this: ch2, 1dc in 1st st at beginning of (24 loops)
R13 - R15: repeat row R12
Make 4 – 6 rows
R16: ch1, 1sc in chspace, *7 dc in next chspace, 1sc in next chspace* repeat from * to * till end of row, close the row with a slip st in 1st ch from beginning (12 fans)
If you want, you can crochet the bell with another yarn or continue crocheting with the white yarn.
If you choose a new color, cut the current yarn and sew the loose ends.
Tie a new thread - gold thread or another thread of a different color.
R17: ch1, 1sc in 1st st, 1sc in next 7 dc, *1sc in next sc, 1sc in next 7 dc* repeat from * to * till end of row, close the row with a slip st in 1st ch from beginning.
Cut yarn and fasten off and weave all ends in.
Finishing Instructions and Recommendations
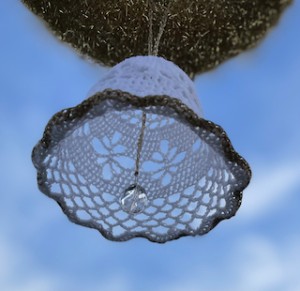
We will use the longer end at the beginning of the magic ring of the upper part of the bell to connect the bead. I tied on a new yarn, gold thread and crocheted a chain long enough to reach the bottom edge of the bell, pulled the bead through and tied it.
If you want to hang the bell, tie a new yarn into the magic ring, crochet a chain approximately 8 cm long, and sew the other end of the chain into the magic ring and you will have a finished loop for hanging. I crocheted the loop with gold yarn.
And voila! You made a cute lace bell!
- Funny Pictures
-
 These are the Pics That Simply Describe Your Life
-
 Hilariously Accurate Parenting Memes That Show the Other Side of Parenthood
-
 Great Pics That Just Depict Our Lives
- Recipes
-
 Crispy Baked Avocado Fries
-
 Baked Beans and Hot Dogs with Biscuit Topping
-
 Roasted Rosemary Lemon Chicken Breasts
- Lifehacks
-
 Crochet Basics: Twisted Fringe
-
 7 Crochet Tips And Tricks
-
 How To Work Crochet Into Denim
- Crochet Ideas
-
 Crochet Snorlax Plushie Doll
-
 Crochet Cat in 1 Row
-
 Crochet Beautiful Penguin Toy
- DIY
-
 Popsicle Stick and Jingle Bell Christmas Tree Ornament
-
 Upcycled Mason Jar Chicken Vase
-
 Crochet Namaste Stephanie Doll
- Knitting Ideas
-
 Knitted Keepsake Bag
-
 Knitted Textured Heart Dishcloth
-
 Knitted Snowfall Dishcloth