Peace Sign Crochet Afghan Square

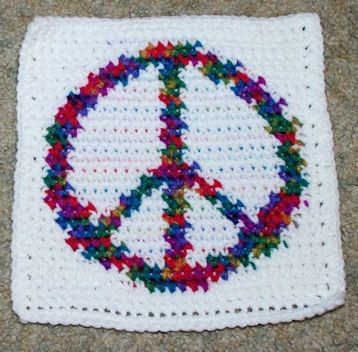
Create a beautiful afghan square featuring a peace sign design using crochet techniques. Keep track of your progress by counting each row as you work on this intricate pattern. The peace sign motif adds a unique and meaningful touch to your crochet project, making it a special piece to showcase in your home or gift to a loved one. Experiment with different color combinations to personalize your afghan square and make it truly one-of-a-kind. Whether you're a beginner or an experienced crocheter, this project offers a fun and rewarding challenge that will result in a beautiful and meaningful finished product. Share your progress with fellow crocheters and inspire others to try their hand at creating their own peace sign afghan square.
Measures 7-1/2" x 7-1/2"
Materials
Red Heart Super Saver-4ply worsted weight (White)
Simply Soft-4ply worsted weight (Mexicana)
Note: I used Simply Soft because I liked the color.
I recommend making the entire square with the same brand of yarn.
Abbreviations for Colors
White (MC) - less than 1 oz
Mexicana (CC) - less than 1/2 oz
Hook Size
Size G
Stitches
Ch, sc, sl st.
Pattern specifies how many single crochet stitches to work for each color.
Difficulty
MEDIUM
Instructions
Row Instructions
RND 1: With MC, ch29. Sc in the 2nd ch from the hook. Sc in ea rem ch. (28sc)
RND 2: Ch1, turn. 28MC.
RND 3: Ch1, turn. 11MC, 6CC, 11MC.
RND 4: Ch1, turn. 9MC, 10CC, 9MC.
RND 5: Ch1, turn. 7MC, 4CC, 2MC, 2CC, 2MC, 4CC, 7MC.
RND 6: Ch1, turn. 5MC, 4CC, 4MC, 2CC, 4MC, 4CC, 5MC.
RND 7: Ch1, turn. 4MC, 4CC, 5MC, 2CC, 5MC, 4CC, 4MC.
RND 8: Ch1, turn. 4MC, 4CC, 5MC, 2CC, 5MC, 4CC, 4MC.
RND 9: Ch1, turn. 3MC, 3CC, 1MC, 2CC, 4MC, 2CC, 4MC, 2CC, 1MC, 3CC, 3MC.
RND 10: Ch1, turn. 3MC, 3CC, 2MC, 2CC, 3MC, 2CC, 3MC, 2CC, 2MC, 3CC, 3MC.
RND 11: Ch1, turn. 2MC, 3CC, 4MC, 2CC, 2MC, 2CC, 2MC, 2CC, 4MC, 3CC, 2MC.
RND 12: Ch1, turn. 2MC, 2CC, 6MC, 2CC, 1MC, 2CC, 1MC, 2CC, 6MC, 2CC, 2MC.
RND 13: Ch1, turn. 2MC, 2CC, 7MC, 6CC, 7MC, 2CC, 2MC.
RND 14: Ch1, turn. 2MC, 2CC, 8MC, 4CC, 8MC, 2CC, 2MC.
RND 15: Ch1, turn. 2MC, 2CC, 9MC, 2CC, 9MC, 2CC, 2MC.
RND 16: Ch1, turn. 2MC, 2CC, 9MC, 2CC, 9MC, 2CC, 2MC.
RND 17: Ch1, turn. 2MC, 2CC, 9MC, 2CC, 9MC, 2CC, 2MC.
RND 18: Ch1, turn. 2MC, 3CC, 8MC, 2CC, 8MC, 3CC, 2MC.
RND 19: Ch1, turn. 3MC, 2CC, 8MC, 2CC, 8MC, 2CC, 3MC.
RND 20: Ch1, turn. 3MC, 3CC, 7MC, 2CC, 7MC, 3CC, 3MC.
RND 21: Ch1, turn. 4MC, 3CC, 6MC, 2CC, 6MC, 3CC, 4MC.
RND 22: Ch1, turn. 5MC, 3CC, 5MC, 2CC, 5MC, 3CC, 5MC.
RND 23: Ch1, turn. 6MC, 4CC, 3MC, 2CC, 3MC, 4CC, 6MC.
RND 24: Ch1, turn. 7MC, 4CC, 2MC, 2CC, 2MC, 4CC, 7MC.
RND 25: Ch1, turn. 9MC, 10CC, 9MC.
RND 26: Ch1, turn. 11MC, 6CC, 11MC.
RND 27: Ch1, turn. 28MC.
RND 28: Ch1, turn. 28MC.
Do Not Fasten off.
Border Instructions
With MC, Ch1, turn.
Sc in ea sc and in ea stitch and in each row end, placing 3sc in ea corner.
Join with sl st.
Fasten off.
- Funny Pictures
-
 Relatable and Funny Memes to Distract You From the Routine
-
 Hilarious Cat Snapchats That Will Leave You With the Biggest Smile
-
 Today’s Top Funny Tweets to Scroll Before Bed
- Recipes
-
 Cappuccino Brownies
-
 Chicken Mushroom Tortellini Bake
-
 Spinach Pie
- Lifehacks
-
 8 Necessary Tips for Baking Bread
-
 Tips & Hacks for Clean Carpets
-
 10 Uses For Old TV Armoires
- Crochet Ideas
-
 Crochet Watermelon Amigurumi
-
 Crochet Shark Applique
-
 Crochet Pineapple Amigurumi
- DIY
-
 Yarn Wrapped Christmas Wreath Ornaments
-
 Egg Carton Snowman Ornament
-
 Stick Peppermint Candy Ornament
- Knitting Ideas
-
 Knitted Star Square Dishcloth
-
 Knitted Free 2025 Year Dishcloth
-
 Knitted Ribbed Adult Hat