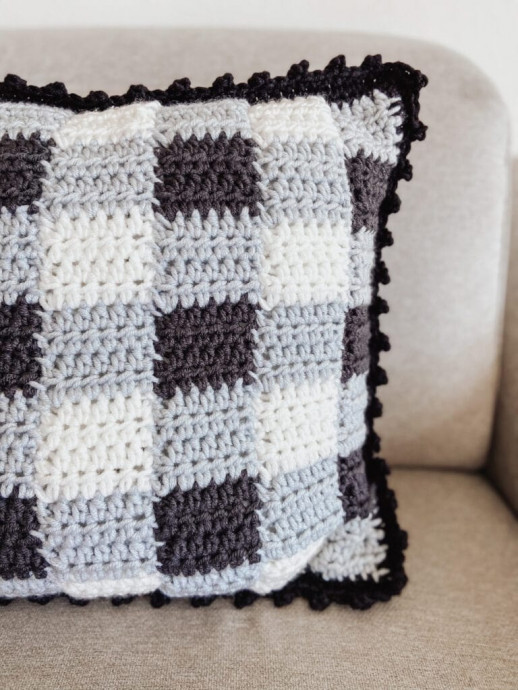
How to Crochet a Gingham Pillow

You’ll Need:
2 skeins of Lion Brand’s Color Made Easy (Bulky #5; 100% acrylic; 247yds/7oz.) in Coal color;
1 skein of the same yarn, but in Shade color;
1 skein of the same yarn, but in Birch color;
Crochet hook 8 mm;
18″ x 18″ Pillow;
Locking Stitch Markers;
Tapestry Needle;
Scissors.
Stitches Control:
6 sts x 4 rows = 2.5” x 2.5”.
Instructions:
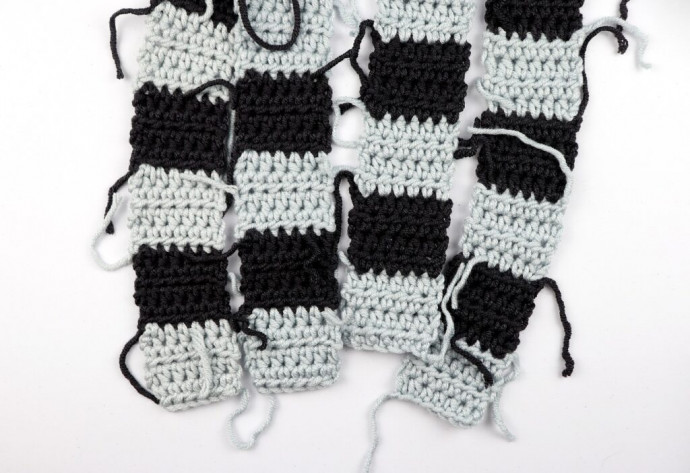
Front Panel 1
Make 4.
Starting with Shade,
Row 1: Ch 8, hdc into 3rd ch from hook and each ch down. (6)
Rows 2-4: Ch 2, turn. hdc into each st across (6)
Switch to Coal
Rows 5-8: Ch 2, turn. hdc into each st across (6)
Switch to Shade
Rows 9-12: Ch 2, turn. hdc into each st across (6)
Repeat Rows 5-12 four more times, switching colors every 4 rows.
You should have 7 squares total, 4 squares of Shade and 3 squares of Coal. Each square should have 4 rows and 6 stitches.
Front Panel 2
Make 3.
Starting with Birch,
Row 1: Ch 8, hdc into 3rd ch from hook and each ch down. (6)
Rows 2-4: Ch 2, turn. hdc into each st across (6)
Switch to Shade
Rows 5-8: Ch 2, turn. hdc into each st across (6)
Switch to Birch
Rows 9-12: Ch 2, turn. hdc into each st across (6)
Repeat Rows 5-12 four more times, switching colors every 4 rows.
You should have 7 squares total, 4 squares of Birch and 3 squares of Shade. Each square should have 4 rows and 6 stitches.
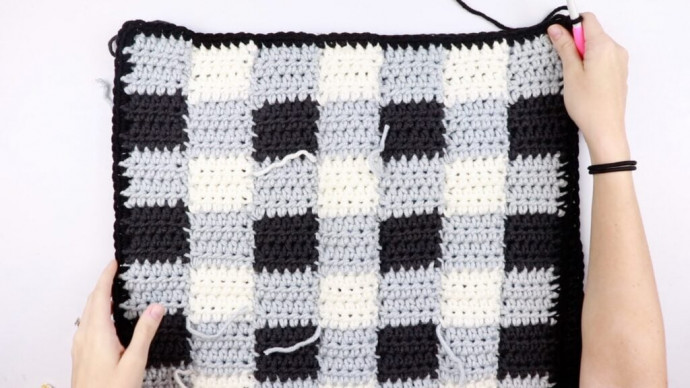
Connecting Squares
1. Line up 2 panels and use locking stitch markers to match up each square to hold the panels in place – the gray and black panel on the left, the white and gray panel on the right. Make sure that your panels are facing right side up and then fold them in half. Both of the right sides should be facing each other.
2. To sew the panels together, you’ll need a strand of yarn that’s almost three times the length of the panels. You can do this with the yarn still attached to the ball, or you can measure it out and cut accordingly.
3. Thread your tapestry needle and starting from the bottom, whip stitch your way to the top, taking out the stitch markers as you reach them. When finished, cut off your yarn a few inches and weave in your ends. Make sure they’re nice and secure!
Border
Once you have all of your panels sewn together, attach Shade into the top right corner and create a single crochet border with 4 stitches in each corner. On the sides you should have 36 stitches, not including the 4 stitches in each corner. Slip stitch to the first single crochet, do not tie off your work.
Back Panel
With Coal,
Row 1: Ch 45, hdc into 3rd ch from hook and each ch down. (42)
Rows 2-__: Ch 2, turn. hdc into each st across (42)
Tie off and weave in ends.
Border
Reattach yarn in top right corner and create a single crochet border the same way you did with the gingham side of the pillow. The side we just made is slightly larger than the first so it won’t even out. Try to evenly space out 36 stitches across the edge so that it lines up with the other side.
Assembly
Place the gingham side of your pillow on top of the back side of the pillow.
Starting from where you left off on the gingham side,
1st rnd: Ch 1, sc in each st around making sure that you are inserting your hook into both stitches from the front and back panels. You can use stitch markers to ensure everything is lining up evenly along the way. Stop before you sew the final edge shut and stuff your pillow insert inside. Sc the last edge shut. Sl st to first st.
Picot Edging
Round 2: Ch 1, sc next, picot next, [sc next 3 st, picot next st]. Rep [ ] to last st. Sc next st. Sl st to join.
Tie off and weave in all ends.