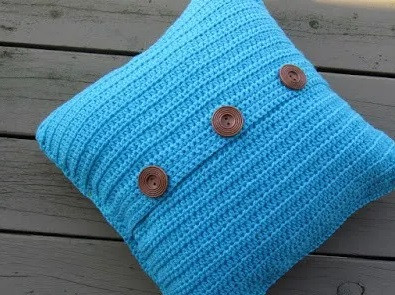
How to Crochet a Stylish 16x16 Inch Pillow with Buttons


You’ll Need:
90 yards of Worsted weight yarn in 3 colors (each);
Crochet hook 4.5 mm;
Three 1 ¼ inch wooden buttons;
Yarn needle.
Size:
16 x 16 inches square pillow.Stitches Control:
Front panel: 12 dc stitches = 4 inches;
Back panel: 13 hdc stitches = 4 inches.
Used Patterns:
Triple Crochet (tr):
Wrap the yarn around the hook twice, insert hook into the next stitch and pull up a loop, (yarn over and pull through 2 loops at a time) 3 times, 1 triple crochet stitch made.Front Post Triple Crochet (Fptr):
This stitch is worked like the regular triple crochet except for the fact that you insert your hook differently before pulling up a loop. For the front post triple crochet, you insert your hook in the same manner and work a triple in place of a double crochet.
Instructions:
Front Panel
Notes:
Use colors A, B, and C in the order: 2 Rows each of color A, B, and C. At the end of every second row, fasten off and start with the new color. Take care to weave in the tails as you go by crocheting over them.With Color A, ch 44 + 7
1st row (RS): Dc in 4th ch from hook and each ch across. Beginning Ch-3 counts as a dc too. Turn. (49 dc);
2nd row: Ch 1 (not a sc here and throughout), 1 sc in the same stitch as ch 1, 1 sc in each dc across. Fasten off. (49 sc);
3rd row: With right side facing, join color B with a sl st in the first sc, ch 3 (counts as first dc), dc in the next stitch, fptr around the dc from one row below the next sc, *(dc in next 3 sc, 1 fptr around the dc from one row below the next sc)*, repeat from * until 2 sc is left, dc in the last 2 sc. Turn. (49 st);
4th row: Ch 1, 1 sc in each stitch across. Fasten off.
5th row: With right side facing, join color C with a sl st in the first sc, ch 3 (counts as first dc), *(dc in next 3 sc, 1 fptr around the dc from one row below the next sc), repeat from * until 4 sc is left, dc in the last 4 sc. Turn. (49 st)
6th row: Ch 1, 1 sc in each stitch across. Fasten off.
Repeat 3rd-6th rows until you have 18 stripes. Weave in any tails left.
Back Panels
Note: Two back panels are worked: one with button holes and one with a button band to sew on the buttons.
Back Panel 1 (With Buttonhole Band)
Ch 53 + 2
1st row: 1 hdc in 3rd stitch from hook, 1 hdc in each stitch across. Beginning ch 2 is not a stitch. Turn. (53 hdc)
2nd row: ch 2 (does not count as a hdc), 1 hdc in each stitch across. Turn. (53 hdc)
Repeat 2nd row until your work measures 8 inches.
Buttonhole Band
1st-3rd rows: Ch 1 (not a sc here and throughout), 1 sc in the same stitch as ch 1, 1 sc in each stitch across. Turn. (53 sc);
4th row: Ch 1, 1 sc in the same stitch as ch 1, 1 sc in the next 10 stitches, ch 3, skip 3 stitches, 1 sc in next 11 stitches, ch 3, skip 3 stitches, 1 sc in next 11 stitches, ch 3, skip 3 stitches, 1 sc in next 11 stitches. Turn. (53 sc)
5th row: Ch 1, 1 sc in the same stitch as ch 1, 1 sc in the next 10 stitches, *(3 sc in next ch-3 space, 1 sc in next 11 stitches), repeat from * until the end. Turn. (53 sc)
6th-7th rows: Ch 1, 1 sc in the same stitch as ch 1, 1 sc in each stitch across. Turn. (53 sc).
Fasten off at the end of the 7th row and weave in the ends.
Back Panel 2 (With Button Band)
Ch 53 + 2
1st row: 1 hdc in the 3rd stitch from hook, 1 hdc in each stitch across. Beginning ch 2 is not a stitch. Turn. (53 hdc);
2nd row: ch 2 (does not count as a hdc), 1 hdc in each stitch across. Turn. (53 hdc).
Repeat 2nd row until your work measures 8 inches.
Button Band
1st-7th rows: Ch 1 (not a sc here and throughout), 1 sc in the same stitch as ch 1, 1 sc in each stitch across. Turn. (53 sc)
Fasten off at the end of the 7th row and weave in the ends.
Assembly
Keep the striped front panel, the wrong side up. Take the two back panels, overlap the buttonhole band over the button band of the second panel and keep it over the front panel. Work a round of sc all around the cover, distributing the stitches as uniformly as possible on the row ends. Make 3 sc for each stripe. Sew on the buttons corresponding to the buttonholes.