Deprecated: Creation of dynamic property myadv::$cms_config is deprecated in /home/www/web/craftorator.com/public_html/system/core/controller.php on line 156
Deprecated: Creation of dynamic property myadv::$cms_user is deprecated in /home/www/web/craftorator.com/public_html/system/core/controller.php on line 156
Deprecated: Creation of dynamic property myadv::$cms_config is deprecated in /home/www/web/craftorator.com/public_html/system/core/controller.php on line 156
Deprecated: Creation of dynamic property subscribe::$cms_config is deprecated in /home/www/web/craftorator.com/public_html/system/core/controller.php on line 156
Deprecated: Creation of dynamic property tune::$cms_config is deprecated in /home/www/web/craftorator.com/public_html/system/core/controller.php on line 156
Deprecated: Creation of dynamic property myvotes::$cms_config is deprecated in /home/www/web/craftorator.com/public_html/system/core/controller.php on line 156
Deprecated: Creation of dynamic property mybookmarks::$cms_config is deprecated in /home/www/web/craftorator.com/public_html/system/core/controller.php on line 156
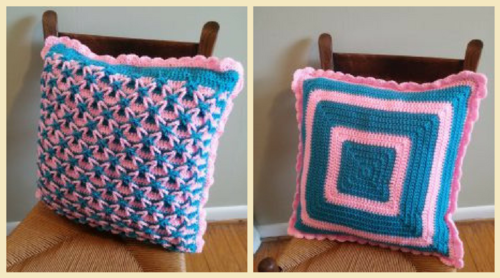
Step-by-Step Guide to Creating a Two-Toned Crochet Pillow
Deprecated: Creation of dynamic property cmsCore::$cats_by_ids is deprecated in /home/www/web/craftorator.com/public_html/system/controllers/tune/frontend.php on line 1521

Deprecated: Creation of dynamic property printview::$cms_config is deprecated in /home/www/web/craftorator.com/public_html/system/core/controller.php on line 156
Deprecated: Creation of dynamic property tune::$cms_config is deprecated in /home/www/web/craftorator.com/public_html/system/core/controller.php on line 156
Deprecated: Creation of dynamic property tune::$cms_config is deprecated in /home/www/web/craftorator.com/public_html/system/core/controller.php on line 156
Deprecated: Creation of dynamic property myadv::$cms_config is deprecated in /home/www/web/craftorator.com/public_html/system/core/controller.php on line 156
Deprecated: base64_decode(): Passing null to parameter #1 ($string) of type string is deprecated in /home/www/web/craftorator.com/public_html/system/controllers/myadv/model.php on line 30
Deprecated: base64_decode(): Passing null to parameter #1 ($string) of type string is deprecated in /home/www/web/craftorator.com/public_html/system/controllers/myadv/model.php on line 30
Deprecated: Creation of dynamic property myadv::$cms_config is deprecated in /home/www/web/craftorator.com/public_html/system/core/controller.php on line 156
Deprecated: Creation of dynamic property myadv::$cms_user is deprecated in /home/www/web/craftorator.com/public_html/system/core/controller.php on line 156
Deprecated: Creation of dynamic property myadv::$cms_config is deprecated in /home/www/web/craftorator.com/public_html/system/core/controller.php on line 156
Deprecated: Creation of dynamic property myadv::$cms_config is deprecated in /home/www/web/craftorator.com/public_html/system/core/controller.php on line 156
Deprecated: Creation of dynamic property myadv::$cms_user is deprecated in /home/www/web/craftorator.com/public_html/system/core/controller.php on line 156
Deprecated: Creation of dynamic property tune::$cms_user is deprecated in /home/www/web/craftorator.com/public_html/system/core/controller.php on line 156
Deprecated: Creation of dynamic property tune::$image_index_to_html is deprecated in /home/www/web/craftorator.com/public_html/system/controllers/tune/frontend.php on line 3176
Deprecated: Creation of dynamic property myadv::$cms_config is deprecated in /home/www/web/craftorator.com/public_html/system/core/controller.php on line 156
Stitches Used
Chain (ch)
Slip Stitch (sl st)
Single Crochet (sc)
Double Crochet (dc)
Foundation Double Crochet (fdc)
You Will Need
- 7 oz. Worsted Weight Yarn - turquoise (color A)
- 7 oz. Worsted Weight Yarn - pink (color B)
- or (2) 7 oz. skeins of worsted weight yarn in colors of your choice
- J/6mm hook
- 18″ pillow form
- Needle to weave in ends
I worked two rows across the same way (one row of each color), then carried my yarn up the side and worked two rows (one of each color) across the opposite way. You don’t have to work it this way, but it will save a lot of weaving in ends and the carried yarn will be hidden in the border.
Pillow Front
With Color A, Fdc 60. This should measure 17″.
Row Instructions
R1) Ch 3, dc in second stitch and next two stitches. [Ch 10, dc in next 4 stitches.] Repeat between []’s across.
R2) Join color B. Ch 3, dc in second stitch and next stitch. [Skip next stitch, ch 10. Dc 2 in next stitch, dc in next two stitches, dc 2 in next stitch. Ch 10. Skip next stitch, dc in next two stitches.] Repeat between []’s. Dc in last stitch.
R3) With color A, ch 3, dc in second stitch, dc 2 in next stitch. Ch 10. Skip next stitch, dc in next 4 stitches, skip next stitch. [Ch 10, dc 2 in next two stitches. Ch 10. Skip next stitch, dc in next 4 stitches, skip next stitch.] Repeat between []’s across. Ch 10, dc 2 in next stitch, dc in each of last two stitches.
R4) Color B, ch 3, dc in second stitch, dc in next stitch, dc 2 in next stitch. Ch 10. Skip next stitch, dc in next 2 stitches, skip next stitch. [Ch 10. Dc 2 in next stitch, dc in next 2 stitches, dc 2 in next stitch. Ch 10. Skip next stitch, dc in next 2 stitches, skip next stitch.] Repeat between []’s across. Ch 10, dc 2 in next stitch, dc in each of last 3.
R5) Color A, ch 3, dc in second stitch and next two stitches. [Skip next stitch, ch 10. Dc 2 in next 2 stitches. Ch 10, skip next stitch, dc in next 4 stitches.] Repeat between []’s across.
R6-9) Repeat rows 2-5.
R10-13) Repeat rows 2-5.
R14-17) Repeat rows 2-5.
R18-21) Repeat rows 2-5.
R22-25) Repeat rows 2-5.
R26-27) Repeat rows 2-3.
R28) Color B, ch 3, dc in second dc and each dc across. (60 stitches) Finish off. Weave all loops together before completing row 29, including loops from row 27.
R29) Color A, ch 3, dc in second stitch and next stitch. When working dc in next stitch, pass needle through top of loop from row 27, then complete dc as normal. Dc in each stitch across, catching corresponding loop from row 27 in every fourth stitch.
Border
Ch 3, turn. Dc in second stitch and each stitch across. Work 2 dc at corner, then dc 2 into every stitch down the side. Work 2 dc in corner, then dc in each stitch across. Work 2 dc at corner, then dc 2 into every stitch up other side. Work 2 dc in corner, join with sl st to beginning ch. Finish off.
Weaving the Loops Together
*This graph should explain why I have never been, am not now, nor will I ever claim to be, an artist, lol. There are some amazing artists in my family but I am NOT one of them!
Hopefully though, even though it lacks in artistic value, it will still help to make sense of the weaving process. Black ink represents the turquoise and red ink represents the pink. I did not show the fdc row on this graph.
And since I couldn’t figure out any way to get a full graph of the pillow to fit one photo and still be clear, we are going to work off of a smaller graph. The principle will still be the same, you will just have more repeats across than what we will be showing.
Ok, let’s start weaving. When working a row, you will be working the loops of that row and the loops of the previous row.
Row Weaving Instructions
R1) Skip loop A. Pull loop C through loop B. Pull loop E through loop D. Skip loop F.
R2) Give loop A a twist, then pull loop G through loop A. Pull loop H through loop C. Pull loop I through loop B. Pull loop J through loop E. Pull loop K through loop D. Pull loop L through loop F.
R3) Pull loop A through loop G. Pull loop B through loop H. Pull loop C through loop I. Pull loop D through loop J. Pull loop E through loop K. Pull loop F through loop L. Still working on row 3, go back and pull loop B through loop A. Pull loop D through loop C. Pull loop F through loop E.
R4) Pull loop G through loop B. Pull loop H through loop A. Pull loop I through loop D. Pull loop J through loop C. Pull loop K through loop F. Pull loop L through loop E.
R5) Pull loop A through loop G. Pull loop B through H. Pull loop C through loop I. Pull loop D through loop J. Pull loop E through loop K. Pull loop F through loop L. Still working on row 5, go back and pull loops through each other as directed in row 1.
The pattern will now repeat itself, although it will not be necessary to continue to twist the beginning and ending loops on row 2. (The twist just helped to hold the stitching together on the first row since those loops did not loop into anything else.)
Pillow Back
R1) With color A, ch 3, work 15 dc into first ch made. Sl st to top of beginning chain.
Row Instructions
R2) Ch 2. In same stitch work 1 dc, ch 1, 2 dc. [Dc in next 3 stitches. In next stitch work 2 dc, ch 1, 2 dc.] Repeat [] 2 more times. Dc in last 3 stitches, join with sl st to beginning ch.
R3) Ch 2, dc in next stitch. [In chain 1 corner work 2 dc, ch 1, 2 dc. Dc in next 7 stitches.] Repeat [] 2 more times. In chain 1 corner work 2 dc, ch 1, 2 dc, dc in last 5 stitches. Join with sl st to beginning ch.
R4) Ch 2, dc in next 3 stitches. [In chain 1 corner work 2 dc, ch 1, 2 dc. Dc in next 11 stitches.] Repeat [] 2 more times. In chain 1 corner work 2 dc, ch 1, 2 dc. Dc in last 7 stitches, join with sl st to beginning chain. Finish off.
R5) Join Color B in ch 1 corner, ch 2, work 1 dc, ch 1, 2 dc in same space. [Dc in next 15 stitches. In ch 1 corner work 2 dc, ch 1, 2 dc.] Repeat between [] 2 more times. Dc in last 15 stitches, join with sl st to beginning chain.
R6) Ch 2, dc in next space. [In chain 1 corner, work 2 dc, ch 1, 2 dc. Dc in next 19 stitches.] Repeat between [] 2 more times. In chain 1 corner, work 2 dc, ch 1, 2 dc. Dc in last 17 stitches, sl st to beginning ch. Finish off.
R7) Join Color A in ch 1 corner, ch 2, work 1 dc, ch 1, 2 dc in same space. [Dc in next 23 stitches. In chain 1 corner work 2 dc, ch 1, 2 dc.] Repeat between [] 2 more times. Dc in last 23 stitches, join with sl st to beginning chain.
R8) Ch 2, dc in next stitch. [In chain 1 corner work 2 dc, ch 1, 2 dc. Dc in next 27 stitches.] Repeat [] 2 more times. In chain 1 corner work 2 dc, ch 1, 2 dc, dc in last 25 stitches. Join with sl st to beginning ch.
R9) Ch 2, dc in next 3 stitches. [In chain 1 corner work 2 dc, ch 1, 2 dc. Dc in next 31 stitches.] Repeat [] 2 more times. In chain 1 corner work 2 dc, ch 1, 2 dc. Dc in last 27 stitches, join with sl st to beginning chain.
R10) Ch 2, dc in next 5 stitches. [In chain 1 corner work 2 dc, ch 1, 2 dc. Dc in next 35 stitches.] Repeat [] 2 more times. In chain 1 corner work 2 dc, ch 1, 2 dc. Dc in last 29 stitches, join with sl st to beginning chain. Finish off.
R11) Join Color B in ch 1 corner, ch 2, work 1 dc, ch 1, 2 dc in same space. [Dc in next 39 stitches. In ch 1 corner work 2 dc, ch 1, 2 dc.] Repeat between [] 2 more times. Dc in last 39 stitches, join with sl st to beginning chain.
R12) Ch 2, dc in next space. [In chain 1 corner, work 2 dc, ch 1, 2 dc. Dc in next 43 stitches.] Repeat between [] 2 more times. In chain 1 corner work 2 dc, ch 1, 2 dc. Dc in last 41 stitches, sl st to beginning ch. Finish off.
R13) Join Color A in ch 1 corner, ch 2, work 1 dc, ch 1, 2 dc in same space. [Dc in next 47 stitches. In chain 1 corner work 2 dc, ch 1, 2 dc.] Repeat between [] 2 more times. Dc in last 47 stitches, join with sl st to beginning chain.
R14) Ch 2, dc in next stitch. [In chain 1 corner work 2 dc, ch 1, 2 dc. Dc in next 51 stitches.] Repeat [] 2 more times. In chain 1 corner work 2 dc, ch 1, 2 dc, dc in last 49 stitches. Join with sl st to beginning ch.
R15) Ch 2, dc in next 3 stitches. [In chain 1 corner work 2 dc, ch 1, 2 dc. Dc in next 55 stitches.] Repeat [] 2 more times. In chain 1 corner work 2 dc, ch 1, 2 dc. Dc in last 51 stitches, join with sl st to beginning chain. Finish off.
R16) Join Color B in ch 1 corner, ch 2, work 1 dc, ch 1, 2 dc in same space. [Dc in next 59 stitches. In ch 1 corner work 2 dc, ch 1, 2 dc.] Repeat between [] 2 more times. Dc in last 59 stitches, join with sl st to beginning chain. Do not finish off.
Weave in all remaining ends on pillow back and front. Place pillow top and bottom together, wrong side facing each other. (Right side out.) Ch 1, then sc evenly around with color B, working through the stitches on both the pillow back and front. Once you have worked around 3 sides, insert the pillow form and stitch together the last side. Ch 1, turn. Sc in first stitch. [Skip next stitch, 5 dc in next stitch. Skip next stitch, sc in next stitch.] Repeat around, ending with 5 dc and a skipped stitch, then join with a sl st to beginning sc. Finish off and weave in remaining end. Your pillow is done!
Deprecated: Creation of dynamic property tune::$cms_config is deprecated in /home/www/web/craftorator.com/public_html/system/core/controller.php on line 156
Deprecated: Creation of dynamic property myadv::$cms_config is deprecated in /home/www/web/craftorator.com/public_html/system/core/controller.php on line 156
Deprecated: Creation of dynamic property myadv::$cms_config is deprecated in /home/www/web/craftorator.com/public_html/system/core/controller.php on line 156
Deprecated: Creation of dynamic property myadv::$cms_user is deprecated in /home/www/web/craftorator.com/public_html/system/core/controller.php on line 156
Deprecated: Creation of dynamic property Myseo::$cms_config is deprecated in /home/www/web/craftorator.com/public_html/system/core/controller.php on line 156
Deprecated: Creation of dynamic property tune::$cms_config is deprecated in /home/www/web/craftorator.com/public_html/system/core/controller.php on line 156
Deprecated: preg_match_all(): Passing null to parameter #2 ($subject) of type string is deprecated in /home/www/web/craftorator.com/public_html/system/controllers/tune/frontend.php on line 688
Deprecated: preg_match_all(): Passing null to parameter #2 ($subject) of type string is deprecated in /home/www/web/craftorator.com/public_html/system/controllers/tune/frontend.php on line 688
Deprecated: Creation of dynamic property Myseo::$cms_template is deprecated in /home/www/web/craftorator.com/public_html/system/core/controller.php on line 156
Deprecated: Creation of dynamic property cmsCore::$renderedContentItem is deprecated in /home/www/web/craftorator.com/public_html/templates/m1/controllers/content/item_view.tpl.php on line 6
Deprecated: Creation of dynamic property tune::$cms_config is deprecated in /home/www/web/craftorator.com/public_html/system/core/controller.php on line 156
Deprecated: Creation of dynamic property myadv::$cms_config is deprecated in /home/www/web/craftorator.com/public_html/system/core/controller.php on line 156
Deprecated: Creation of dynamic property myadv::$cms_config is deprecated in /home/www/web/craftorator.com/public_html/system/core/controller.php on line 156
Deprecated: Creation of dynamic property myadv::$cms_user is deprecated in /home/www/web/craftorator.com/public_html/system/core/controller.php on line 156
Deprecated: Creation of dynamic property tune::$cms_config is deprecated in /home/www/web/craftorator.com/public_html/system/core/controller.php on line 156
Deprecated: Creation of dynamic property tune::$cms_config is deprecated in /home/www/web/craftorator.com/public_html/system/core/controller.php on line 156
Deprecated: Creation of dynamic property myreauth::$cms_config is deprecated in /home/www/web/craftorator.com/public_html/system/core/controller.php on line 156
Deprecated: Creation of dynamic property tune::$cms_config is deprecated in /home/www/web/craftorator.com/public_html/system/core/controller.php on line 156
Deprecated: Creation of dynamic property tune::$cms_config is deprecated in /home/www/web/craftorator.com/public_html/system/core/controller.php on line 156
Deprecated: Creation of dynamic property cmsTemplate::$user_awards is deprecated in /home/www/web/craftorator.com/public_html/system/controllers/awards/model.php on line 95
Annabelle
Deprecated: Creation of dynamic property commentscomplaint::$cms_config is deprecated in /home/www/web/craftorator.com/public_html/system/core/controller.php on line 156
Reply
Deprecated: Creation of dynamic property tune::$cms_config is deprecated in /home/www/web/craftorator.com/public_html/system/core/controller.php on line 156