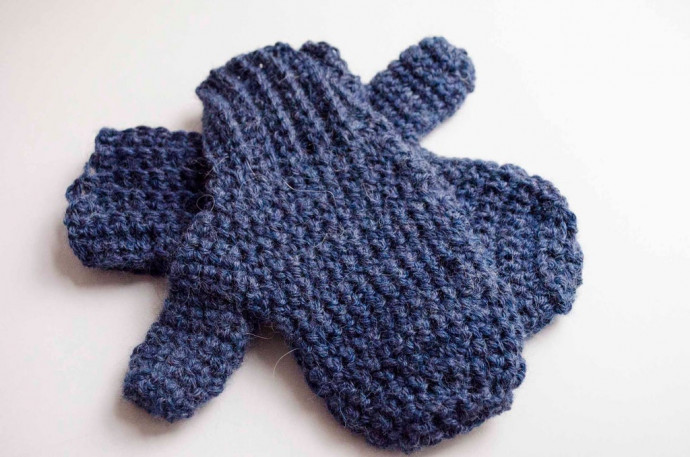
Crochet Mitten Pattern Using Baby Alpaca Yarn

You’ll Need:
2 balls of Baby Alpaca in Spotted Blue.
Crochet hook 5 mm.
Tapestry needle.
Scissors.
Instructions
Chain 13 with your crochet hook.
Row 1: starting on the second chain from the crochet hook, work 12 single crochets on the back loop of each stitch. Chain 1, and turn the work. At the end of the row, you will have 12 stitches.
Row 2: work 12 single crochets on the back loop of each stitch. Chain 1, and turn the work.
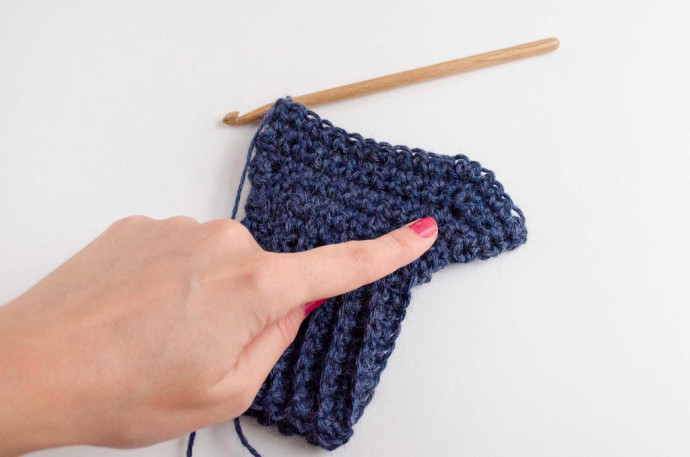
Rows 3 to 25: repeat row 2.
When you have worked all rows, you’ll have something similar to what you see in the picture above. Now we are going to join the piece to form the mitten cuff.
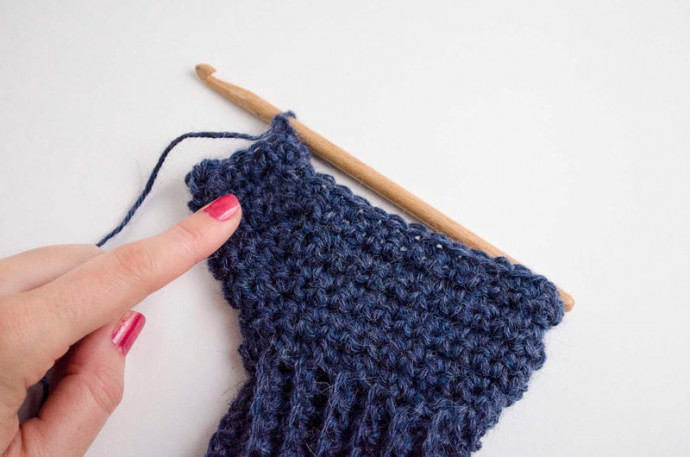
Row 26: fold the crocheted piece in a way so row 1 is behind row 25. Join both sides using a slip stitch, that means, make 1 slip stitch in each stitch to join the piece and form a tube.
The cuff will be closed. Turn the piece right side out, and place the seam to the right. You’ll be in the position you see in the picture. Now we are going to work around the edge of the cuff to start forming the part of the hand.
Row 27: chain 1, and 1 single crochet in the same stitch where you chain. Work 25 single crochets around the cuff, on the edge of the piece we crocheted first. Join the row with 1 slip stitch, chain 1, and turn the work. You’ll have 26 stitches.
From now on, every row is worked by turning the work, that means we’ll work in the round but without joining the rows, not in spiral. At the end of each row, join the rows with a slip stitch, chain 1, and turn the work, and continue with the next row skipping the slip stitch you made. Now we’ll work the increases for the thumb.
Thumb Increases
Row 28: work all stitches in single crochet. Join the row with 1 slip stitch, chain 1 and turn the work.
Row 29: work 12 single crochets, increase 1 stitch, and work 12 single crochets. Join the row with 1 slip stitch, chain 1 and turn the work. At the end of the row, you’ll have 28 stitches.
Row 30: work 12 single crochets, increase 2 stitches, work 12 single crochets. Join the row with 1 slip stitch, chain 1 and turn the work. At the end of the row, you’ll have 30 stitches.
Row 31: work 12 single crochets, increase 1 stitch, work 2 single crochets, increase 1 stitch, and work 12 single crochets. Join the row with 1 slip stitch, chain 1 and turn the work. At the end of the row, you’ll have 32 stitches.
Row 32: work 12 single crochets, increase 1 stitch, work 4 single crochets, increase 1 stitch, and work 12 single crochets. Join the row with 1 slip stitch, chain 1 and turn the work. At the end of the row, you’ll have 34 stitches.
Row 33: work 12 single crochets, increase 1 stitch, work 6 single crochets, increase 1 stitch, and work 12 single crochets. Join the row with 1 slip stitch, chain 1 and turn the work. At the end of the row, you’ll have 36 stitches.
Row 34: work 12 single crochets, increase 1 stitch, work 8 single crochets, increase 1 stitch, and work 12 single crochets. Join the row with 1 slip stitch, chain 1 and turn the work. At the end of the row, you’ll have 38 stitches.
Separating the Thumb
Row 35: work 25 single crochets. Count from the last single crochet you just made from the back 12 single crochets. That means, count as if you wanted to go back on the stitches you just made. Once you have found that stitch, 12 stitched back, join it to the stitch you are at with a slip stitch. The slip stitch separates the thumb from the rest of the mitten. Chain 1 and turn the work.
Now we’ll crochet the thumb. To do so, we are going to work only on the stitches we separated when we made the slip stitch.
Row 36: work 12 single crochets, increase 1 stitch, and chain 1 and turn the work. At the end of the row, you’ll have 12 stitches.
Rows 37 to 42: repeat row 36. We now have the thumb!
We’ll make a decrease in all the stitches to close it.
Decreasing the Thumb
Row 43: make 6 decreases. Join the row with a slip stitch, chain 1 and turn the work. You’ll have 6 stitches at the end of the row.
Cut the yarn leaving a long enough tail, thread it on your tapestry needle and pass it through the 6 remaining stitches from the last round. Pull it strongly to close the hole and then weave it in inside the thumb.
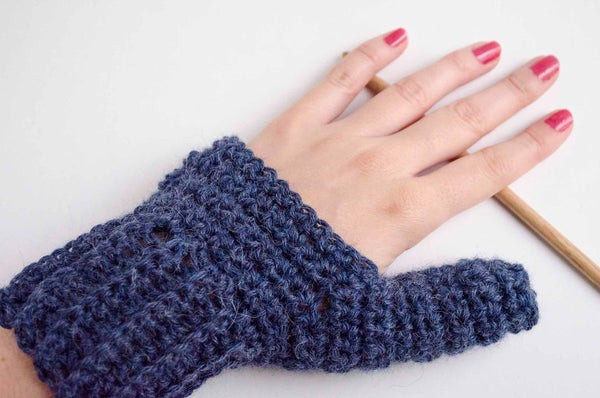
With the thumb to the right, join the yarn to the mitten. Find the first single crochet on the base of the thumb (check the picture above), make the yarn go through it, chain 1, and work a single crochet on the same stitch.
Now work 12 single crochets and you will reach the seam we have been doing on the side of the mitten. Join the row with 1 slip stitch, chain 1 and turn the work.
Completing the Mitten
Row 44: work 13 single crochets, pick 2 stitches from the base of the thumb by working 1 single crochet in each of them, and work 13 single crochets. Join the row with 1 slip stitch, chain 1 and turn the work. You’ll have 28 stitches at the end of the row.
Row 45: work 12 single crochets, make 2 decreases and work 12 single crochets. Join the row with 1 slip stitch, chain 1 and turn the work. You’ll have 26 stitches at the end of the row.
Row 46: work 26 single crochets. Join the row with 1 slip stitch, chain 1 and turn the work. You’ll have 26 stitches at the end of the row.
Rows 47 to 52: repeat row 46.
At this point, we have worked the palm and fingers part of the mitten. Now we are going to start closing the stitches in order to close the part of the finger tips.
Closing Finger Tips
Row 53: make 1 decrease, work 11 single crochets, make 1 decrease and work 11 single crochets. Join the row with 1 slip stitch, chain 1 and turn the work. You’ll have 24 stitches at the end of the row.
Row 54: work 24 single crochets. Join the row with 1 slip stitch, chain 1 and turn the work.
Row 55: make 1 decrease, work 10 single crochets, make 1 decrease and work 10 single crochets. Join the row with 1 slip stitch, chain 1 and turn the work. You’ll have 22 stitches at the end of the row.
Row 56: make 1 decrease, work 9 single crochets, make 1 decrease and work 9 single crochets. Join the row with 1 slip stitch, chain 1 and turn the work. You’ll have 20 stitches at the end of the row.
Row 57: make 10 decreases. Join the row with 1 slip stitch, chain 1 and turn the work. You’ll have 10 stitches at the end of the row.
Row 58: make 5 decreases. Join the row with 1 slip stitch, chain 1 and turn the work. You’ll have 5 stitches at the end of the row.
Now we have closed enough stitches to finish the mitten, so cut the yarn leaving a tail long enough and thread the tapestry needle.
Pass the tapestry needle through the 5 remaining stitches and pull strongly to close the hole. Weave the ends inside the mitten.
Repeat the same steps for the second mitten.