How to Knit a Stylish Sweater: A Step-by-Step Guide


You’ll Need
400g of grey-green yarn (45% wool, 55% acrylic; 250m/100g);
Knitting needles size 3;
3 buttons.
Size
Size: S.
Used Patterns
Pearl Pattern
1st row: knit stitch, purl;
2nd row: purls above knit stitches, knit stitches above purls.
Stockinette Stitch
In RS row – knit stitches, in WS row – purls.
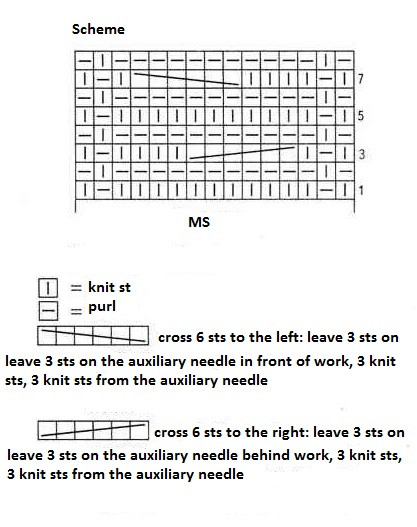
Cable Pattern
Follow the scheme, which states both RS and WS rows.
Instructions
Back
Make 97 chain stitches + 2 selvage stitches, then make the 1st row with knit stitches. Follow with 3 cm of pearl pattern. Continue work using stockinette stitch. Decrease 1 stitch every 9th row from both sides. In 31 cm from the set-up row, finish your work with 10 cm of pearl pattern. For arm-holes, decrease 1 x 4 stitches, 2 x 1 stitch from both sides. In 58 cm from the set-up row, finish your work.
Front
Make 46 chain stitches + 2 selvage stitches and replicate the first 31 cm as done for the back. Then, divide all stitches into 3 parts, starting the cable pattern according to the scheme in the central part, and continue work with stockinette stitch from both sides of the cables. In 41 cm from the set-up row, decrease 1 x 4 stitches, 2 x 1 stitch for arm-holes. In 50 cm from the set-up row, decrease 1 x 4 stitches, 1 x 2 stitches, and 8 x 1 stitch in every 2nd row for the neck-hole. In 58 cm from the set-up row, finish your work. Create another half of the front in symmetry.
Sleeves
Make 73 stitches + 2 selvage stitches, complete the 1st row with knit stitches, followed by 3 cm of pearl pattern, then continue with stockinette stitch. Decrease 7 x 1 stitch in every 3rd row from each side. All decreases should be finished within 15 cm. Divide your work into 3 parts and focus on the central part using the cable pattern; proceed with stockinette stitch from both sides. In 34 cm from the set-up row, shape arm-holes and sleeve caps by decreasing 1 x 4 stitches, 1 x 2 stitches in every 2nd row from both sides, followed by 6 x 1 stitch decreases in every 3rd row, and finally, decrease 8 x 1 stitch in every row. Bind off the remaining stitches.
Assembly
To work with the pearl pattern for the placket: for the front, create 2 plackets of 3 cm wide and 50 cm long, and for the neck-hole, make 1 placket of 3.5 cm wide and 48-50 cm long, including a button-loop on one end. Complete all seams. Sew up the sleeves. Attach plackets and buttons securely.