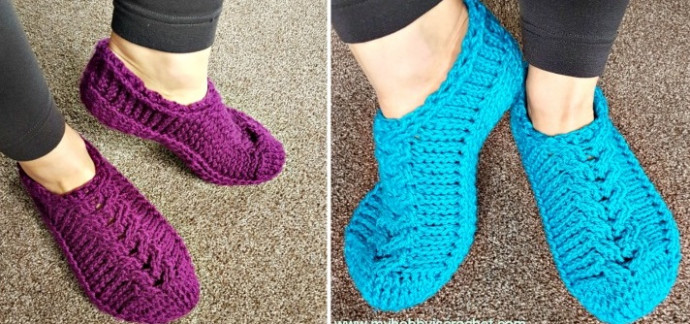
Crochet Slippers Using Red Heart Chic Sheep Yarn

You’ll Need:
2 skeins of Red Heart Chic Sheep by Marly Bird;
Crochet hook 5 mm;
Yarn needle;
Stitch marker;
Scissors.
Stitch Control
4 fpdc sts = 1" (2.5 cm)
Special Stitches
Standing fpdc: Standing front post double crochet = make a slip knot on your hook, wrap yarn around hook once, insert hook from front to back around the post of the next st. Complete as for regular dc.
Dec fpdc: (invisible) decrease front post double = yo and insert hook from the front to the back around the post of the next 2 sts (at the same time). Complete as for regular dc.
Dec bpdc: (invisible) decrease back post double = yo and insert hook from the back to the front around the post of the next 2 sts (at the same time). Complete as for regular dc.
Instructions
Start with a magic ring.
Rounds
Round 1: ch 1, work 12 hdc into ring, join with sl st to top of first hdc. (12 sts)
Round 2: ch 2, *1 dc into top of next st, 1 fpdc around the same st as the dc just made, repeat around from *, join with sl st to top of first st. (24 sts)
Round 3: ch 2, 1 fpdc around each of next 5 sts, (1 dc into top of next st, 1 fpdc around same st) x 2 times, 1 fpdc around each of next 10 sts, (1 dc into top of next st, 1 fpdc around same st) x 2 times, 1 fpdc around each of next 5 sts; join with sl st to top of first fpdc. (28 sts)
Round 4: ch 2, 1 fpdc around each of next 6 sts, (1 dc into top of next st, 1 fpdc around same st) x 2 times, 1 fpdc around each of next 12 sts, (1 dc into top of next st, 1 fpdc around same st) x 2 times, 1 fpdc around each of next 6 sts; join with sl st to top of first fpdc. (32 sts)
Round 5: ch 2, 1 fpdc around each of next 7 sts, (1 dc into top of next st, 1 fpdc around same st) x 2 times, 1 fpdc around each of next 14 sts, (1 dc into top of next st, 1 fpdc around same st) x 2 times, 1 fpdc around each of next 7 sts; join with sl st to top of first fpdc. (36 sts)
Round 6: ch 2, work 1 fpdc around each of next 9 sts, 1 bpdc around each of next 5 sts, then start cable: sk next 2 sts, work 1 fptr around each of next 2 sts; going behind the 2 fptr just made, work 1 dc into each of the 2 skipped sts, sk next 2 fpdc, work 1 dc into each of next 2 sts; going in front of the 2 dc just made, work 1 fptr around each of the 2 skipped sts - cable sts are done; starting with the first st after the marked st, work 1 bpdc around each of next 5 sts, 1 fpdc around each of next 9 sts, join with sl st to top of first fpdc. (36 sts)
Round 7: ch 2, work 1 fpdc around each of next 9 fpdc, 1 bpdc around each of next 5 bpdc, then work 1 fpdc around each of 8 sts of the cable, work 1 bpdc around each of next 5 bpdc, 1 fpdc around each of next 9 fpdc, join with sl st to top of first fpdc. (36 sts)
Round 8: ch 2, work 1 fpdc around each of next 9 fpdc, 1 bpdc around each of next 5 bpdc, work
Cable: sk next 2 fpdc, work 1 fptr around each of next 2 sts, going behind the 2 fptr just made, work 1 dc into each of the 2 skipped sts, sk next 2 fpdc, work 1 dc into each of next 2 sts, going in front of the 2 dc just made, work 1 fptr around each of the 2 skipped fpdc sts; then work 1 bpdc around each of next 5 bpdc, 1 fpdc around each of next 9 fpdc; join with sl st to top of first fpdc. (36 sts)
Repeat as rounds 7-8 until you have 7 complete cables, ending with a round 8 repeat.
Cut yarn. Fasten off.
Start Working in Rows:
Row 1 (right side): Counting from right to left on the last round you made, join yarn with a standing fpdc around the 7th fpdc of the cable; 1 fpdc around next fpdc, 1 bpdc around each of next 5 bpdc, 1 fpdc around each of next 18 fpdc (be careful to not work around the ch2 in the middle of the foot), 1 bpdc around each of next 5 bpdc, 1 fpdc around each of next 2 fpdc; ch 2, turn. (32 sts)
Row 2 (wrong side): 1 bpdc around each of next 2 sts, 1 fpdc around each of next 5 sts, 1 bpdc around each of the next 18 sts, 1 fpdc around each of next 5 sts, 1 bpdc around each of 2 sts, ch 2, turn. (32 sts)
Row 3 (right side): ch 2, 1 fpdc around next 2 sts, 1 bpdc around each of next 5 sts, 1 fpdc around each of next 18 sts, 1 bpdc around each of next 5 sts, 1 fpdc around each of next 2 sts; ch 2, turn. (32 sts)
Repeat as rows 2-3, until you have 23 ridges beginning with the first cable round, ending with a row 2 repeat on wrong side.
Shaping the Heel with Decreases
You will crochet 2 rows with decreases in the middle of the piece. Each decrease row you will decrease 4 sts.
Row 1: On right side: ch 2, 1 fpdc around each of next 2 sts, 1 bpdc around each of next 5 sts, 1 fpdc around each of next 5 sts, 1 dec-fpdc × 4 times, 1 fpdc around each of next 5 sts, 1 bpdc around each of next 5 sts, 1 fpdc round each of next 2 sts. (28 sts)
Row 2: On wrong side: ch 2, 1 bpdc around each of next 2 sts, 1 fpdc around each of next 5 sts, 1 bpdc around each of next 3 sts, 1 dec-bpdc × 4 times, 1 bpdc around each of next 3 sts, 1 fpdc around each of next 5 sts, 1 bpdc around each of next 2 sts. (24 sts)
Cut yarn leaving a long tail that will be used to sew the sides together.
Seaming the Heel
Thread yarn needle with the long tail. Holding the piece on the right sides so that the sts on the edge of each side align themselves. We will seam around the post of the sts on each side, not into the top of the sts.
This way the seam will be almost invisible, imitating the front post sts.
Seam the sides at heel inserting the needle around the post of the stitches on each side this way:
for the front post sts part: insert needle from front to back around the post of the sts on both sides;
for back post sts part: insert needle from back to front around the sts of the side nearest to you and from front to back around the sts of the other side.
Seam any holes created by the decrease sts. Cut yarn. Fasten off.
Make another slipper the same way.