You’ll Need:
400 (500)g of brown yarn (70% alpaca, 30% polyamide; 225m/50g);
Crochet hook 5.5 and 6.
Size:
S (L).
Note:
Use crochet hook 5.5 only for neck-hole and sleeves fastening.
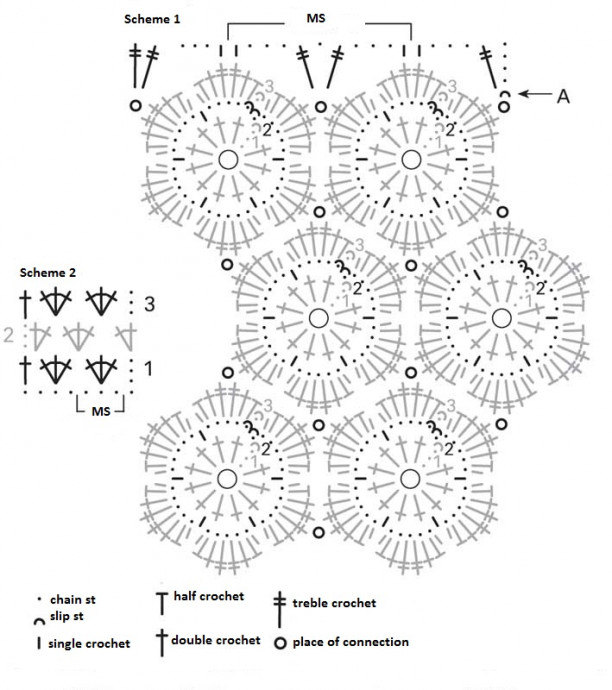
Used Patterns
Flower Motif:
Work according to Scheme 1 with circle rows. For the 1
st motif, make a loop of yarn and create 3 circle rows according to the scheme. Start every row with 3 or 1 chain stitches instead of the 1
st double crochet or single crochet, and finish with 1 slip stitch in the upper chain stitch increase. If needed, turn to the next row using a slip stitch. Make all subsequent motifs like the 1
st motif, attaching yarn to the previous motif in the 3
rd circle row. Connect the motif with previous motifs in marked places using 1 slip stitch.
Waste Course:
Work according to Scheme 1. Join the yarn at Arrow A, start with 4 chain stitches instead of a treble crochet, work through the pattern repeat 5 times, and finish with stitches after the pattern repeat.
Main Pattern:
The quantity of stitches is a multiple of 3 + 2. Work according to Scheme 2. Start before the pattern repeat, follow the pattern repeat, and finish with stitches after the pattern repeat. Make rows 1
st to 3
rd once, then repeat rows 2
nd to 3
rd.
Fringe of Picots:
Start every circle row with 1 chain stitch instead of the 1
st single crochet or 1 slip stitch, finishing with 1 slip stitch in the chain stitch increase.
1st circle row: single crochets;
2nd circle row: *1 slip stitch, 1 picot, skip 1 single crochet of the previous row*; repeat from * to *.
Make rows 1st to 2nd once.
Stitches Control:
11 stitches x 7 rows = 10 x 10 cm;
Flower motif diameter – 10 cm.
Instructions
Lower Border:
Make 30 (36) flower motifs and connect them according to Scheme 1. First, connect 10 (12) motifs in a strip, then connect the 10
th (12
th) motif with the 1
st motif to create the first ring. Create the 2
nd and 3
rd rings in the same manner as the first one, connecting motifs to replace the previous ring. The height of the border is 27 cm.
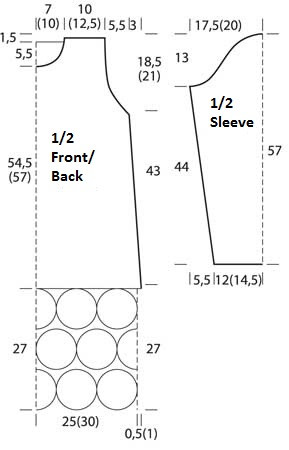
Back:
Fasten 5 (6) motifs of the upper ring of the border with 1 waste course row. Continue with the main pattern, making 56 (58) stitches in the 1
st row. For the side chamfer, decrease 13 x 1 stitch in every 8
th row from both sides = 50 (62) stitches. In 43 cm from the beginning of the waste course row, decrease 3 stitches from both sides for armholes, then continue with 3 x 1 stitch in each row = 38 (50) stitches. In 60 (62.5) cm from the beginning of the main pattern, bind off the central 16 (22) stitches for the neck-hole and finish both sides separately. In 61.5 (64) cm from the beginning of the waste course, finish your work on the remaining 11 (14) stitches for the shoulders.
Front:
Create in the same manner as the back, but for a deeper neck-hole, bind off the central 10 (16) stitches in 54.5 (57) cm from the beginning of the waste course and finish both sides separately. For a smooth rounding, decrease 3 x 1 stitch in every row from the inner sides.
Sleeves:
For each sleeve, make 26 (32) chain stitches + 3 chain stitches for increase and work with the main pattern. For sleeve chamfer, increase 1 stitch from both sides in 3 cm from the set-up row, then, add 5 x 1 stitch in every 6
th and 4
th rows alternately = 38 (44) stitches. In 44 cm from the set-up row, decrease 3 stitches from both sides for sleeve caps, then make 8 x 1 stitch in every row. In 57 cm from the set-up row, finish your work on the remaining 16 (22) stitches.
Assembly:
Make shoulder seams. Fasten the neck-hole with fringe of picots. Sew the sleeves, and make side and sleeve seams. Fasten the edges of the sleeves with fringe of picots.

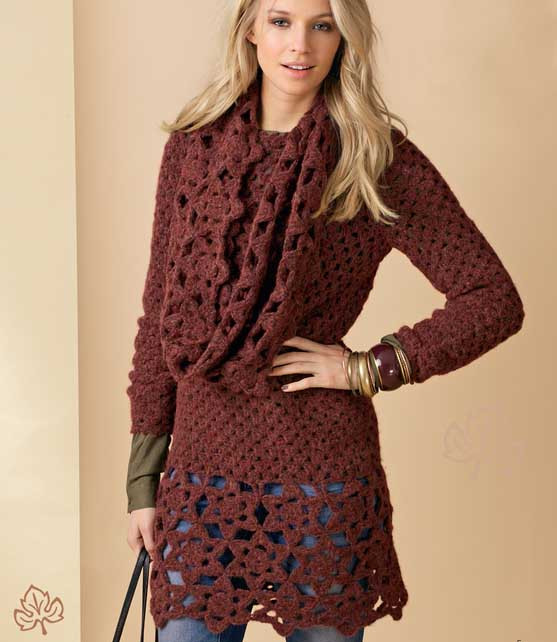
This tunic is so nice
Thank you so much!