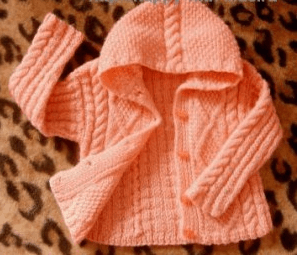
A Complete Guide to Knitting a Peach Cotton Garment


You'll Need:
300g of 100% cotton yarn of peach color;
Knitting needles 4.5;
Auxiliary needle;
5 buttons.
Size:
75-80 cm.
Used Techniques
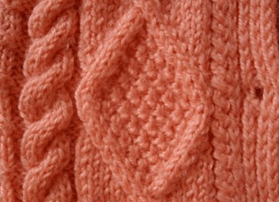
2 x 2 rib, pearl ornament, fancy ornaments due to the schemes 1 and 2.
Instructions
Placket
The width of the front placket is 7 sts. In order to make the placket, use "rib with slipped st pattern." To make this, you should make in the 1st row knit sts with purls by turn. In the second row, make the pattern repeat: * slip 1 st (yarn in front of work), 1 knit st*. Then, repeat the first and second rows. Stitched control for pearl ornament is 16 sts x 24 rows = 10 x 10 cm.
Back
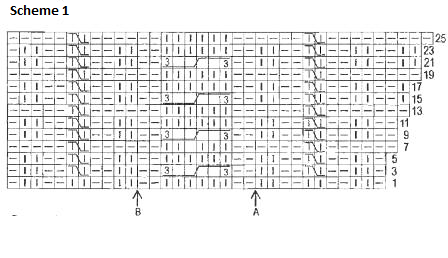
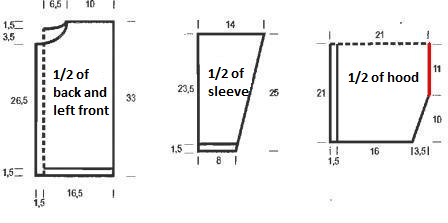
Cast on 74 sts and make 1.5 cm with 2 x 2 rib. After that, continue working with the ornament according to scheme 1. When you make 25 rows, make 36 sts, then knit 36 sts in reversed order, i.e., reflecting. Next wrong side row (and all the other wrong side rows) are made according to the ornament. Then, continue working according to scheme 1 (row 3), but without decreasing sts. Make 31.5 cm height from the set-up row, bind off 14 central sts for the neck-hole. Then, finish the two parts of the back separately. For rounding the neck-hole, bind off 7 sts in the 2nd row. As a result, there should be 22 sts left, which should be bound off at the height of 33 cm from the 1st row.
Fronts
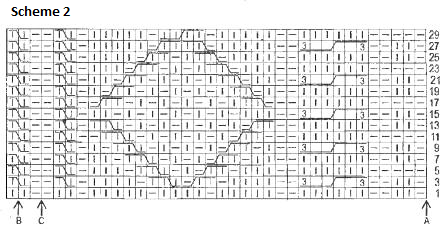
Then, start making the left front, cast on 42 sts. Next, make 33 sts with 2 x 2 rib ornament, and 7 sts with "rib with slipped st pattern." In 1.5 cm above the 2 x 2 rib start making the ornament according to scheme 2, between A and C points. After knitting to 28 cm from the set-up edge, make sts decreases and form the neck-hole. Bind off 15 sts at the beginning, then bind off 1 x 2 sts, 1 x 1 st in a row. When the height is 33 cm from the beginning of front, bind off the last 22 sts. After finishing the left front, make the right front in symmetry with it, but reflecting. The difference is that you need to make 5 holes for fastener in the right front. You should divide the sts for the fastener at equal distances from one another. Bind off the central st in the right-side row and cast on a new st at the same place in the wrong-side row, making yarn over.
Sleeves
Cast on 32 sts for one sleeve and make 1.5 cm with 2 x 2 rib. Then, turn to the ornament according to scheme 1 and increase 1 st in every 6th row 8 times from both sides. Make increases from both sides, even though on the scheme they're shown only from one side. Knit to the length of 25 cm, after that bind off the sts of the last row. Make the second sleeve.
Hood
Cast on 72 sts, after that make 1.5 cm with 2 x 2 rib. Then, continue working with the following technique: 30 sts of pearl ornament, 10 sts according to scheme 1 points A-B, 30 sts of pearl ornament. After knitting 17.5 cm from the set-up edge, bind off 3 sts twice and 2 x 2 sts for chamfers. Then, sew the ready-made hood along the seam line.
Assembly
Sew the back, front and make shoulder seams. Then sew the hood to the neck hole. Sew the sleeves, make side and sleeve seams. Sew the buttons.