

Easy Crochet Spring Bunny — Beginner-Friendly Amigurumi Pattern

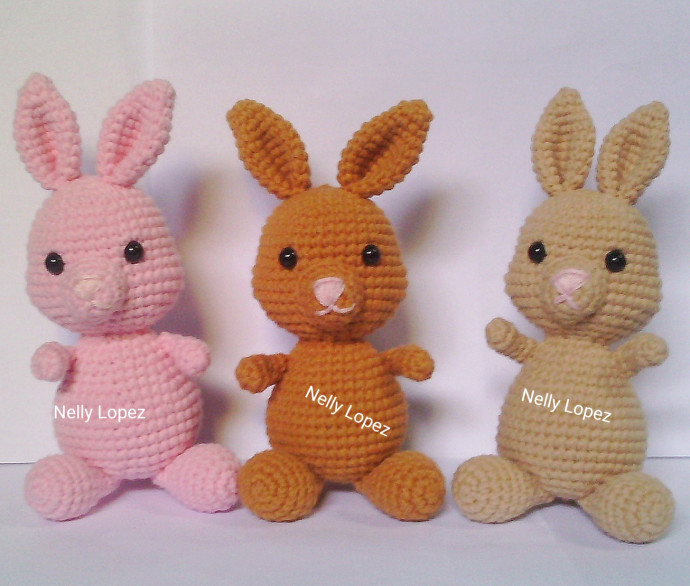
Create a sweet, handmade Spring Bunny with this beginner-friendly amigurumi pattern. This project uses lightweight cotton yarn and simple single crochet rounds to build a cuddly bunny perfect for spring décor, baby showers, or thoughtful handmade gifts. Read the pattern through first, prepare your materials, and work in continuous rounds for a neat, seamless finish.
Before you begin: place safety eyes before stuffing the head (the pattern marks the stitches for eye placement), stuff firmly but not overly tight for a soft, poseable toy, and use a stitch marker to keep track of round starts. The pattern below is written in USA terminology.
The Crochet Spring Bunny
The Crochet Spring Bunny is an adorable and charming addition to any handmade collection, perfect for bringing a touch of whimsy and cuteness to your décor. With its fluffy yarn and sweet design, this little bunny is sure to put a smile on anyone's face. Whether you're looking to create a thoughtful gift or simply want to indulge in some relaxing crochet time, crafting this Spring Bunny is a delightful way to spread joy and creativity. Get your yarn and hook ready, and let's crochet some happiness together!
Materials Needed
- Gantsilyo Guru Selections Milk cotton Light (Mini) #3 weight yarn
- Size 2.5mm crochet hook
- Yarn needle
- Stitch marker
- Fiberfill for stuffing
Skill Level
Beginner
Terminology
This pattern is written in USA Terminology
- Ch - chain
- Sc - single crochet
- Inc - increase
- Dec - decrease
Pattern Start
All pieces are done in continuous round, without join at the end of every round.
Head
- Round 1: 6 Sc in magic ring
- Round 2: Inc in every stitch (12)
- Round 3: (Sc, Inc in next st) repeat around (18)
- Round 4: (2Sc, Inc in next st) repeat around (24)
- Round 5: (3Sc, Inc in next st) repeat around (30)
- Round 6: (4Sc, Inc in next st) repeat around (36)
- Round 7-11: Sc in each st around (36)
On Round 11, with a piece of scrap yarn mark 15th and 22nd stitch. Marked stitches are for safety eyes placement.
- Round 12: 7Sc, Inc in next 4 sts, 14Sc, Inc in next 4 sts, 7Sc (44)
- Round 13-14: Sc in each st around (44)
- Round 15: 7Sc, Dec x4, 14Sc, Dec x4, 7Sc (36)
- Round 16: (4Sc, Dec) repeat around (30)
- Round 17: (3Sc, Dec) repeat around (24)
- Round 18: (2Sc, Dec) repeat around (18)
- Round 19: (Sc, Dec) repeat around (12)
Continue working on the Body:
- Round 20: (Sc, Inc in next st) repeat around (18)
- Round 21: (2Sc, Inc in next st) repeat around (24)
- Round 22: Sc in each st around (24)
- Round 23: (3Sc, Inc in next st) repeat around (30)
- Round 24: Sc in each st around (30)
- Round 25: (4Sc, Inc in next st) repeat around (36)
- Round 26: (5Sc, Inc in next st) repeat around (42)
- Round 27-31: Sc in each st around (42)
- Round 32: (5Sc, Dec) repeat around (36)
- Round 33: (4Sc, Dec) repeat around (30)
- Round 34: (3Sc, Dec) repeat around (24)
- Round 35: (2Sc, Dec) repeat around (18)
- Round 36: (Sc, Dec) repeat around (12)
- Round 37: Dec around (6)
Finish off, cut yarn leaving a long tail. Using a yarn needle, thread through each and pull tight to shut opening close. Tuck in yarn tail to hide.
Ears
- Round 1: 6 Sc in magic ring
- Round 2: (2Sc, Inc in next st) x2 (8)
- Round 3: (3Sc, Inc in next st) x2 (10)
- Round 4: (4Sc, Inc in next st) x2 (12)
- Round 5: (Sc, Inc in next st) repeat around (18)
- Round 6-11: Sc in each st around (18)
Finish off, cut yarn leaving a long tail for sewing ears to the head.
Fold the ear bottom in half and sew to shape.
Muzzle
- Round 1: 6 Sc in magic ring
- Round 2: Inc in each st around (12)
- Round 3: (3Sc, Inc in next st) repeat around (15)
- Round 4: (4Sc, Inc in next st) repeat around (18)
Finish off, cut yarn leaving a long tail for later sewing muzzle to the face. With light pink colored yarn or thread, embroider nose and mouth detail.
Arms
- Round 1: 6 Sc in magic ring
- Round 2: (Sc, Inc in next st) repeat around (9)
- Round 3: Sc in each st around (9)
- Round 4: (Sc, Dec) repeat around (6)
- Round 5-6: Sc in each st around
Finish off, cut yarn leaving a long tail for sewing the arms to the body later.
Feet
- Round 1: 6 Sc in magic ring
- Round 2: Inc in every stitch (12)
- Round 3: (Sc, Inc in next st) repeat around (18)
- Round 4-6: Sc in each st around
- Round 7: (4Sc, Dec) repeat around (15)
- Round 8: (3Sc, Dec) repeat around (12)
- Round 9-10: Sc in each st around (12)
- Round 11: (2Sc, Dec) repeat around (9)
- Round 12: (Sc, Dec) repeat around (6)
Finish off, cut yarn leaving a long tail. Using yarn needle, thread through each and pull tight to shut opening close.
Tail
- Round 1: 6 Sc in magic ring
- Round 2: Inc in every stitch (12)
- Round 3: (Sc, Inc in next st) repeat around (18)
- Round 4: Sc in each st around (18)
- Round 5: (Sc, Dec in next st) repeat around (12)
- Round 6: Dec around (6)
Finish off, cut yarn leaving a long tail for sewing the tail to the body later.
Finishing & Assembly
- Sew the muzzle to the front center of the head, lining it up under the marked eye stitches. Embroider the nose and mouth with light pink thread as suggested in the Muzzle section.
- Sew ears to the top of the head; fold the bottom of each ear as instructed to give a natural ear shape before attaching.
- Attach arms to the sides of the body and feet to the bottom front so the bunny can sit upright. Use the long tails left on each piece to securely sew them in place, reinforcing with a couple of passes for durability.
- Attach the tail to the lower back of the body. Weave in all yarn tails neatly into the body to hide them.
- Safety note: If making this toy for small children, consider embroidering eyes or using child-safe embroidered features instead of removable safety eyes.
Customization Ideas
- Add a tiny crocheted scarf, ribbon, or felt flower for seasonal decor.
- Change yarn color for different looks — soft pastels work well for spring themes.
- Adjust stuffing amount for a firmer or softer toy.
Happy crocheting! Share your finished bunnies for inspiration and keep a note of any stitch adjustments you make for future projects.