

Cute Crochet Piggy Pouch Pattern — Beginner-Friendly Coin Pouch (7")

Penelope
Aug 30, 2026 10:26 PM
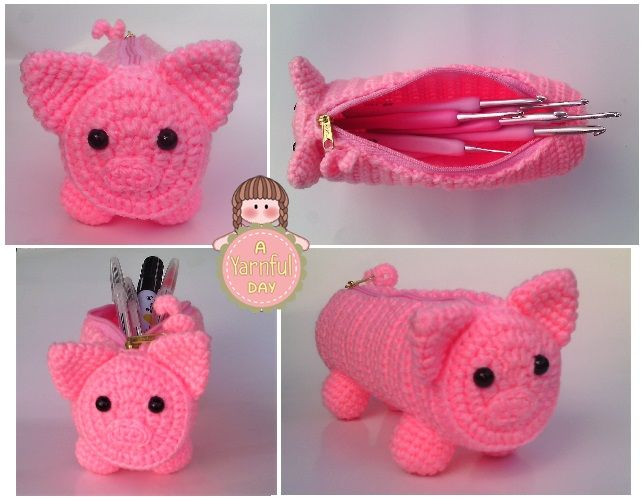
Make a charming Crochet Piggy Pouch that's both adorable and practical. This beginner-friendly pattern creates a 7-inch pig-shaped zipper pouch perfect for coins, lip balm, a small snack, or attaching to a bag as a whimsical accessory. The pattern uses light worsted/DK yarn and a 3.5 mm hook; finished measurements, gauge, and a full stitch-by-stitch pattern are included below.
Materials Needed
- Love Knots yarn (Light worsted/ DK weight)
- Shade 00013 (3 small skeins used)
- Size 3.5 mm crochet hook
- 6 mm safety eyes
- Size 3 zipper (7.5 inches long)
- Yarn needle for sewing parts
- Small amount of fiber fill to stuff the legs
Finished Measurements
7 inches long
Skill Level
Beginner
Gauge
2 inches = 8 stitches, 2 inches = 6 rows
Terms Used
All terms are in USA Terminology.
- Ch – chain
- Hdc – half double crochet
- St/sts – stitch/stitches
- Sl st – slip stitch
- Inc – increase
- FO – fasten off
Pattern Start
Base
- Round 1: In magic ring, Ch 2, 10 Hdc, Join (10)
- Round 2: Ch 2, 2 Hdc in each st around, Join (20)
- Place a stitch marker on the 3rd and 15th stitch of round 2 for safety eyes placement.
- Round 3: Ch 2, (1 Hdc, Inc in next st) repeat around, Join (30)
- Attach safety eyes between rounds 2 and 3.
- Round 4: Ch 2, (2 Hdc, Inc in next st) repeat around, Join (40)
- Round 5: Work in Back Loops Only. Ch 2, 1 Hdc in each st around, Join (40)
- You will now be working in rows.
- Row 1: Ch 1, Hdc in same st and next 37 sts, Do not join (38)
- Row 2 - 28: Ch 1 Turn, Hdc in each st across (38)
- You will now be working in rounds.
- Row 29 / Round 1: Ch 1, Hdc in each st across, Ch 2, Join on top of Ch 1 made in the beginning of round. (38 Hdc, 2 Ch)
- Round 2: Ch 2, Hdc in each st around, Join (40)
- Round 3: Ch 2, (2 Hdc, Dec in next st) repeat around, Join (30)
- Round 4: Ch 2, (1 Hdc, Dec in next st) repeat around, Join (20)
- Round 5: Ch 2, Dec all around, Join (10)
Legs
Crocheted in continuous round.
- Round 1: Ch 2, 6 Sc in 2nd chain from hook, Do not join (6)
- Round 2: Inc in each st around (12)
- Round 3: (Sc, Inc in next st) repeat around (18)
- Round 4-7: Sc in each st around (18)
- Finish off, cut yarn leaving long tail for sewing legs to the base later.
Ears
Crocheted in continuous round.
- Round 1: Ch 2, 6 Sc in 2nd chain from hook, Do not join (6)
- Round 2: (Sc, Inc in next st) repeat around (9)
- Round 3: (2 Sc, Inc in next st) repeat around (12)
- Round 4: (3 Sc, Inc in next st) repeat around (15)
- Round 5-6: Sc in each st around (15)
- Finish off, cut yarn leaving long tail for sewing ears to the base later.
- Sew the ears.
Nose (Note)
- Ch 4, 2 Sc in 2nd ch from hook, Sc in next st, 4 Sc in last ch, on the other side of chain (remaining loop) Sc in next st, 2 Sc in next.
- Finish off, cut yarn leaving long tail for sewing nose to the base later.
Tail
- Chain 10, 3 Sc in 2nd ch from hook and each chain across. Finish off, and tie the curlique made in the zipper handle.
Assembly & Finishing
- Sew the legs, ears and nose to the base using the long tails left after finishing each piece. Use the stitch marker placements as a guide for eye and feature placement.
- Lightly stuff the legs with a small amount of fiber fill before sewing them closed.
- Attach the zipper to the top opening of the base. Use the tail-made curlique to tie around the zipper handle to create the piggy tail attachment.
- Weave in all ends and secure pieces so the pouch is ready to use.
Notes & Tips
- All terms are in USA terminology. Keep a stitch marker handy for counting and eye placement.
- Check your gauge if you want the exact finished size; adjust hook size if needed.
- This pattern is suitable for beginners familiar with basic stitches listed above.
No comments