

Make an Adorable Crochet Kokeshi Doll Amigurumi — Easy Step-by-Step Pattern

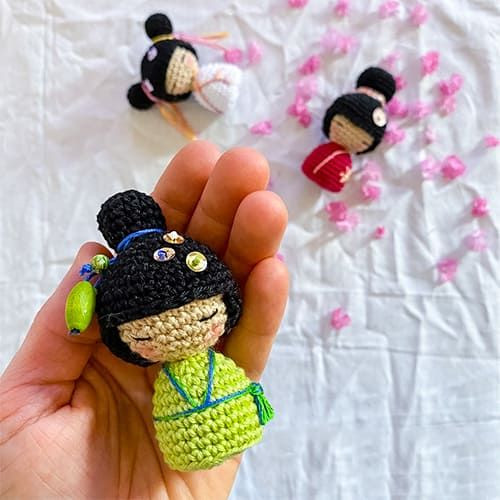
Make a sweet, collectible Crochet Kokeshi Doll Amigurumi with this clear, step-by-step pattern. Combining the classic rounded head and simple body of traditional Kokeshi dolls with amigurumi techniques, this project is great for crocheters of intermediate level who want a quick, giftable toy or charming home decoration. Below you'll find materials, abbreviations, and detailed rounds to create the head, hair and body pieces, plus finishing tips for embroidery and decoration.
Crochet Kokeshi Doll Amigurumi
Crochet Kokeshi Doll Amigurumi is a delightful and charming craft project that brings together the beauty of traditional Japanese Kokeshi dolls with the creativity of amigurumi crochet. These mini dolls are not only adorable but also make wonderful gifts or cute decorations for your home. With their colorful yarn and unique designs, creating your own Crochet Kokeshi Doll Amigurumi is a fun and rewarding way to add a touch of whimsy to your craft collection. Get ready to bring a smile to your face every time you see these tiny dolls with their big heads and sweet expressions!
Materials
- Crochet hook size: 2.5/3 mm
- Cotton yarn
- Yarn needle
- Stuffing
Abbreviations
- Ch: Chain
- St: Stitch
- Slst: Slip stitch
- Sc: Single crochet
- MR: Magic ring
- Inc: Increase
- Dec: Decrease
- FLO: Front loop only
- BLO: Back loop only
Creating the Head
Begin from the head with light brown.
Rnd 1: 6 sc in MR (6)
Rnd 2: 6 inc (12)
Rnd 3: (sc,inc)*6 (18)
Rnd 4: (18)
Rnd 5: (sc2,inc)*6 (24)
Rnd 6: (sc3,inc)*6 (30)
Rnd 7-9: (30)
Rnd 10: (sc3,dec)*6 (24)
Rnd 11: (sc2,dec)*6 (18)
Stuff.
Rnd 12: (sc,dec)*6 (12)
Rnd 13: (sc2,dec)*3 (9)
Change color, use the one you choose for the dress.
Rnd 14: work FLO (sc2,inc)*3 (12)
Rnd 15: (sc,inc)*6 (18)
Rnd 16: (sc2,inc)*6 (24)
Rnd 17-22: (24)
Rnd 23: work BLO (sc2,dec)*6 (18)
Stuff.
Rnd 24: (sc,dec)*6 (12)
Rnd 25: 6 dec (6)
Cut off and secure.
Creating the Hair
Rnd 1: 6 sc in MR (6)
Rnd 2: 6 inc (12)
Rnd 3: (sc,inc)*6 (18)
Rnd 4: (18)
Rnd 5: (sc2,inc)*6 (24)
Rnd 6: (sc3,inc)*6 (30)
Rnd 7-9: (30)
At the end of round 9, work ch 1 and turn, work in rows.
Rnd 10: sc20, ch, turn
Rnd 11: sc20, ch, turn
Rnd 12: dec, sc7, dec, sc7, dec, ch, turn (17)
Rnd 13: dec, sc13, dec, ch, turn (15)
Rnd 14: dec, sc4, dec, 3st tog, sc4, dec, ch, turn (11)
Work slst all around.
Creating the Big Ball
Rnd 1: 6 sc in MR (6)
Rnd 2: 6 inc (12)
Rnd 3: (sc,inc)*6 (18)
Rnd 4: (sc2,inc)*6 (24)
Rnd 5-8: (24)
Rnd 9: (sc2,dec)*6 (18)
Stuff, cut off and leave a long tail to sew on the head.
Creating the Small Ball
Rnd 1: 6 sc in MR (6)
Rnd 2: 6 inc (12)
Rnd 3: (sc,inc)*6 (18)
Rnd 4-6: (18)
Rnd 7: (sc,dec)*6 (12)
Stuff, cut off and leave a long tail to sew on the head.
With black embroidery thread, embroider the eyes, and with colored threads and beads, decorate the doll. Color the cheeks.
Finishing & Tips
Sew the hair piece to the head using the long tail left from the hair. Attach the big and small balls where desired to form the base or decorative elements. Use small beads or embroidery for facial features and add blush to the cheeks with a tiny dab of fabric-safe chalk or pastel. Secure all loose ends and weave in tails so the doll is child-safe if intended as a toy. For a firmer finish, use slightly tighter tension and extra stuffing in the head for a rounded shape.