

Charming Crochet Fox Brooch — Free Pattern & Step-by-Step Assembly

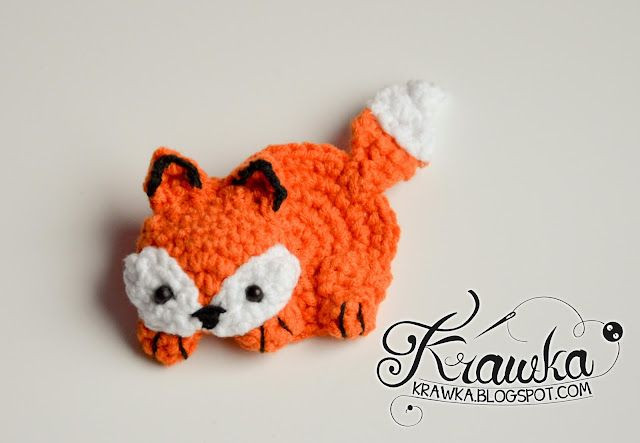
Create an adorable miniature Crochet Fox Brooch with this complete pattern and clear assembly instructions. Perfect as a handmade gift or a whimsical accessory, this brooch is made with orange, white and black yarn and finished with small bead eyes. Below you'll find the materials list, detailed stitch-for-stitch pattern pieces, and step-by-step assembly tips to help you finish a neat, secure brooch.
Introduction
Crochet Fox Brooches are simply adorable! These tiny handmade accessories bring a touch of whimsy and charm to any outfit. Crafted with intricate detail, the crocheted fox design is sure to put a smile on your face. A wonderful way to add a pop of personality to your style, these brooches make lovely gifts for friends or a delightful treat for yourself. Whether you're a crochet enthusiast or simply appreciate cute accessories, a Crochet Fox Brooch is a fun and versatile addition to any accessory collection.
Materials
- Orange, white, and black yarn (I use yarn with a gauge of 24.0 to 30.0 sts = 4 inches)
- 2 black beads (4 mm would be best)
- 3 mm crochet hook
- Brooch or safety pin
Pattern
Head - Make 1
Orange yarn
- R1: 6 sc in MR (6)
- R2: inc around (12)
- R3: *sc 3, inc* X2 (18)
- R4: sc around (18)
- R5: sc around (18)
- R6: *sc 4, dec* X3 (15)
- R7: *sc 3, dec* X3 (12)
- R8: sc around (12)
- R9: sc 10, ss 2 (12) FO
White Face Puffs - Make 2
White yarn
- R1: 7 ch (7)
- R2: ss, sc, hdc 2, sc, ss on one side of chain, then ss, sc, hdc 2, sc, ss on the other side. FO
Body - Make 1
Orange yarn
- R1: 6 sc in MR (6)
- R2: inc around (12)
- R3: *sc 3, inc* X2 (18)
- R4: sc 4, inc 3, sc 6, inc 3, sc 2 (24)
- R5: *sc 2, inc* X8 (32)
- R6: *sc 3, inc* X8 (40) FO
Paws - Make 3
Orange yarn
- R1: 5 sc in MR (5)
- R2: sc around (5) FO
Ears/Rear Paw Knee - Make 3
Orange yarn
- R1: 5 ch (5) TURN
- R2: starting from the 2nd ch, sc 4 (4) TURN
- R3: sc 2, dec (3) TURN
- R4: dec, ss (2) FO
Tail - Make 2 (One Orange, One White)
Orange/white yarn
- R1: 5 ch (5)
- R2: starting from the 2nd ch, sc 4 (4)
- R3: sc 2, dec (3)
- R4: dec, sc (2)
- R5: ss, sc (2)
- R6: dec (1) FO
Assembly Instructions
You can take the white thread and shape the end of the tail more.
Firstly, let's sew the head to the body with orange thread. Look at the pictures to see where exactly the head is placed.
Secondly, let's sew the ears. You can make them more pointy by sewing the ends with orange thread.
Take the 3rd ear, which is the knee and sew it to the body, then sew all three paws.
Now attach the white puffs and with black yarn, make a little nose.
Take two black beads and make eyes. Make two black lines on each paw just like you see in the picture.
Sew the white and orange part of the tail together. Then attach it to the body.
The last step is attaching the brooch part. Remember to do it very carefully and firmly.
Finishing Tips & Variations
- Use a stitch marker while working rounds to keep track of the first stitch and maintain even shaping.
- When sewing pieces together, use matching yarn and small, neat whip or ladder stitches so seams are less visible.
- Secure the brooch backing with multiple passes of thread and a small dab of fabric glue if desired for extra security (allow glue to dry fully before wearing).
- Try different yarn weights or colorways for a unique look—just note that gauge will change the finished size.
- To clean, spot clean or hand wash gently and reshape while damp. Avoid machine washing to protect beads and the brooch backing.
If you have any questions about a specific step or want tips for adapting the pattern (different sizes, adding more facial detail, or converting to a keychain), feel free to ask.