Crochet Wave Wall Hanging Guide

Crochet Wave Wall Hangings are a delightful way to add a touch of whimsy and coziness to any space! These charming creations often feature a soothing wave pattern that brings a touch of the ocean into your home. They come in a variety of colors and sizes, making it easy to find the perfect one to complement your decor. Whether you hang it in the living room, bedroom, or even your workspace, this unique piece of handmade art is sure to bring a smile to your face every time you see it. So, why not treat yourself to a Crochet Wave Wall Hanging and let the wave of happiness wash over you?
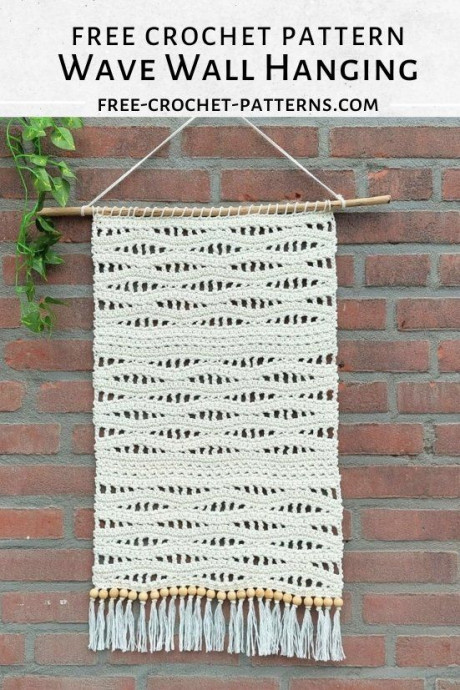
Materials
- 4 skeins of Durable Macramé yarn in the color Ivory. Total used: 325 grams, 260 meters. This is 100% cotton yarn.
- Crochet hook 5.0 mm
- A stick / dowel of approximately 54 cm (21 inches) long
- Optional: wooden beads, approximately 14 mm (0.5 inch) in diameter
- Needle and scissors
- Row counter
Crochet Stitches and Abbreviations
- Chain (ch)
- Single crochet (sc)
- Half Double Crochet (hdc)
- Double crochet (dc)
- Treble (tr)
Instructions
RND 1: Chain 52.
ROW 1: 1 sc in the 2nd ch from the hook. 1 sc in each ch until the end of the row. Turn. (51)
ROW 2: Ch 1, 1 sc in the first stitch. *1 sc in the next stitch, ch 1, skip 1 stitch, 1 sc in the next stitch, ch 1, skip 1 stitch, 1 hdc in the next stitch, ch 1, skip 1 stitch, 1 dc in the next stitch, ch 1, skip 1 stitch, 1 tr in the next stitch, ch 1, skip 1 stitch, 1 tr in the next stitch, ch 1, skip 1 stitch, 1 dc in the next stitch, ch 1, skip 1 stitch, 1 hdc in the next stitch, ch 1.* Repeat between * and * until you have 3 stitches left. At the end of the row: Skip 1 stitch, 1 sc in the last 2 stitches. Turn.
ROW 3: Ch 1, 1 sc in the first 2 stitches, 1 sc in the chain-1 space. *1 sc in the next stitch, 1 sc in the chain-1 space.* Repeat between * and * until you have 2 stitches left. 1 sc in the last 2 stitches at the end of the row. Turn. (51)
ROW 4: Ch 1, 1 sc in each stitch until the end of the row. Turn. (51)
ROW 5: Ch 5 (these count as the first stitch (1 treble) and 1 chain), *skip 1 stitch, 1 tr in the next stitch, ch 1, skip 1 stitch, 1 dc in the next stitch, ch 1, skip 1 stitch, 1 hdc in next stitch, ch 1, skip 1 stitch, 1 sc in the next stitch, ch 1, skip 1 stitch, 1 sc in the next stitch, ch 1, skip 1 stitch, 1 hdc in the next stitch, ch 1, skip 1 stitch, 1 dc in the next stitch, ch 1, skip 1 stitch, 1 tr in the next stitch, ch 1.* Repeat between * and * until you have 2 stitches left. At the end of the row: skip 1 stitch, 1 tr in the last stitch of the row. Turn.
ROW 6: Ch 1, 1 sc in the first stitch, 1 sc in the next chain-1 space. *1 sc in the next stitch, 1 sc in the next chain-1 space.* Repeat between * and * until the end of the row. At the end of the row: work 1 sc in the next stitch, 1 sc in the chain-5 space and 1 sc into the 4th chain from the previous row. Turn. (51)
ROW 7: Ch 1, 1 sc in each stitch until the end of the row. Turn. (51)
ROWS 8 to 13: Repeat rows 2 to 7.
ROWS 14 to 19: Repeat rows 2 to 7.
ROWS 20 to 24
ROW 20: Ch 1, 1 sc in the first stitch. *Ch 1, skip 1 stitch, 1 sc in next stitch.* Repeat between * and * until the end of the row. Turn.
ROW 21: This row is worked in the chain-1 space of the previous row (except for the last stitch). Ch 1. Skip the first stitch, 2 sc in the first chain space of the previous row. *Skip 1 stitch, 2 sc in the next chain space.* Repeat between * and * until the last stitch. 1 sc in the last stitch. Turn.
ROW 22: Repeat row 20.
ROW 23: Repeat row 21.
ROW 24: Ch 1, 1 sc in each stitch until the end of the row. Turn.
Now we will continue with the Mesh Wave Stitch again.
ROWS 25 to 30: Repeat rows 2 to 7.
ROWS 31 to 36: Repeat rows 2 to 7.
ROWS 35 to 40: Repeat rows 2 to 7.
Now we will continue with the Sieve Stitch again.
ROW 41: Repeat row 20.
ROW 42: Repeat row 21.
ROW 43: Repeat row 20.
ROW 44: Repeat row 21.
ROW 45: Repeat row 24.
Continue with the Mesh Wave Stitch.
ROWS 46 to 51: Repeat rows 2 to 7.
ROWS 52 to 57: Repeat rows 2 to 7.
ROWS 58 to 63: Repeat rows 2 to 7.
Leave a long strand of yarn; you’ll use it later to attach your work to the stick.
Finishing the Wall Hanging
Fringes
Cut several strands of yarn to approximately 30 cm in length. Insert your crochet hook through the stitch from the back side of your work, fold 1 strand in half, and pull it through using the hook. Then, pull the 2 short ends through the loop you just created and pull tight.
Use a needle to string a wooden bead onto both strands. Tie a knot below the bead. I spaced out the fringes with beads by skipping one stitch between each placement. If you leave out the beads, you can add a fringe to every stitch.
Now, it’s time to unravel the strands, a bit of a task, but worth the effort! I used a very thin crochet hook to pull apart the strands and then separated them individually. You can also try using a comb or a brush.
Blocking
To enhance the stitch definition, I blocked my wall hanging by pinning it onto a yoga mat and misting it with water using a spray bottle. I also sprayed the fringes and brushed them through gently. Then, I let everything dry completely.
Once dry, gently comb or brush the fringes again and trim them to an even length.
Stick
My wooden stick measures approximately 54 cm (21 inches). Lay it along the top edge of your crochet work and secure it by sewing around it using the remaining yarn, skipping one stitch each time. Fasten off and weave in the ends.
For the hanging cord, I opted for a simple yet secure method. I folded a long strand of yarn in half, knotted it around one side of the stick, then repeated the process on the other side. A final knot, cut the yarn and it’s ready to hang!