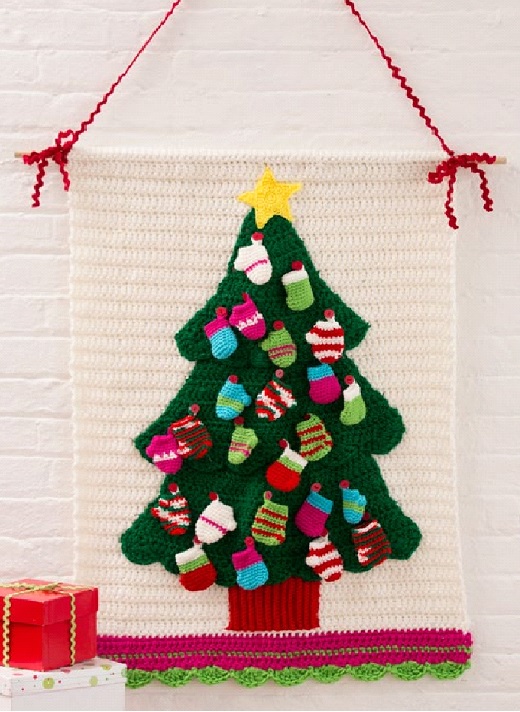
Crochet Christmas Tree Wall Hanging: A Festive Guide


Do you feel it in the air? Yeah, it's the smell of Christmas. I'm waiting for it so much, and you?
And what about starting to decorate your house to feel the mood?
I offer you to knit a Christmas Tree for the wall, let's start!
What You Need
Susan Bates® Crochet Hooks: 4.25 mm [US G-6] and 6 mm [US J-10]
Yarn needle, stitch marker, 24 red ½” (12 mm) buttons, 30” wooden rod, 36” (94cm) of rick rack
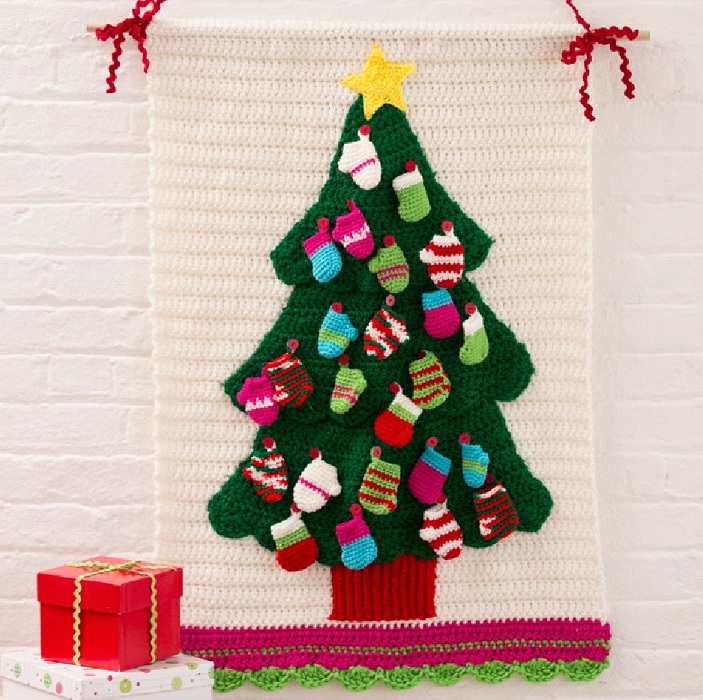
Wall hanging measures 24” wide x 30” long (61 x 76 cm).
Special Stitches
- fan = 6 tr in indicated stitch.
- sc2tog = [Insert hook in next stitch, yarn over and pull up a loop] twice, yarn over and draw through all 3 loops on hook.
- sc5tog = [Insert hook in next stitch, yarn over and pull up a loop] 5 times, yarn over and draw through all 6 loops on hook.
Special Technique
Join with sc = Place a slip knot on hook, insert hook in indicated stitch, yarn over and draw up a loop, yarn over and draw through both loops on hook.
Notes
Wall hanging is made with a backdrop, tree, and ornaments. The backdrop is made in rows with a rod pocket for inserting a dowel or curtain rod. The tree and star are made separately and sewn to the wall hanging. The stocking and mitten ornaments are made separately with a loop to hang them from buttons.
Use a larger hook and hold 2 strands of yarn together for the backdrop and tree. All other pieces are made with a smaller hook and a single strand of yarn.
To change color, work the last stitch of the old color to the last yarn over. Yarn over with the new color and draw through all loops on the hook to complete the stitch. Proceed with the new color. Cut the old color.
Wall Hanging
Backdrop
With a larger hook and 2 strands of A held together, ch 62.
Row 1 (wrong side): Sc in 2nd ch from hook and each ch across, turn—61 sc.
Row 2 (right side): Ch 3 (counts as first dc here and throughout), dc in each st, turn—62 dc.
Row 3: Ch 1, skip first st, *dc in next st, slip st in next st; repeat from * across working last slip st in top of beginning ch, turn.
Row 4: Ch 3, dc in each st across, turn.
Rows 5–58: Repeat last 2 rows 27 times.
Row 59: Repeat Row 3. Fasten off, leaving a long tail for sewing.
Lower Edging
Row 1 (right side): With the right side of Row 1 facing and working in the opposite side of the foundation ch, join 2 strands of B with sc in the first ch, sc in each ch across, turn—61 sts.
Row 2: Ch 3, dc in each st across; change to C, turn.
Row 3: Ch 1, sc in each st across; change to B, turn.
Row 4: Repeat Row 2.
Row 5: Ch 1, sc in first st, *skip next 2 sts, fan in next st, skip next 2 sts, sc in next st; repeat from * across. Fasten off.
Tree
Bottom Section
With a larger hook and 2 strands of D held together, ch 25.
Row 1 (wrong side): Sc in 2nd ch from hook and each ch across, turn—24 sc.
Row 2: Ch 3, 2 dc in next st, *dc in next st, 2 dc in next st; repeat from * across, turn—36 dc.
Rows 3–7: Ch 3, dc in each st across, turn.
Rows 8–11: Ch 3, dc in first st (base of ch 3), dc in each st to the beginning ch, 2 dc in the top of the beginning ch, turn—44 dc.
Row 12: Ch 1, sc in the first st, *skip next 2 sts, fan in next st, skip next 2 sts, sc in next st; repeat from * across. Fasten off, leaving a long tail for sewing.
Middle Section
With a larger hook and 2 strands of D held together, ch 19.
Rows 1–4: Repeat Rows 1–4 of bottom section—27 dc.
Rows 5–12: Repeat Row 8 of bottom section—43 dc.
Row 13: Repeat Row 12 of bottom section. Fasten off, leaving a long tail for sewing.
Top Section
With a larger hook and 2 strands of D held together, ch 4.
Row 1 (right side): Work 5 dc in 4th ch from hook (beginning ch count as first dc), turn—6 dc.
Row 2: Ch 3, dc in each st across, turn.
Row 3: Ch 3, dc in next st, 2 dc in next 2 sts, dc in last 2 sts, turn—8 dc.
Row 4: Ch 3, dc in each st across, turn.
Row 5: Ch 3, dc in next 2 sts, 2 dc in next 2 sts, dc in last 3 sts, turn—10 dc.
Row 6: Ch 3, dc in next 3 sts, 2 dc in next 2 sts, dc in last 4 sts, turn—12 dc.
Row 7: Ch 3, dc in next 4 sts, 2 dc in next 2 sts, dc in last 5 sts, turn—14 dc.
Row 8: Ch 3, dc in each st across, turn. Rows 9–15: Repeat Row 8 of bottom section—28 dc.
Row 16: Repeat Row 12 of the bottom section. Fasten off, leaving a long tail for sewing.
Tree Base
With a smaller hook and E, ch 17.
Row 1 (right side): Sc in 2nd ch from hook and in each ch across, turn—16 sc.
Rows 2–22: Ch 1, working in back loops only, sc in each st, turn.
Fasten off, leaving a long tail for sewing.
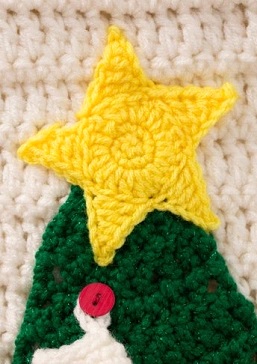
Star
With a smaller hook and F, ch 2.
Round 1 (right side): Work 5 sc in 2nd ch from hook—5 sc. Do not join.
Round 2: Work 2 sc in each st; join with a slip st in the first sc—10 sc.
Round 3: Ch 3, dc in the same st as join, 2 dc in each remaining st around; join with a slip st in the first sc—20 sc.
Round 4: *Ch 6, slip st in 2nd ch from hook, sc in next ch, hdc in next ch, dc in next ch, tr in last ch, skip next 3 sts, slip st in next st; repeat from * 4 times; join with a slip st in the first ch of beginning ch. Fasten off, leaving a long tail for sewing.
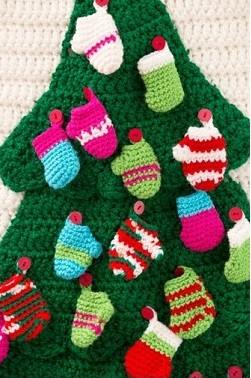
Stocking
Make 2 stockings in each of the following color sequences:
- Stocking 1: 8 rounds with B, 4 rounds with G
- Stocking 2: 8 rounds with G, 4 rounds with B
- Stocking 3: all rounds with H
- Stocking 4: 9 rounds with C, 3 rounds with A
- Stocking 5: 5 rounds with E, 3 rounds with C, 4 rounds with A
- Stocking 6: 2 rounds with C, 1 round with E 3 times, 3 rounds with E
With a smaller hook, ch 6.
Round 1 (right side): Sc in 2nd ch from hook and in next 3 ch, 3 sc in last ch; working in the opposite side of the foundation ch, skip the first ch, sc in next 3 ch, 2 sc in last ch—12 sc. Do not join. Place marker for the beginning of the round and move the marker up as each round is completed.
Round 2: Work 2 sc in the first st, sc in next 3 sts, 2 sc in next 3 sts, sc in next 3 sts, 2 sc in the last 2 sts—18 sc.
Rounds 3 and 4: Sc in each st around. Round 5: Sc in the first 3 sts, [sc2tog] 6 times, sc in the last 3 sts—12 sc.
Rounds 6–11: Sc in each st around. Round 12: Working in front loops only, loosely slip st in each st around, (slip st, ch 6, slip st) in the first slip st (hanging loop made). Fasten off tightly.
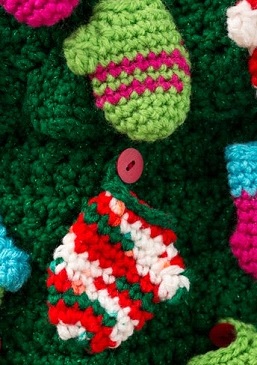
Mitten
Make 2 mittens in each of the following color sequences:
- Mitten 1: all rounds with H
- Mitten 2: 2 rounds with E, 2 rounds with A 3 times
- Mitten 3: 4 rounds with C, 1 round with B, 1 round with C, 1 round with B, 5 rounds with C
- Mitten 4: 4 rounds with G, 3 rounds with C, 5 rounds with G
- Mitten 5: 5 rounds with E, 3 rounds with C, 4 rounds with A
- Mitten 6: 4 rounds with B, 1 round with A, 1 round with [next 2 sts with B, next st with A] around, 1 round with [next st with B, next 2 sts with A] around, 5 rounds with B
With a smaller hook, ch 2.
Round 1 (right side): Work 6 sc in 2nd ch from hook—6 sc. Do not join. Place marker for the beginning of round and move marker up as each round is completed.
Round 2: Work 2 sc in each st around—12 sc.
Round 3: Sc in each st around.
Round 4: *Sc in next 3 sts, 2 sc in next st; repeat from * twice—15 sc.
Rounds 5–7: Sc in each st around.
Round 8: Sc in next 7 sts, 5 dc in front loop of next st, sc in next 7 sts—14 sc and 5 dc.
Round 9: Sc in next 7 sts; working in back loops only, sc5tog (thumb made), sc in next 7 sts—15 sc.
Round 10: Sc in each st around.
Round 11: *Sc in next 3 sts, sc2tog; repeat from * twice—12 sc.
Round 12: Repeat Round 12 of the stocking.
Finishing
Fold last 3 rows of the backdrop to the wrong side and sew across the long edge to form a rod pocket.
Use a photograph as a guide for placement of all pieces. Weave in ends.
Arrange stockings and mittens on tree sections as follows: 9 pieces on each of the bottom and middle sections and 6 pieces on the top section. Pin a safety pin or marker where each button will be sewn. Sew all buttons in place.
With rows positioned vertically, center the lower edge of the tree base on Row 2 of the backdrop and sew in place. Slightly overlap the bottom section of the tree on the top edge of the tree base, pin in place, and sew. Repeat to attach the middle and top sections, overlapping previously sewn sections.
Sew the star on the top section. Hang stockings and mittens on buttons. Weave in any remaining ends. Insert the wooden rod and tie on rick rack for hanging.
Abbreviations
A, B, C = Color A, Color B, Color C, etc.; ch = chain(s); dc = double crochet; hdc = half double crochet; sc = single crochet; st(s) = stitch(es); tr = treble (triple) crochet; ( ) = work directions in parentheses into the same st; [ ] = work directions in brackets the number of times specified; * = repeat whatever follows the * as indicated.
So what, now you feel it?