Crochet Filet Mom Wall Hanging Guide

Introduction
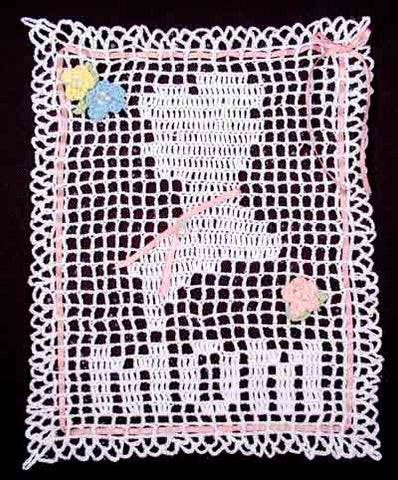
Looking to add a cozy touch to your space? The Crochet Filet Mom Wall Hanging is the perfect way to infuse warmth and personality into any room. This handcrafted piece features intricate crochet work that spells out "Mom," making it a sweet and sentimental addition to your decor. Whether you hang it in your living room, bedroom, or kitchen, this charming wall hanging is sure to bring a smile to your face every time you see it. With its delicate design and heartfelt message, the Crochet Filet Mom Wall Hanging is not just a decoration; it's a reminder of the love and care that fills your home.
Skill Level
Intermediate Skill
Dimensions
Size: 7” x 9”
Materials Needed
To create this beautiful piece, you will need the following materials:
- Crochet Cotton Thread, size 10
- White (MC) - 95 yds (86 meters)
- Pink (A), Yellow (B), Blue (C) & Green (D) - 5 yds (5 meters) each
- 3 mm Round Pearl Beads - 9
- 6 mm x 10 mm Pearl Drop Bead - 1
- 1/8" Pink Satin Ribbon - 1-1/2 yds (1.3 meters)
- Sewing Needle
- Heavy Spray Starch
- Cardboard
- Non-rust Pins
Crochet Hook Size
Crochet Hook: Steel #7 (1.65 mm) or size needed to obtain gauge.
Gauge
Gauge: 4 x 4 squares = 1”
Abbreviations
| ch | chain | Rnd(s) | Round(s) |
| dc | double crochet | sc | single crochet(s) |
| hdc | half double crochet | sl st(es) | slip stitch(es) |
| MC | main color | st(s) | stitch(es) |
| rep | repeat |
Directions
Starting Rows
Row 1 (right side): With MC, ch 72, dc in 8th ch from hook, (ch 2, skip next 2 ch, dc in next ch) across. (22 squares)
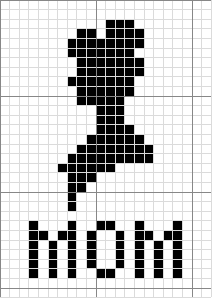
Rows 2-31: Continue in 4-dc Filet Crochet blocks (see Filet Crochet Basics on reverse), using Fig. 1 as a guide. At the end of Row 31, do not finish off.
Filet Chart
Fig. 1 – Filet Chart
Filet Mom Wall Hanging
Edging
Rnd 1: Ch 1, turn, sc in first dc, (ch 5, sc in next dc) across, ch 5, sc in same dc; ♥ working along edges of rows, (ch 5, sc in end dc of next row) across, ♥ ch 5, sc at base of Row 1 dc; working in unused lps of starting ch, ch 5, sc in first lp, skip next 2 lps, (ch 5, sc in next lp at the base of a dc) across, ch 5, sc in same lp; rep ♥ to ♥, ch 2; join with a dc to first sc to form last ch-5 sp. (110 ch-5 sps)
Rnd 2: Ch 1, turn, sc in same dc as joining, ch 5, sc in same st, ch 5, * (sc in next ch-5 sp, ch 5) across to next ch-5 corner, (sc, ch 5) twice in ch-5 corner, rep from * around, omitting last corner of last rep; join with a sl st to first sc. (114 ch-5 sps) Finish off.
Making Roses and Leaves
Roses (Make 1 each in A, B, and C)
Ch 7, (4 dc, sl st) in 3rd ch from hook and in each ch across; join with sl st to first ch. (5 petals) Finish off leaving long end. Weave in short end.
Leaves (Make 4)
With D, * ch 7, sl st in next ch, sc in next ch, hdc in next ch, dc in next ch, (hdc, sl st) in last ch, rep from * once more. Finish off leaving long end. Weave in short end.
Finishing Touches
Using Sewing Needle and long ends of Roses, sew 3 round Beads to the center of each Rose. Using picture as a guide, sew Roses to Wall Hanging. Using picture as a guide, and using long ends of Leaves and Sewing Needle, sew Leaves to Wall Hanging. Weave in ends.
Adding the Ribbon
Cut a 6” length of Ribbon. Using picture as a guide, wrap around the neck of the silhouette. Using MC and Sewing Needle, sew Ribbon closed and sew Drop Bead to Ribbon and Wall Hanging. Using picture as a guide, starting and ending at top right corner, weave Ribbon through outside squares of filet. Tie in a bow.
Starching
Place Plastic Wrap across Cardboard. The cardboard sewing boards that fold up work great for this. Place piece on Plastic Wrap. Pin into desired shape. Generously spray doily with Heavy Spray Starch. Allow to dry completely. This method allows for washing and re-starching whenever necessary.