Crochet Amira Cardigan

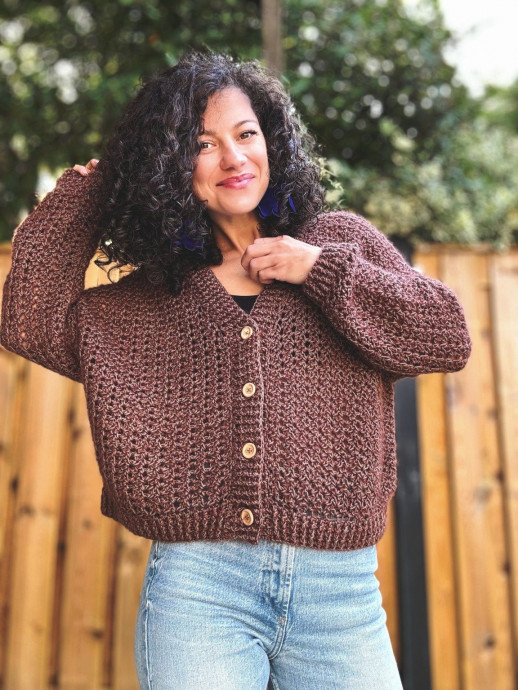
The Crochet Amira Cardigan is a cozy and stylish addition to any wardrobe, perfect for cool weather or layering in any season. Its intricate crochet design gives it a unique and handmade charm that adds a touch of bohemian flair to your outfit. Whether you're lounging at home or out running errands, this cardigan is versatile and comfortable. The flowy fit and soft yarn make it a go-to piece for a relaxed and carefree look. With its flattering silhouette and beautiful details, the Crochet Amira Cardigan is sure to become a favorite in your collection of knitwear, bringing warmth and style wherever you go. It's like wrapping yourself in a hug!
Materials
- Yarn: Size 2, Sport weight yarn
- Crochet Hooks:
- 6.5 mm crochet hook
- 4 mm crochet hook for cuffs, bottom hem, and collar
- 4 Buttons 2cm diameter (or more depending on your preferences)
- Yarn needle for weaving in ends
- Stitch markers
- Scissors
*For the Amira Cardigan, I used fingering-weight cotton paired with mohair held together.
Notes About Design
The Amira Cardigan features a relaxed drop shoulder construction, with a positive ease of about 32 cm around bust circumference. The back and front panels are worked separately and then joined at the shoulders. The sleeves are worked from the top down, starting at the armholes. To assemble the sweater, sew the side edges from the sleeve cuffs down to the bottom hem. Finish by adding a stretchy border to the cuffs, bottom hem, and collar.
The use of thinner yarn with a larger crochet hook makes the Amira Cardigan incredibly light, while the seams provide structure and stability. The stitch pattern is simple yet elegant, offering a slightly lacy appearance that adds both breathability and style.
While the sample uses a blend of mohair and cotton, which pairs beautifully with the larger hook size and stitch pattern, you can experiment with different yarns or hook sizes to achieve a fabric that feels comfortable and pleasing to you. The pattern includes instructions on how to adjust for a different gauge, positive ease, allowing for customization to suit your preferences.
Measurements and Sizes
The Amira Cardigan Pattern is available in 9 sizes, from XS up to 5X Large. The model is 168 cm tall, with a 88 cm bust circumference, and wears a size Extra Small. The sizes are written as follows: XS (S, M, L) (XL, 2XL, 3XL, 4XL, 5XL);
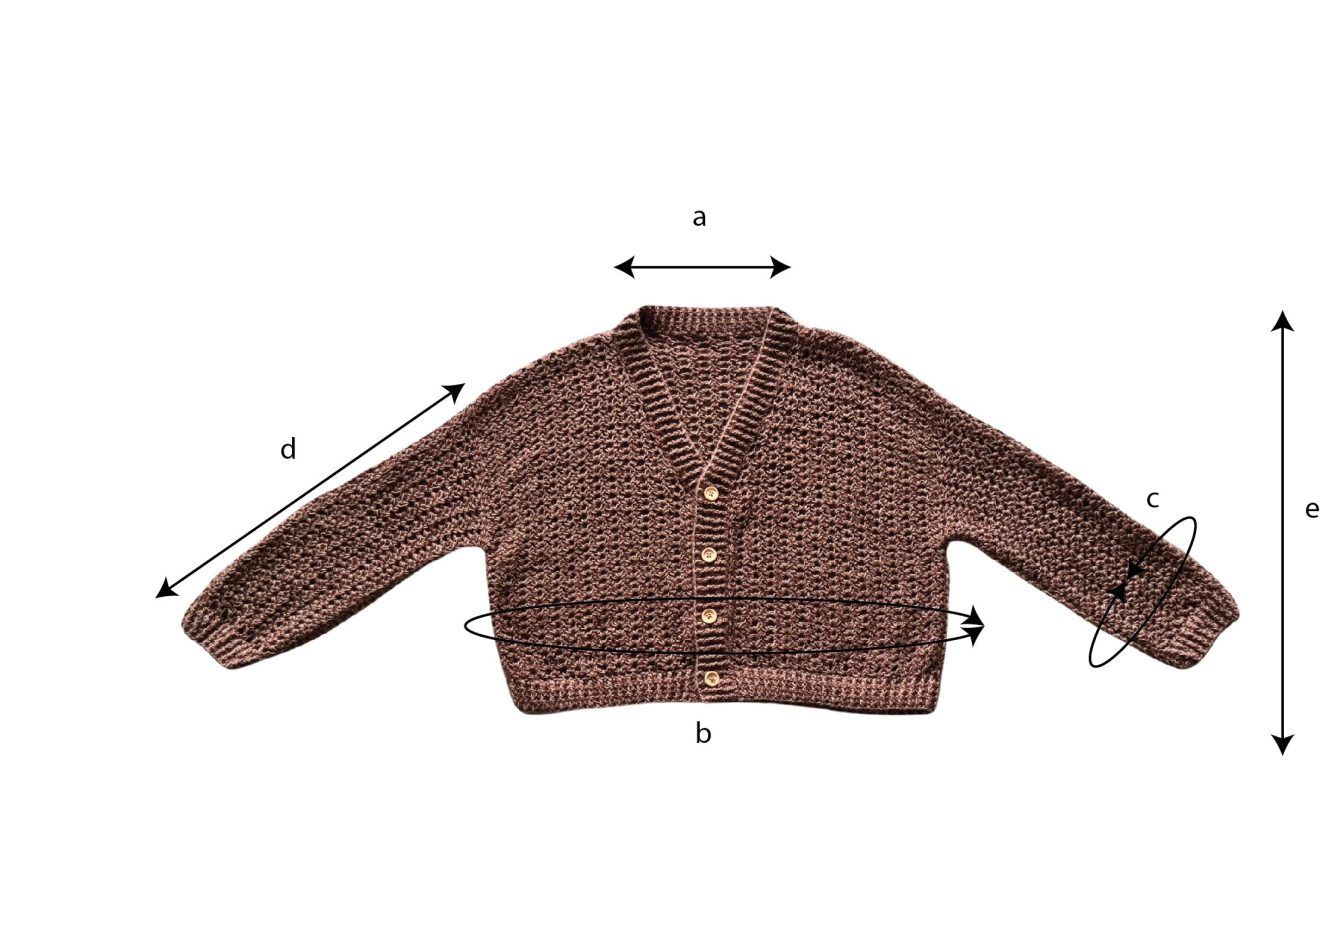
Final Measurements of the Amira Cardigan
- Neck Width: a: 18 cm (18, 18, 18) (18, 18, 18, 18, 18)
- Bust Circumference: b: 116 cm (120, 125, 138), (142, 152, 165, 174, 187)
- Sleeve Circumference: c: 38 cm (38, 42, 42) (42, 47, 51, 51, 56)
- Sleeve Length: d: 40 cm (40, 42, 42) (44, 44, 46.5, 46.5, 46.5)
- Length: e: 49 cm (49, 49, 49) (51, 51, 53, 53, 53)
Yarn
For the Amira Cardigan, I used:
- Rainbow Cotton 8/4 by Hobbii Yarn, in color 005, Grey Brown. Yarn composition: 100% cotton; each skein has 50 grams and is approximately 170 meters.
- Friends Kid Silk by Hobbii Yarn, in color 12, Chocolate. Yarn composition: 72% Mohair, 25% Silk, 3% Wool; each ball has 25 grams and 200 meters.
- For each size, you will approximately need: 940 (960, 1040, 1110) (1180, 1280, 1460, 1510, 1630) meters.
Note: If you’re holding two types of yarn together, you’ll need the specified yardage for each yarn type.
Abbreviations
- Ch – chain
- Sc – single crochet
- scVst – (1sc, 3ch, 1sc) in the same st or space
- Dc – double crochet
- Fpdc – front post double crochet
- Bpdc – back post double crochet
- Ss – slip stitch
- St(s) – stitch(es)
- R – row
- ** – repeated section.
Tension
Using a 6.5 mm crochet hook in scVst stitch pattern:
- 4.5 scVst = 10 cm
- 9 rows = 10 cm
Stitch Pattern and Techniques
Single Crochet V Stitch
The primary stitch pattern used in the Amira Sweater is a variation of Vst but using single crochet stitches and 3ch as separating chain. This stitch pattern requires a multiple of 3+1 stitches.
Pattern (use it for the gauge swatch):
- Chain the required number of stitches.
- R1: ch2 (1ch will count as a sc and the second as ch-sp), 1sc into the 3rd stitch, *skip 2sts, 1scVst (1sc, 3ch, 1sc) in the next st, skip the next 2sts; *rep the section to the end of the row; finish the row with (1sc, 1ch, 1sc) into the last st, 2ch and turn;
- R2: 1sc into the first 1ch-sp, *1scVst in the next 3ch-sp, *rep. to the end of the row; finish the row with 1sc and 1ch onto the last 1ch-sp, 1sc into the first ch (the second one counting from right to left)
Front Post, Back Post Double Crochet Ribbing
For the collar, cuffs, and bottom hem, we will work a ribbing pattern alternating 1fpdc and 1bpdc.
Instructions
Back Panel
Working the Back Panel (Bottom-Up):
If you’d like to use a different yarn or hook size, and adjust the number of stitches to match your gauge, follow these steps:
- Make a gauge swatch in the scVst pattern and measure the number of scVsts and rows within a 10 cm square.
- Take your bust measurement, or refer to standard body measurements for bust circumference, and add your desired amount of positive ease. Divide this number in half to determine the back panel width.
- Using your gauge, calculate the number of scVsts needed to achieve the desired panel width.
- Multiply the number of scVsts required for the back panel width by 3, then add 1 more stitch to the total. This will be the number of stitches you need to start with.
Start: ch 82 (85, 88, 97) (100, 106, 115, 121, 130) sts.
R1: ch2 (1ch will count as a sc and the second as ch-sp), 1sc into the 3rd stitch, *skip 2sts, 1scVst (1sc, 3ch, 1sc) in the next st, skip the next 2sts; *rep the section to the end of the row; finish the row with (1sc, 1ch, 1sc) into the last st, 2ch and turn;
R2: 1sc into the first 1ch-sp, *1scVst in the next 3ch-sp, *rep. to the end of the row; finish the row with 1sc and 1ch onto the last 1ch-sp, 1sc into the first ch (the second one counting from right to left).
Rep. R2 until you reach the desired length or until you have: 39 (39, 39, 39) (41, 41, 43, 43, 43) rows;
Final Row (To Straighten the Edge):
To straighten the edge of the panel, work the last row as follows:
ch1 at the end of previous row and turn;
1sc into the first st, 2ch, *1sc in next 3ch-sp, 2ch; *rep. to the end of the row; finish the row with 1sc into the last st (ch).
Fasten off.
Front Panel
Working the Front Panel (Bottom-Up):
The front panels are worked identically. However, during assembly, one front panel will need to be positioned with the “wrong side” facing outward to align with the V neckline. This won’t affect the appearance of the stitch, as the pattern looks the same on both sides.
To determine the number of stitches needed to begin:
Divide the total stitches for the back panel in half, rounding to the nearest multiple of 3 + 1.
For example, in size S, the back panel has 85 stitches. Half of that is 42.5; rounding to the closest multiple of 3, we get 42. Adding 1 results in 43 stitches for each front panel.
Start with: 40 (43, 43, 49) (49, 52, 58, 61, 64) stitches.
Note: For sizes M and XL, I’ve kept the stitch count the same as sizes S and L, since the ribbed border will add width to the front panel. Alternatively, you can use the next multiple of 3 + 1, which is 46.
Work in the same stitch pattern as the back panel until you have 22 (22, 22, 22) (24, 24, 26, 26, 26) rows.
You can adjust the row count in this section based on where you want the V-neckline to begin.
Starting from the next row, we’ll begin decreasing for the V-neck. Decreases will occur only at one edge, at the beginning of each row.
Next Row: 2ch (if you ch2 at the end of previous row, just turn), 1scVst into the next 3ch-sp; continue with 1scVst in each 3ch-sp to the end of the row, 1sc, into the last 1ch-sp, 1ch, 1sc into the first ch; 2ch and turn.
Next row: 1sc into the first 1ch-sp, 1scVst in each 3ch-sp, except the last one, 1sc into the last 3ch-sp, 3ch, *1sc into the last sc, 2ch and turn.
finishing the last scVst into the last sc instead of working the second sc of the last Vst into the same 3ch-sp for a straighter edge.
Next Row: 1sc into the first 3ch-sp, 1scVst into each of the next 3ch-sps; 1sc, into the last 1ch-sp, 1ch, 1sc into the first ch; 2ch and turn.
Next Row: 1sc into the first 1ch-sp, *1scVst in the next 3ch-sp, *rep. to the end of the row; finish the row with 1sc and 1ch onto the last 1ch-sp, 1sc into the first ch (the second one counting from right to left).
Next row: Rep. previous row;
Rep. the last 4 rows 3 more times, until you have:
38 (38, 38, 38) (40, 40, 42, 42, 42) rows;
Next Row: Rep. the previous row.
Last row (to straighten the edge): ch1 at the end of previous row and turn;
1sc into the first st, 2ch, *1sc in next 3ch-sp, 2ch; *rep. to the end of the row; finish the row with 1sc into the last st (ch).
Fasten off.
Rep. the same pattern for the second front panel;
Joining the Shoulders
Place the front and back panels side by side, aligning the shoulder edges carefully. Stitch the shoulder seams together using your preferred method—this could be sewing, slip stitches, or single crochet stitches. For my version, I used the ladder stitch to join the seams.
Sleeves
Use two stitch markers to mark the desired sleeve width. To do this, count the side rows from the shoulder seam towards the back panel, and then count the same number of side rows towards the front panel.
If you want to adjust the sleeve width, refer to your gauge. Determine how many scV stitches are needed for the desired sleeve width. Multiply the number of scV stitches by 3, and the result will be the number of side rows you need to count from both the front and back panel edges. Add one more side row to the count as the stitch pattern requires a multiple of 3+1 sts;
Marking the sleeves side rows (mark the same number on both panels, counting from the shoulder seam):
25 (25, 28, 31) (31, 31, 34, 34, 37) side rows.
Rejoin yarn on the right side, into the first marked side row;
R1: 2ch, 1sc into the same side row, *skip the next 2 side rows, 1scVst into the next side row, *rep. to the shoulder seam, skip the shoulder seam and then **1scVst into the next side row, skip the next 2 side rows; **rep. to the end of the row; finish the row with 1sc, 1ch, 1sc into the last side row;
Continue working into the established stitch pattern until you get to the desired length or until you have 39 (39, 40, 40) (41, 41, 42, 42, 42) rows.
To Finish the Sleeve Edge
Work as follows:
ch1 at the end of the previous row and turn.
1sc into the first st, 2ch, *1sc into the next 3ch-sp, 2ch; *rep. to the end of the row; finish the row with 1sc into the last st;
Sleeves’ Cuff Ribbing
Change to a 4mm crochet hook.
ch3 at the end of the previous row and turn; (ch3 will count as dc).
R1: 1dc in each st to the end of the row; ch3 and turn.
R2: 1fpdc in next st, 1bpdc in next st; Alternate 1fpdc and 1bpdc to the end of the row; ch3 and turn;
Row 3 (Decrease Row): In Row 3, we will make some decreases. You can work the decreases around either the front post stitches or back post stitches. To make a decrease, work two stitches around the same post together. This will require you to skip 1 stitch in between. So, instead of 1bpdc, 1fpdc, 1bpdc, you will have only 1bpdc by working the 2bpdc together and skipping the fpdc in between;
R3: bpdc2tog, then alternate 1fpdc and 1bpdc for the next 5 stitches; repeat this pattern as many times as your stitch count allows. To finish the row, work the remaining stitches, alternating fpdc and bpdc.
R4-R6: Alternate front post double crochet (fpdc) with back post double crochet (bpdc), working each post stitch as established in the previous row.
Assembling
After completing the sleeves, fold the piece with the front panels over the back panel, aligning the side edges. Join the side edges using your preferred sewing method. I used the ladder stitch, the same as for the shoulder seam. To ensure you have enough yarn on the needle, measure out a length that is three times the length of the seam you need to sew.
Bottom Hem and Collar Ribbing
For both the collar and bottom hem ribbing, use a 4mm crochet hook. Follow the same ribbing pattern as the cuffs: alternate between 1 front post double crochet (Fpdc) and 1 back post double crochet (Bpdc).
Bottom Hem Ribbing
Start with the bottom hem ribbing;
Into the bottom hem ribbing work 1st of the ribbing pattern into each st of the bottom hem;
R1: 3ch, 1dc in each st around; ch3 and turn.
R2: *1fpdc, 1bpdc; Alternate to the end of the round;
Rep. R2 until you have 5 rows or until your ribbing has the desired width;
Front Panels and Collar Ribbing
For the neckline and front panel ribbing, it’s essential to calculate the number of stitches you’ll need to work into each side row to ensure even tension. Follow these steps:
- Measure Ribbing Gauge: Measure how many stitches fit into 10 cm of the ribbing pattern (you can use the bottom hem ribbing you’ve already worked as a reference).
- Measure Row Gauge for the Front Panels: Measure the number of side rows in 10 cm along the edge of a front panel.
- Calculate Stitch-to-Row Ratio: Divide the ribbing gauge (stitches per 10 cm from Step 1) by the front panel row gauge (rows per 10 cm from Step 2) to determine how many stitches to work per side row.
- Adjust for Even Stitch Count: Round your result as needed, and if necessary, multiply the result until you get an even number for a balanced ribbing pattern.
Example Calculation for Ribbing on Front Panels:
In my sample, the result in Step 3 was 1.8. This means I need to work 1.8 stitches in the ribbing pattern for every 1 side row of the front panel edge. To achieve an even number, I multiplied 1.8 by 2, then 3, and finally 5, which resulted in 9. This tells me that for every 5 side rows, I need to work 9 stitches in the ribbing pattern.
Ribbing Pattern for Front Panel Side Rows: Work 2 stitches into each of the next 4 side rows, then 1 stitch into the following side row. Repeat this pattern across the entire edge.
Bottom Hem Ribbing Side Edges: Work 2 stitches into each side row.
Neckline Stitches: Follow the same ribbing pattern as used for the front panel edges.
*R1: 2ch, 1dc in each st to the end of the row; ch3 and turn; *work the sts as calculated above.
R2: *1fpdc, 1bpdc; *alternate to the end of the round;
Button Holes
In this sample, the buttonholes are on the left front panel, with 4 buttons in total. Follow these steps to calculate the spacing between buttonholes (each buttonhole will take up 2 stitches):
- Mark the Top Buttonhole Position: Place a stitch marker where the top buttonhole will be, 2 stitches before the start of the V-neck.
- Mark the Bottom Button Position: Place a stitch marker where you want the last button, leaving 5 stitches from the bottom edge of the cardigan.
- Count the Stitches Between Markers: Count the stitches between the two markers, including the top marked stitch but excluding the bottom one.
- Calculate Spacing Between Buttonholes: Divide the total stitch count from Step 3 by the number of buttons. This result will give you the number of stitches allocated for each buttonhole area (2 stitches for the buttonhole itself plus the stitches leading to the next buttonhole).
- Adjust for Even Spacing (if needed): If the result in Step 4 isn’t an even number, adjust the spacing slightly between 1 or 2 buttonholes. It’s fine if not all segments are exactly equal in stitch count.
This setup will ensure evenly spaced buttonholes and a balanced look.
Continue in the ribbing pattern. When you reach a buttonhole position, chain 2 and skip 2 stitches (adjust the chain and skipped stitches depending on your button size). Test the buttonhole to ensure the button fits before proceeding.
Work in the ribbing pattern as usual. When you reach the buttonhole chains, work double crochet stitches directly into each chain stitch to maintain the ribbing continuity.
To Finish
Sew the buttons, weave in all ends, and block to measurements.