Crochet Vintage-Inspired Sailor Style Bonnet

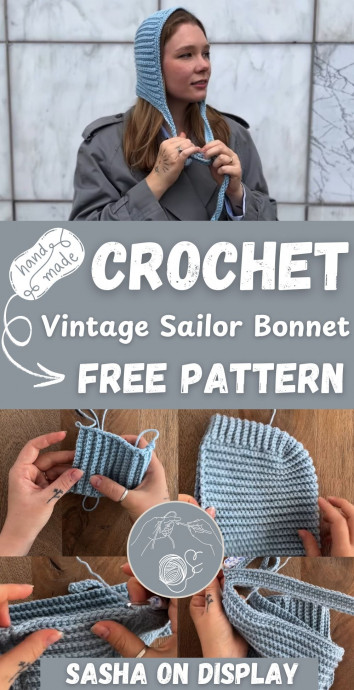
The Crochet Vintage-Inspired Sailor Style Bonnet is a charming and nostalgic accessory that adds a touch of whimsy to any outfit. With its classic sailor design and intricate crochet detailing, this bonnet brings a timeless elegance to your look. Whether you're strolling along the beach or attending a retro-themed party, this bonnet is sure to turn heads and spark conversations. Its soft texture and adjustable fit make it comfortable to wear all day long, making it a versatile piece that you'll reach for time and time again. Embrace the vintage vibes and sail away in style with this adorable sailor bonnet!
Materials
- Acrylic yarn (or any yarn of your preference, such as merino wool or mohair)
- Crochet hook suitable for your yarn (4 mm recommended)
- Stitch markers (bobby pins can be used as an alternative)
- Weaving needle
- Measuring tape (optional)
- Pair of scissors
Top of the Bonnet
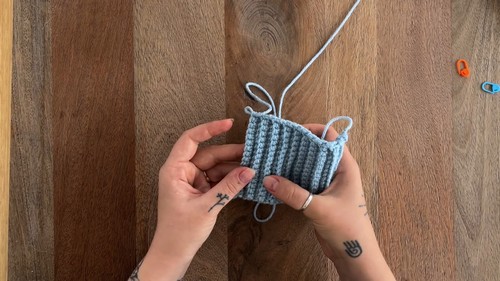
Foundation and Row 1
Create a slip knot and place it on your hook.
Chain 16 stitches for the foundation chain.
Add one extra chain as a turning chain.
Begin single crochet (SC) in the second chain from the hook across the row (16 stitches total).
Mark the first SC with a stitch marker.
Rows 2–21: Ribbed Texture
Chain 1 and turn your work at the start of each row.
Work SC in the back loop only (BLO) across the row.
In the last stitch of each row, work through both loops to create a clean edge.
Use a stitch marker to identify the first stitch of each row.
Continue for a total of 21 rows.
The finished piece should measure approximately 13 cm long by 9 cm wide.
Shaping the Sides and Back
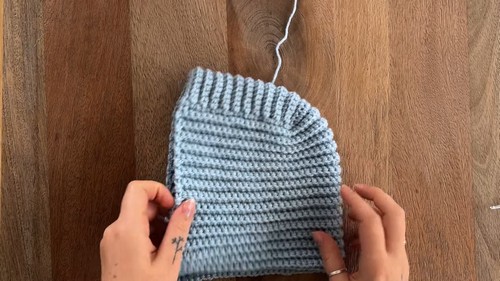
First Side (Vertical Edge)
Make a turning chain.
Work 21 SC along the side of the ribbed piece, alternating between placing stitches "in the row" and "in between the rows."
Mark the first stitch.
Back (Bottom Edge)
Make a turning chain.
Work 16 SC evenly along the back edge using the back loops.
Mark the first stitch.
Second Side (Opposite Vertical Edge)
Chain one and turn.
Work 21 SC, using the same stitch placement method as the first side.
Mark the first stitch.
Total stitch count around the bonnet at this stage should be 61 SC.
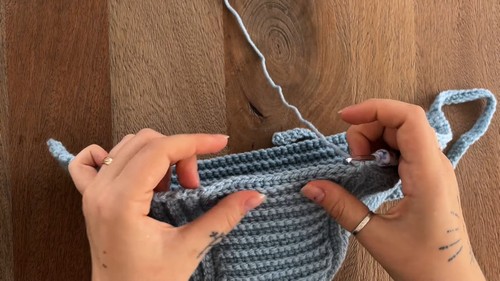
Body of the Bonnet (Worked in Continuous Rounds)
Chain one and turn.
Work 61 SC in a round around the perimeter (sides and back).
Use BLO for each stitch, except for the last stitch of each row—use both loops there to maintain the edge.
Continue working in rounds in this manner.
Make a total of 30 rounds, or adjust based on your desired bonnet depth.
Finished sides should measure around 18–19 cm.
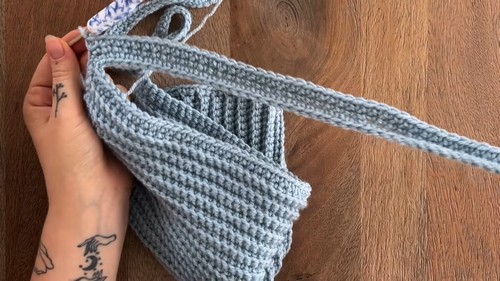
Ties and Frontal Ribbing
First Tie
Chain 60 (or more for longer ties, minimum 50).
Chain one extra for turning.
SC in each chain starting from the second loop from the hook.
Frontal Ribbing
From the end of the tie, begin working SC along the front edge of the bonnet.
Alternate between stitching into rows and between rows.
Continue across the top section as well.
Second Tie
Chain 60 (same as first tie).
Chain one extra for turning.
SC across each chain starting from the second loop.
Lower Ribbing
Continue with SC across the lower edge of the bonnet to meet the starting point of the first tie.
Thickening Ties and Ribbed Edges
First Tie (Second Round)
SC across the edge of the tie.
At the final loop, work 3 SC into the same stitch to curve around.
Continue SC down the opposite side of the tie.
Ribbed Edging (Front and Bottom)
Begin working SC in back loop only across the frontal and bottom ribbed sections.
This creates a ribbed texture around the bonnet’s edge.
Second Tie (Second Round)
SC through both loops across the second tie.
Work 3 SC into the last loop to curve the corner.
Continue SC down the opposite side.
Optional: Extra Ribbing Rows
You can add another full round of ribbed SC around the body using BLO if you want a thicker trim.
Finishing Touches
Fasten off by cutting the yarn and pulling the end through the loop.
Weave in all loose ends using your needle.
Optionally block the bonnet to shape and stretch it, especially if using merino or wool-based yarns.