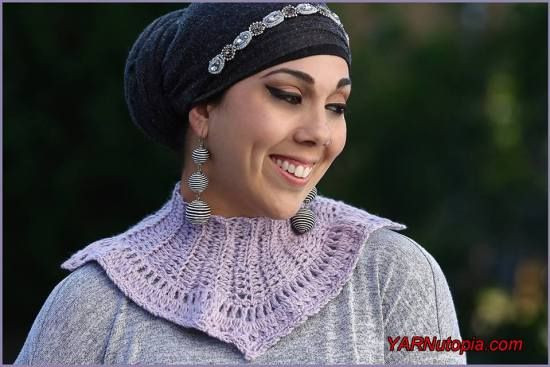
Crochet Vintage Inspired Pelerine Collar

Introduction
The Crochet Vintage Inspired Pelerine Collar is a charming and timeless accessory that adds a touch of elegance to any outfit. With its intricate crochet work and delicate details, this pelerine collar is sure to make you feel like a vintage fashion icon. Whether you're pairing it with a simple blouse or a romantic dress, this accessory brings a touch of old-world charm to your wardrobe. So go ahead and embrace your inner vintage diva with this stylish and versatile piece that is perfect for any occasion!
Materials You Will Need
- Cascade Avalon yarn (or any worsted weight yarn)
- Buttons
- Size H-5.00mm crochet hook
- Yarn needle
- Scissors
Notes
- This collar is worked in rows and then rounds.
- The yarn I used is a worsted weight size 4 medium yarn.
- You can make more or fewer rows to fit around your neck.
- I highly recommend blocking this collar after you make it.
Special Stitches Used in This Pattern
- Ch: chain
- St: Stitch
- Sl st: slip stitch
- SC: Single Crochet
- BLO: Back Loop Only
- YO: Yarn Over
- HDC: Half Double Crochet
- DC: Double Crochet
Cluster: [YO, insert hook, YO, pull through, YO pull through 2 loops on your hook] 3 times, YO pull through all loops on your hook. Cluster made.
Collar Instructions
Neck: Work in Back Loop Only
Ch 16
Row 1: SC in 2nd ch from hook and next 4 chs, HDC in next 5 chs, DC in last 5 chs, turn. (15)
Row 2: Ch 2 (does NOT count as anything) DC in 5 sts, HDC in 5 sts, SC in last 5 sts, ch 1, turn.
Row 3: SC in 5 sts, HDC in 5 sts, DC in last 5 sts, turn.
Continue with Repeating Rows
Rows 4-?: Repeat Rows 2 and 3 (if you want to make this larger or smaller, just repeat these 2 rows until your piece fits around your neck. I ended on row 32 or 33. End on a repeat of Row 3.)
Working in Rounds
Next you will work in rounds. Do not attach the piece (you will sew on buttons later).
Round 1: SC 80 sts evenly around the side of the piece, Sl st to first stitch. Your piece should be closed (like it’s going to slip over your head).
Round 2: Ch 4 (counts as DC + ch 1), *[DC, Ch 1] in next st, repeat from * around entire piece. End with ch 1, sl st to 3rd ch of beginning ch 4.
Round 3: Sl st into ch 1 sp, Ch 1, [Cluster, Ch 2, Cluster] in same sp (this should be the very center back of your piece), *[Ch 1, Cluster in next ch sp] 19 times, ch 1, [Cluster, Ch 2, Cluster] in next ch sp, repeat from * around ending with ch 1 and sl st to first cluster.
Round 4: Sl st into ch 2 sp, [2 SC, ch 2, 2 SC] in ch 2 sp, *SC in each cluster AND in each ch 1 sp until next corner, [2 SC, ch 2, 2 SC] in next ch 2 sp, repeat from * around, ending with sc in last ch sp, sl st to first st.
Round 5: Sl st into corner ch 2 sp, Ch 3, sl st back into the ch 2 sp, *Ch 3, sk 2 sts, sl st in next st, repeat from * until next corner sl st into corner, ch 3, sl st back into corner ch 2 sp, repeat from * around, sl st to first ch of beg. ch 3.
Assembly
Sew buttons to top of the collar. Block this piece.
Fasten off, weave in all ends. Enjoy!