Crochet Henna Inspired Mandala

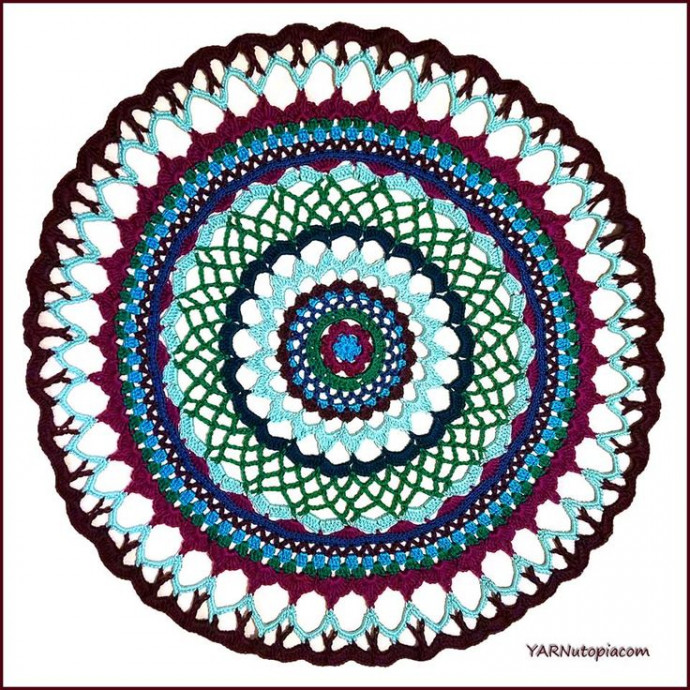
Crochet Henna Inspired Mandala is a delightful craft project that combines the intricate beauty of traditional henna designs with the cozy charm of crochet. Creating these mandalas is not only a fun and creative way to unwind but also a fantastic way to add a touch of bohemian flair to your home decor. The vibrant colors and intricate patterns make each mandala a unique piece of art that can brighten up any space. Whether you are an experienced crocheter looking for a new challenge or a beginner eager to try something new, diving into the world of Crochet Henna Inspired Mandalas is sure to bring a smile to your face.
Materials
- Caron Simply Soft Yarn in Cobalt Blue (~100 yards)
- Caron Simply Soft Yarn in Fuchsia (~100 yards)
- Caron Simply Soft Yarn in Kelly Green (~70 yards)
- Caron Simply Soft Yarn in Royal Blue (~50 yards)
- Caron Simply Soft Yarn in Robins Egg (~50 yards)
- Caron Simply Soft Yarn in Plum Perfect (~100 yards)
- Caron Simply Soft Yarn in Pagoda (~100 yards)
- H-5.00mm Crochet Hook
- Yarn Needle
- Scissors
Notes
- This project uses less than 600 yards of yarn.
- Use a smaller hook to make these smaller.
- Use a bigger hook to make these bigger.
- Weave in all the ends as you go so you don’t have to weave them all in at the very end.
- This Mandala is 33 inches across (84 cm).
Special Stitches
- Ch(s): chain(s)
- YO: Yarn Over
- St(s): Stitch(es)
- prev.: Previous
- Sl st: slip stitch
- SC: Single Crochet
- HDC: Half Double Crochet
- DC: Double Crochet
- TR: Treble Crochet
- TR2TOG: Treble Crochet 2 Together (Decrease)
- DTR: Double Treble
- Picot: Ch 3, Sl st to 3rd ch from hook
Pattern
Mandala
With Cobalt Blue
Start with Magic Ring or Ch 4, Sl st in 1st ch to form a ring.
RND 1: Ch up 3 (Counts as DC here and throughout), 11 DC into ring. Sl st to beg ch up 3. Fasten off. (12)
RND 2: In any st around, attach Fuchsia, Ch 1, SC in same st, *CH 3, SK 1 st, SC in next st, repeat from * around. Sl st to 1st sc. (6 ch 3 sps)
RND 3: Sl st into ch 3 sp, Ch 1, *[SC, HDC, DC, HDC, TR, HDC, DC, HDC, SC] in ch 3 sp, Sl st in SC, repeat from * around, sl st to first SC, Fasten off. (6 petals total)
RND 4: Attach Kelly Green to any TR of any petal, Ch 1, SC in same st, *Ch 5, SC in middle TR of next Petal, repeat from * around, sl st to 1st sc.
RND 5: Sl st in ch 5 sp, Ch up 3, 6 DC in same ch 5 sp, 7 DC in each ch 5 sp around. Sl st to ch up 3. Fasten off. (42 sts)
RND 6: Attach Royal Blue in any st. Ch 1, SC in same st, *Ch 3, SK next st, SC in next st, repeat from * around, finishing with ch 1, HDC in 1st sc (so you start next round in the center of the ch sp) (21 ch 3 sps)
RND 7: Ch 1, SC around the HDC from the previous round, *Ch 3, SC in next ch 3 sp, repeat from * around, sl st to 1st sc. Fasten off. (21 Ch 3 sps)
RND 8: Attach Cobalt Blue to any ch 3 sp, CH up 1, 3 SC in ch 3 sp, *Ch 1, 3 SC in next ch 3 sp, repeat from * around, sl st to 1st sc. Fasten off.
RND 9: Attach Plum Purple to any ch 1 sp, ch up 3, 5 DC in same sp, *Sl st in middle SC of 3 SC grouping, 5 DC in next ch 1 sp, repeat from * around, sl st to beg ch up 3. Fasten off.
RND 10: Attach Robins Egg to any middle DC of any shell, Ch 1, SC in same st, *Ch 6, SC in middle DC of next shell, repeat from * around, Sl st to beg sc. (21 ch 6 sps)
RND 11: Sl st in ch 6 sp, ch up 1, [SC, HDC, DC, HDC, TR, DTR, TR, HDC, DC, HDC, SC] in each ch 6 sp around. Sl st to beg. sc. Fasten off. (21 petals)
RND 12: Attach Pagoda to any DTR of any petal, Ch 1, SC in same st, *Ch 7, SC in DTR of next petal, repeat from * around, sl st to 1st SC. (21 ch 7 sps)
RND 13: Sl st in ch 7 sp, Ch up 3, 9 DC in same sp, 10 DC in each ch sp around, sl st to beg. ch 3. Fasten off (210 DC)
RND 14: Attach Kelly Green to any gap between the 10 DC grouping (See video tutorial for specific location), Ch 1, SC in same gap, *Ch 6, Sk 5 sts, SC BETWEEN 5th and 6th DC of the grouping, Ch 6, sk 5 sts, DC in the gap between the groupings, repeat from * around, ending with Ch 3, DC in beg. SC (so you start the next round in the center of the ch sp) (42 Ch 6 sps)
RND 15: Ch 1, SC around DC of prev. round. *Ch 6, SC in next ch sp, repeat from * around ending with Ch 3, DC in beg. SC. (42 Ch 6 sps)
RND 16: Repeat Round 15.
RND 17: Ch 1, SC around DC of prev. round, *Ch 7, SC in next ch sp, Ch 3, SC in next ch sp, repeat from * around, sl st to beg. SC. Fasten off. (21 Ch 7 sps, 21 Ch 3 sps)
RND 18: Attach Robins Egg to any Ch 3 sp, Ch 1, SC in same sp, *Ch 1, [5 DC, ch 2, 5 DC] in ch 7 sp, Ch 1, SC in next ch 3 sp, Repeat from * around, sl st to beg. sc. Fasten off. (210 SC)
RND 19: Attach Fuchsia to any ch 2 sp between the 5 DC groupings, Ch 1, SC in same sp, *Ch 2, 7 DC in the next SC, Ch 2, SC in next ch 2 sp, repeat from * around, sl st to first sc. Fasten off.
RND 20: Attach Royal Blue to any ch 2 sp, Ch up 1, *2 SC in Ch 2 sp, SC in SC, 2 SC in Ch 2 sp, SC in each st, repeat around. Sl st to first SC. (252 SC)
RND 21: Working in BLO, ch up 1, SC in each st around. (252 sc) Fasten off.
RND 22: Attach Plum Perfect to any st, Ch 5 (Counts as DC + Ch 2), DC in same st, *SK 2 Sts, V-Stitch in next st, repeat from * around, sl st to the 3rd ch of the beg. ch 5. Fasten off. (268 DC–134 V-stitches)
RND 23: Attach Cobalt Blue to any ch 2 sp, ch up 3, 2 DC in same sp, *Ch 1, 3 DC in next ch 2 sp, repeat from * around, sl st to beg. ch 3. Fasten off. (84 groups of 3 DC–252 DC)
RND 24: Attach Kelly Green to any ch 1 sp, Ch up 3, 2 DC in same sp, *Ch 1, 3 DC in next ch 1 sp, repeat from * around, sl st to beg. ch 3. Fasten off. (84 groups of 3 DC–252 DC)
RND 25: Attach Fuchsia to any ch 1 sp, Ch 1, SC in same sp, *[4TR, DC, DCT, Picot, DTR, DC, 4TR] in next ch 1 sp, SC in next ch 1 sp, repeat from * around, sl st to beg sc. Fasten off. (42 petals)
RND 26: Attach Robins Egg to any picot, ch 1, sc in same picot, *Ch 12, SC in next picot, repeat from * around, Sl st to 1st SC. (42 ch 12 sps)
RND 27: Ch 1, SC in same st, *[8 SC, ch 3, 8 SC] in ch 12 sp, sc in next sc, Repeat from * around, sl st to 1st SC. Fasten off. (714 SC)
RND 28: Attach Plum Perfect to any Ch 3 sp, ch 1, SC in same sp, *Ch 6, Sk 4 sts, TR2TOG (skipping 7 sts in between this decrease stitch), Ch 6, SC in next ch 3 sp, Repeat from * around, sl st to first SC.
RND 29: Ch up 2 (does not count as anything), DC in first st, *6 DC in ch 6 sp, DC in TR2TOG st, 6 DC in ch 6 sp, DC in SC, repeat from * around, sl st to first DC. Fasten off. (588 DC)
Weave in all ends.
Assembly Step
Be sure to block this piece flat on a surface. Just pin it down to the shape and spray it with water and let it dry.
Enjoy!!