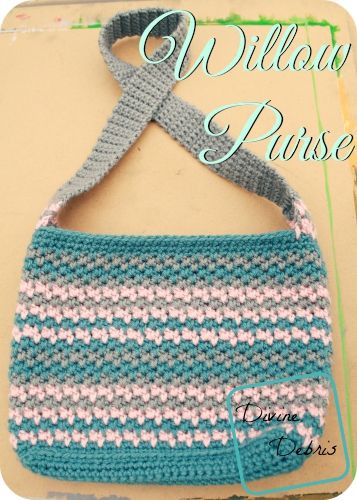
Crochet Willow Purse

The Crochet Willow Purse Overview
The Crochet Willow Purse is not just a bag; it's a stylish statement piece that adds a touch of charm to any outfit. This handcrafted purse, with its intricate willow pattern, is perfect for those who appreciate the art of crochet. Its spacious interior offers enough room to carry your essentials, making it both practical and fashionable. Whether you're heading out for a casual day with friends or a special event, this purse will certainly turn heads and spark conversations. So, why not treat yourself to this delightful accessory and embrace the beauty of handmade craftsmanship?
Materials Needed
- US I (5.50 mm) crochet hook
- 3 colors of worsted weight/ size #4 yarn (5 oz/ 241 yards)
- I used Vanna’s Choice in dusty blue, silver grey, and pink
- Tapestry needle
Gauge
I: 17 dcs x 8 row = 4″
Terms/Stitches Used
- st(s): stitch(es)
- ch(s): chain(s)
- sc(s): single crochet(s)
- spike sc(s): spike single crochet(s)
Notes
You will need to know how to work into the back loop only for a row of this pattern.
The ch 1 at the beginning of the rows does not count as a stitch.
Rotate on row 7 means rotate the whole piece 90°.
This pattern is created in the round with a slip st at the end of each row into the first st.
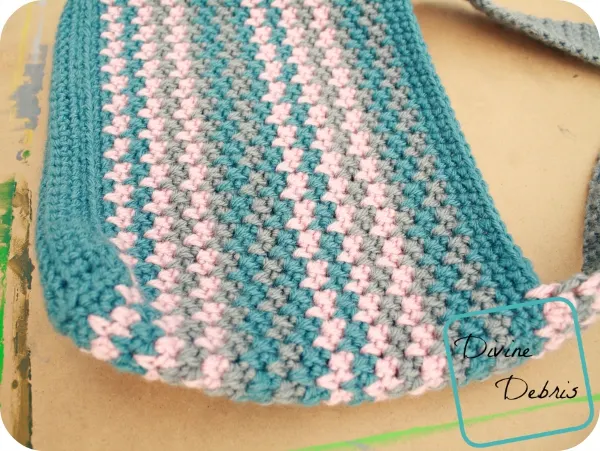
Colors are labeled color A (dusty blue), color B (pink), and color C (silver grey).
Finished Product Dimensions
- Height: 7.5″ (from row 8 to 46)
- Width: 10.75″ (laid completely flat)
- Straps: 30″ish (from side 1 where it secures to the bag to side 2 where it secures to the bag)
Pattern Instructions
Bag
Base
Color A: Row 1: Ch 31, sc into the second ch from the hook and across – 30 scs
Rows 2 – 6: Turn, ch 1, sc into each st across – 30 scs
Row 7: Turn, ch 1, sc into the next 30 sts, ch 1 at the corner and rotate the piece, sc into the next 6 row ends, ch 1 at the corner and rotate the piece, sc into the next 30 sts, ch 1 at the corner and rotate the piece, sc into the next 6 row ends, ch 1 at the corner and rotate the piece, slip st into the first sc to secure – 72 scs, 4 ch-1 spaces
Sides
Row 8: Ch 1, sc into the back loop only of the same st as join and into the back loop only of the next 71 sts, slip st into the first st to secure – 72 scs
Row 9: Ch 1, sc into the same st as join and into the next 71 sts, slip st into the first st to secure – 72 scs
Color B: Row 10: Ch 1, sc into the same st as join and spike sc into the next st, *sc into the next st, spike sc into the next st,* repeat from * to * 34 more times, slip st into the first st to secure – 36 scs, 36 spike scs
Row 11: Ch 1, spike sc into the same st as join and sc into the next st, *spike sc into the next st, sc into the next st,* repeat from * to * 34 more times, slip st into the first st to secure – 36 spike scs, 36 scs
Color A: Rows 12 – 13: repeat rows 10 – 11
Color B: Rows 14 – 15: repeat rows 10 – 11
Color C: Rows 16 – 17: repeat rows 10 – 11
Color B: Rows 18 – 19: repeat rows 10 – 11
Color C: Rows 20 – 21: repeat rows 10 – 11
Color A: Rows 22 – 23: repeat rows 10 – 11
Color C: Rows 24 – 25: repeat rows 10 – 11
Color A: Rows 26 – 27: repeat rows 10 – 11
Color B: Rows 28 – 29: repeat rows 10 – 11
Color A: Rows 30 – 31: repeat rows 10 – 11
Color B: Rows 32 – 33: repeat rows 10 – 11
Color C: Rows 34 – 35: repeat rows 10 – 11
Color B: Rows 36 – 37: repeat rows 10 – 11
Color C: Rows 38 – 39: repeat rows 10 – 11
Color A: Rows 40 – 41: repeat rows 10 – 11
Color C: Rows 42 – 43: repeat rows 10 – 11
Color A: Row 44: repeat row 10
Rows 45 – 46: ch 1, sc into the same st as join and into the next 71 sts, slip st into the first st to secure – 72 scs
Fasten off all your colors, weave in your ends.
Straps
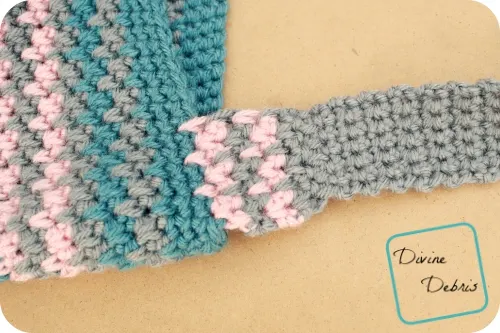
Side 1
Note: Line up your first st with the corner of your 6 sc side (refer to row 7 if you’re confused)
Color B: Row 1: Ch 1, sc into the first st, spike sc into the next st, sc into the next st, *spike sc into the next st,* repeat from * to * once more – 3 scs, 3 spike scs
Row 2: Turn, ch 1, sc into the first st, spike sc into the next st, sc into the next st, *spike sc into the next st,* repeat from * to * once more – 3 scs, 3 spike scs
Color C: Rows 3 – 4: repeat row 2
Color B: Rows 5 – 6: repeat row 2
Color C: Rows 7 – 8: repeat row 2
Rows 9 – 122: Turn, ch 1, sc across – 6 scs
Fasten off, leave a very long tail, which you will use to secure the other side of the strap.
Side 2
Switch to the other side (parallel to side 1). Line up your first st with the corner of your 6 sc side (refer to row 7 if you’re confused).
Color B: Row 1: Ch 1, sc into the first st, spike sc into the next st, sc into the next st, *spike sc into the next st,* repeat from * to * once more – 3 scs, 3 spike scs
Row 2: Turn, ch 1, sc into the first st, spike sc into the next st, sc into the next st, *spike sc into the next st,* repeat from * to * once more – 3 scs, 3 spike scs
Color C: Rows 3 – 4: repeat row 2
Color B: Rows 5 – 6: repeat row 2
Color C: Rows 7 – 8: repeat row 2
Fasten off, leave a long tail.
Finishing Touches
Use the tail from this side and the tail from side 1’s row 122, to secure side 2’s row 8 to side 1’s row 122. Make sure it’s good and secure before weaving your ends complete.
Weave in all ends.