Crochet Teddy Bear Purse Pattern

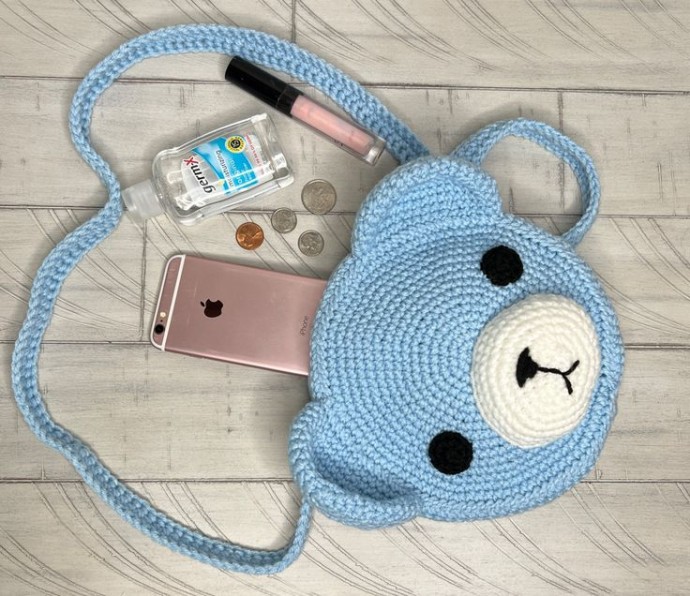
The Crochet Teddy Bear Purse is an adorable and charming accessory that combines practicality with cuteness. This purse is not only a stylish way to carry your essentials but also a fun conversation starter wherever you go. The intricate crochet work gives the purse a handmade feel, adding a unique touch to your outfit. The teddy bear design adds a playful element that is sure to bring a smile to anyone's face. Whether you're heading out for a casual day or a special occasion, this purse is the perfect companion to complete your look with a touch of sweetness. Get ready to showcase your love for crochet and teddy bears in a fashionable and lovable way with this must-have accessory!
Necessary Materials
For this pattern, you will need:
- 4.25mm hook
- Worsted Weight Yarn in colors of your choice
- Zipper
- Small amount of stuffing
- Yarn needle
- Scissors
- Stitch markers
- Fabric for lining and matching thread (optional)
- Sewing needle (optional)
Abbreviations
- Mr - magic ring
- St - stitch
- Sc - single crochet
- Inc - increase (sc twice in one stitch)
- Dec - decrease (sc two stitches together)
- Ch - chain
Front and Back Panels
Round 1: mr 6 [6]
Round 2: inc 6 [12]
Round 3: (sc 1, inc)x6 [18]
Round 4: sc 1, inc, (sc 2, inc)x5, sc 1 [24]
Round 5: (sc 3, inc)x6 [30]
Round 6: sc 2, inc, (sc 4, inc)x5, sc 2 [36]
Round 7: (sc 5, inc)x6 [42]
Round 8: sc 3, inc, (sc 6, inc)x5, sc 3 [48]
Round 9: (sc 7, inc)x6 [54]
Round 10: sc 4, inc, (sc 8, inc)x5, sc 4 [60]
Round 11: (sc 9, inc)x6 [66]
Round 12: sc 5, inc, (sc 10, inc)x5, sc 5 [72]
Round 13: (sc 11, inc)x6 [78]
Round 14: sc 6, inc, (sc 12, inc)x5, sc 6 [84]
Round 15: (sc 13, inc)x6 [90]
Round 16: sc 7, inc, (sc 14, inc)x5, sc 7 [96]
Tie off, weave in ends.
Middle Panel
(You can add extra rows to make this panel as thick as you want, and you should adjust the amount of chain stitches to the length of your zipper if you are using one!)
Row 1: Foundation sc 96
Rows 2-3: ch 1, turn, sc across [96]
Row 4: sc 33, ch 30, skip 30 st, sc 33 [96]
Row 5: sc 33, sc in every ch st, sc 33 [96]
Row 6: sc across [96]
Tie off, leave a long tail for sewing. Sew a zipper in ch space if you want to have a zipper, then sew ends together to make one big circle, making sure to not twist the piece.
Strap
You can add extra rows to make the strap thicker if you desire, or do less rows if you want it thinner.
Row 1: Foundation sc desired length, leaving starting tail of yarn long enough to sew with (I usually add a couple extra inches so I can fold over the ends so the strap can be attached a bit more securely).
Rows 2-3: ch 1, sc across.
Tie off, leaving a long tail for sewing.
Snout
Ch 6
Round 1: starting in second ch from hook, sc 4, inc, turn work to unworked side of ch, sc 4, inc. You are now working in the round. [12]
Round 2: (sc 1, inc)x6 [18]
Round 3: (sc 2, inc)x6 [24]
Round 4: (sc 3, inc)x6 [30]
Round 5: (sc 4, inc)x6 [36]
Round 6: (sc 5, inc)x6 [42]
Rounds 7-8: sc around [42]
Tie off, leaving a long tail for sewing. Embroider nose.
Eyes (Make Two)
Round 1: mr 6 [6]
Round 2: (inc, sc 1)x3 [9]
Tie off, leaving a long tail for sewing.
Ears (Make Two)
Round 1: mr 6 [6]
Round 2: inc x6 [12]
Round 3: (sc 1, inc)x6 [18]
Round 4: (sc 2, inc)x6 [24]
Round 5: (sc 3, inc)x6 [30]
Round 6: (sc 4, inc)x6 [36]
Round 7: (sc 5, inc)x6 [42]
Rounds 8-9: sc around [42]
Round 10: (sc 5, dec)x6 [36]
Round 11: sc around [36]
Tie off, leave a long tail for sewing.
Assembly
- -Start by adding back panel to one side of the middle panel (making sure to position the ch st opening with where you want the top of your purse to be). Attach securely and weave in ends.
- -After that, I like to add the eyes and the nose to the front panel. Don't forget to stuff the nose a little bit! Sew the front panel to the other side of the middle panel so that you now have a circle-shaped pouch, and then sew on the ears.
- -Then, all that’s left to do is attach the strap! When you’re finished with all that, then you’re all done!
You can absolutely add a fabric lining to your purse if you want to make it more sturdy. If you do that, I would just trace the panels (front, middle, and back) and give ¼-½in seam allowance and then sew the lining together in the same fashion as the crochet pieces were sewn together. You can then attach it under the zipper (I would do this before assembling the whole purse). I chose not to add a lining to mine this time because I didn’t have any matching fabric that I liked, and it’s still a very sturdy purse, so it’s really up to you if you want to do that or not!<3