Crochet A Baby Bib

Crocheting a baby bib is a delightful and rewarding project for any crafter! Not only is it a fun way to unleash your creativity, but it also results in a practical and charming accessory for the little one. With just a hook, some soft yarn, and a simple pattern, you can whip up a personalized bib that will be both useful and adorable. Whether you choose colorful yarn or opt for a classic design, the joy of crafting something handmade for a precious baby is unmatched. So grab your supplies, settle into a cozy spot, and enjoy the soothing rhythm of crochet as you create a special bib that will surely be treasured.
Materials Needed
Yarn: Any 4-ply yarn, I used Red Heart with Love “Aran” and “Lettuce”.
Notions List
- Sewing needle and thread
- Patches cut from fabric
- 2 ½” wide Ecru lace with satin ribbon, or ½” wide ecru cotton lace or lace of choice
- Yarn needle
- Ultra hold or wonder under
- Pull tie bow
- Small piece of felt
Crochet Hook Sizes
J/10/6.00MM
Gauge
Main pattern rows of dc, in nxt st, sc in nxt st: 4”x4” = 12 rows up and down, 10 st across
Stitch Key
- dc = double crochet
- sc = single crochet
- slp st = slip stitch
- hdc = half double crochet
- ch1 sp = chain 1 space
- sp = space
- nxt = next
- st = stitch
- yo = yarn over
- repeat between * * = repeat the sequence that is between the * * as many times as stated
- x = times, will follow number, e.g., repeat sequence 8x or 8 times
Row Instructions
Row 1: J/10/6.00MM Hook CH 45, place marker in 45th chain, chain 58, end off (103 Ch)
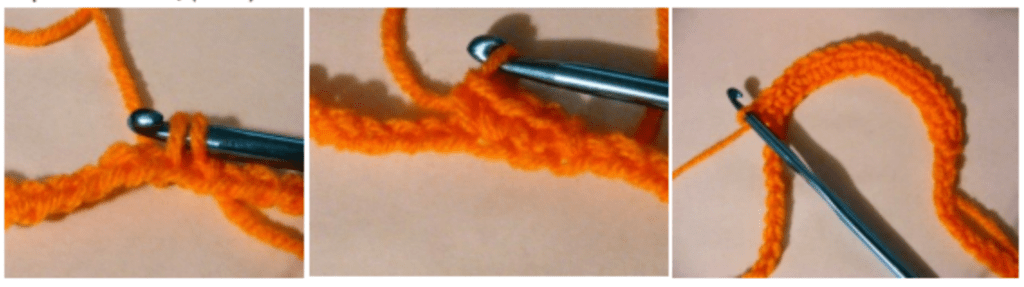
Row 2: The bib will be worked from the neck down. With the short end of the chain on your right, attach yarn at the 45th chain PIC 1 (working towards the long end of chain) CH 1; *SC in nxt st; 2 SC in nxt st;* Repeat 6 more x; (21 st)
Row 3: Turn, CH 1; (You are now working in the SC’s only, and will build the bib from here. The rest of the chains are left to dangle, and will be the bib ties. You will be crocheting them at the end of the pattern, so they are a little thicker and stronger.) [*DC in nxt st, SC in nxt st;* Repeat 2 more x; DC & SC in nxt st;] Repeat between [ ] 1 more x; *DC in nxt st, SC in nxt st;* Repeat 2 more x; DC in last st (23 st)
Row 4: Turn, CH 1;* SC in nxt st, 7x; 2 SC in nxt st;* Repeat once more; SC in nxt st, 7x (25 st)
Row 5: Turn, CH 1; DC in nxt st; *SC in nxt st; DC in nxt st;* Repeat 2 more x; SC & DC in nxt st; *SC in nxt st; DC in nxt st;* Repeat 3 more x; SC & DC in nxt st; *SC in nxt st; DC in nxt st;* Repeat 3 more x (27 st)
Row 6: Turn, CH 1; SC in nxt st, 8x; 2 SC in nxt st; SC in nxt st, 4x; 2 SC in nxt st; SC in nxt st, 4x; 2 SC in nxt st; SC in nxt st, 8x (30 st)
Row 7: Turn, CH 1; *DC in nxt st; SC in nxt st;* Repeat 4 more x; DC & SC in nxt st; DC in nxt st; *SC in nxt st; DC in nxt st;* Repeat once more; SC & DC in nxt st; SC in nxt st; *DC in nxt st; SC in nxt st;* Repeat once more; DC & SC in nxt st; DC in nxt; *SC in nxt st; DC in nxt st;* Repeat 2 more x; SLP ST in nxt st; Place marker in last st through the rest of the pattern, then SLP ST in nxt st. This will even out the edge of the bib. Do not place marker in SLP ST; the marker will help you see where to SLP ST when you move on to the next row. (33 st)
Row 8: Turn, SLP ST in nxt st, 2x; you can now remove the marker from the first st: SC in nxt st, 10x; 2 SC in nxt st; SC in nxt st 7x; 2 SC in nxt st; SC in nxt st, 10x; SLP ST in nxt st; Remember to place the marker and leave the rest of the stitches unworked (31 st)
Row 9: Turn, SLP ST in nxt st, 2x; Remember to remove the marker: CH 1, DC in nxt st; *SC in nxt st, DC in nxt st;* Repeat 3 more x; SC & DC in nxt st; SC in nxt st; *DC in nxt st; SC in nxt st;* Repeat once more; DC & SC in nxt st; *DC in nxt st; SC in nxt st;* Repeat 4 more x; SLP ST in nxt st; Remember to place the marker and leave the rest of the stitches unworked (28 st)
Row 10: Turn, SLP ST in nxt st, 2x; Remember to remove the marker: SC in nxt st, 4x; 2 SC in nxt st; SC in nxt st, 6x; 2 SC in nxt st; SC in nxt st, 6x; 2 SC in nxt st; SC in nxt st, 4x; SLP ST in nxt st; Remember to place the marker and leave the rest of the stitches unworked (26 st)
Row 11: Turn, SLP ST in nxt st, 2x; CH 1, DC in nxt st; *SC in nxt st; DC in nxt st;* Repeat once more; SC & DC in nxt st; *SC in nxt st, DC in nxt st;* Repeat 5 more x; SC & DC in nxt st; SC in nxt st; DC in nxt st; SC in last 2 st’s; END OFF; Leave the rest of the stitches unworked (25 st). The edges of the bib will be bumpy, and they will be evened out when you add the finishing rows.
Finishing Rows Option 1
Row 1: Join yarn w/SLP ST at upper left corner of bib, where the bib tie is (this is the chain section that was left unworked at the beginning of the pattern) CH 1; SC around edge of bib (smoothing out the bumpy areas). You can achieve this by not crocheting down into the divets, but skipping over them.
Row 2: Turn, *CH 1, SLP ST in nxt st* Repeat in every st around the bib. When you get to the bib string continue on with *CH 1, SLP ST in each CH*, ending off at the end of the tie. This leaves one string unworked. Please follow Row 3.
Row 3: Join Yarn in first CH of the second Bib string; *CH 1, SLP ST in CH* Repeat in each CH of the string. When you reach the bib, anchor string with SLP ST to Bib, end off.
Finishing Rows Option 2
Row 1: Join yarn w/SLP ST at upper left corner of bib, where the bib tie is (this is the chain section that was left unworked at the beginning of the pattern) CH 1; SC around edge of bib (smoothing out the bumpy areas). You can achieve this by not crocheting down into the divets, but skipping over them.
Row 2: Continuing on up the bib tie, *CH 1, SLP ST in nxt st* Repeat in every CH going up the bib tie. Please follow Row 3 to complete the other Bib tie.
Row 3: Join Yarn in first CH of the second Bib string; *CH 1, SLP ST in CH* Repeat in each CH of the string. When you reach the bib, anchor string with SLP ST to Bib, end off.
Buttons & Lace Attachment for Bib
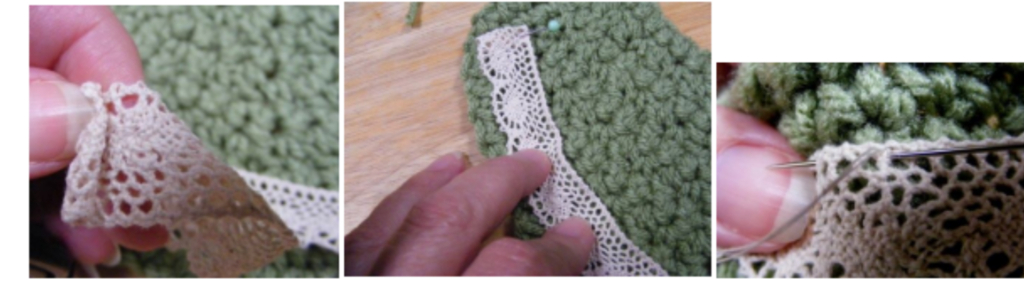
Fold the lace over twice and pin in place (Pic 1). Since there is a curve in the bib, applying the lace requires a little ease. If the lace is narrow, then you can just pin in place, and work the ease in as you pin the lace in place. Notice how it is slightly bumpy (Pic 2). It is all pinned, with a little ripple that will be worked into the bib as you hand sew it on to the bib.
Applying the buttons can be frustrating but is very easy when you use Scotch tape. Position the buttons in place, and then take a piece of scotch tape, and in one fell swoop, lay put the tape over the buttons…if done quickly, the buttons will not shift.
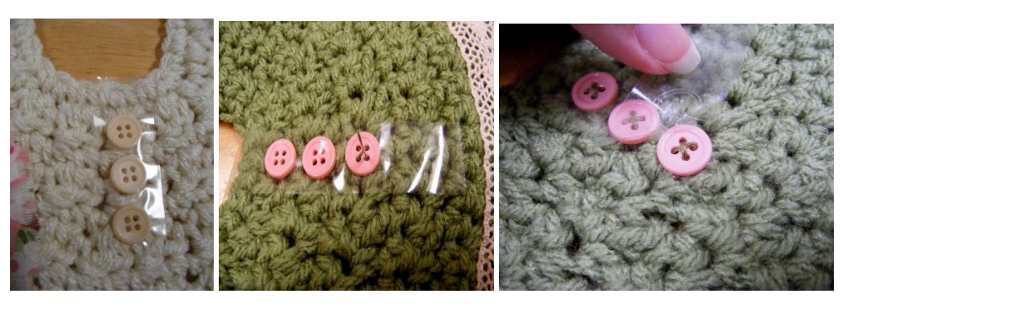
Sew the buttons in place, going through the Scotch tape (Pic 2). When all buttons are in place, gently peel the Scotch tape away, lifting it gently away from the fiber. (Pic 3)
Adding fabric embellishments to this baby bib is easy.