Crochet Baby Blanket Guide: Mastering the Star Stitch

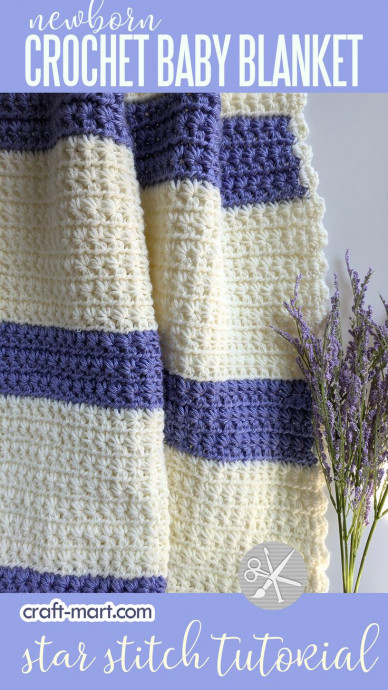
Crochet baby blankets are not only adorable but also a heartfelt way to keep little ones warm and cozy. The intricate patterns and soft yarn used in creating these blankets make them extra snug for babies. Whether you choose pastel colors, vibrant hues, or a mix of both, each stitch is made with love and care. The time and effort put into crafting a crochet baby blanket truly make it a special gift that can be cherished for years to come. So, grab your crochet hook, select some delightful yarn, and let your creativity flow as you whip up a precious blanket for the newest addition to the family!
Materials for Star Stitch Practice Swatch
To practice the star stitch, gather the following materials:
- Lyon Brand Yarn ‘Pound of Love’ in Antique White
- Crochet Hook (size J / 6 mm)
- Measuring Tape
- Scissors
Note: We’ll list the yarn and materials for the Newborn Baby Blanket after the Star Stitch Tutorial. You can practice with any yarn but it is better to make a swatch using the same yarn you’ll be using for the whole project. This way, you can measure your gauge and figure out exactly how many stitches you’d need for the blanket of desired size and which hook you’d use.
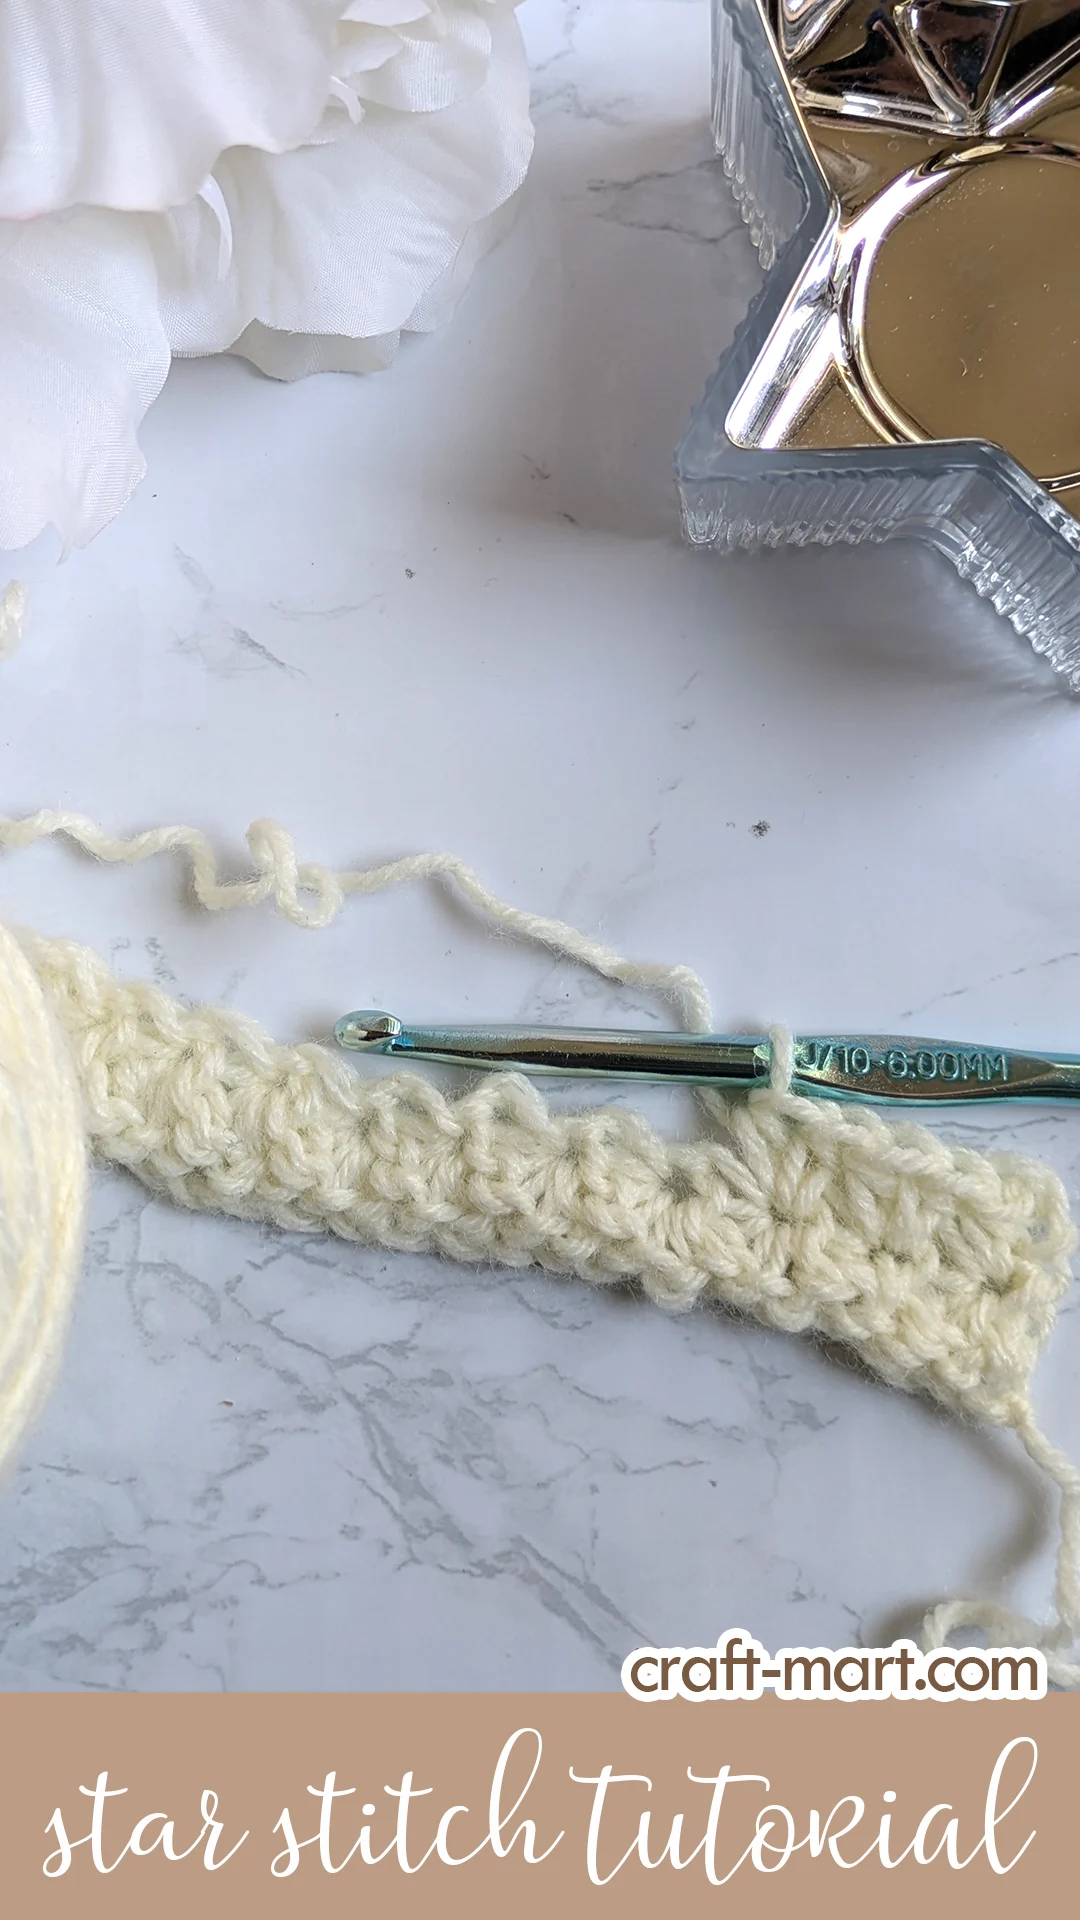
The first thing to remember is, crochet star stitch is an easy 2-row repeat. The first row will create gorgeous little stars that are the heart of this stitch. The second row is for you to relax with simple half-double crochet stitches all across to complete the stars of the previous row.
Star Stitch Tutorial (for Newborn Crochet Baby Blanket)
Let’s practice with a sample swatch so you can master the star stitch. As a result, you will feel completely confident about starting your newborn crochet baby blanket.
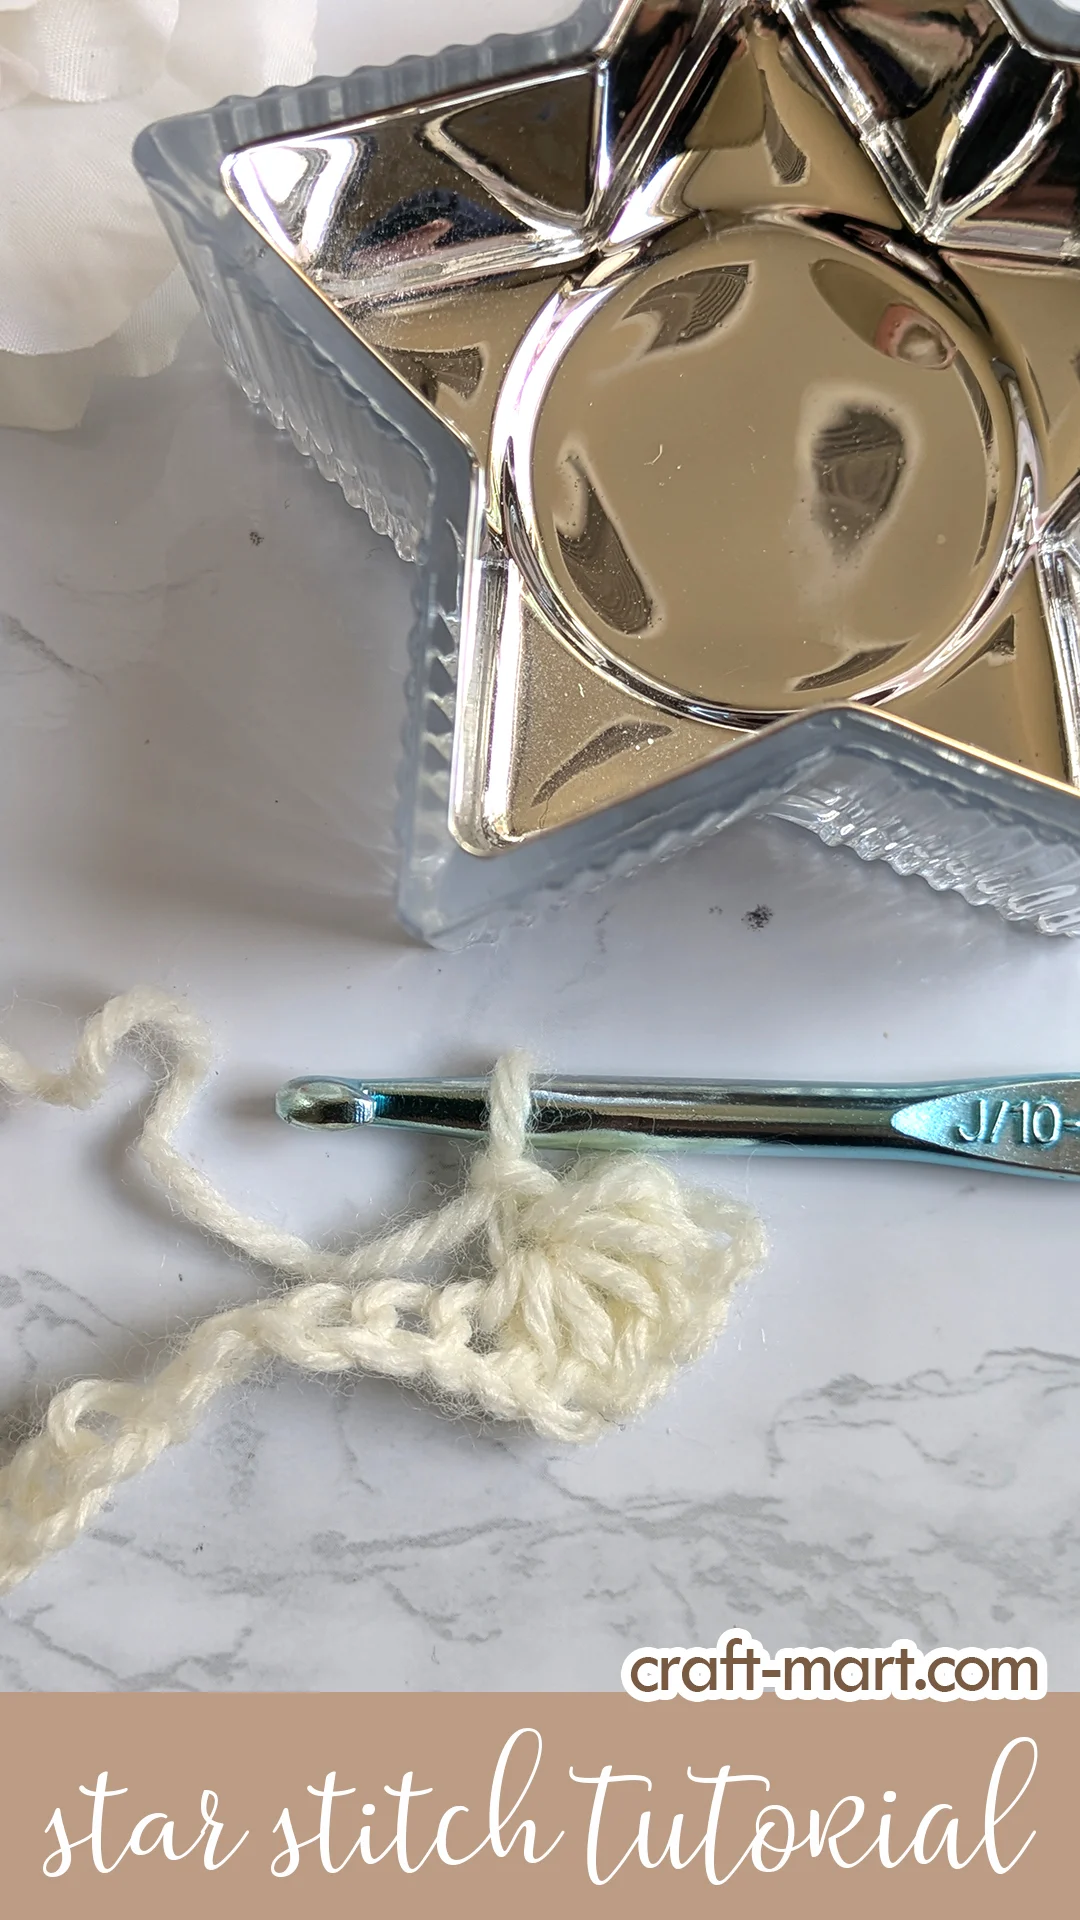
Chain 20 (multiple of 2) + 3 stitches for a foundation row.
Row 1 (Sample Swatch)
Next, insert your hook into the 2nd chain from the hook, pull up a loop (2 loops on the hook), then repeat that for the next 4 chains (6 loops on the hook).
Next, yarn over and pull through all 6 loops on the hook. As a result, each one of these loops will form 6 ‘rays’ of your first star. Tip: Don’t pull on the yarn too hard and leave it room to ‘breathe’ so your star stitch will have a rich texture. As a result, the star stitches shouldn’t be too tight.
Lastly, chain 1 to complete the center of the star. As illustrated, you have completed the first half of the star (bottom part) which consists of 5 single crochet stitches together (5sctog). The second row will add the final 2 rays to each star in the row.
For the second star, insert your hook into the center of the first star, and pull up a loop. Next, insert the hook into the last leg (ray) of the same star and pull up a loop. Lastly, insert your hook into the base of the star and the next two stitches and pull up the loops (6 loops on the hook).
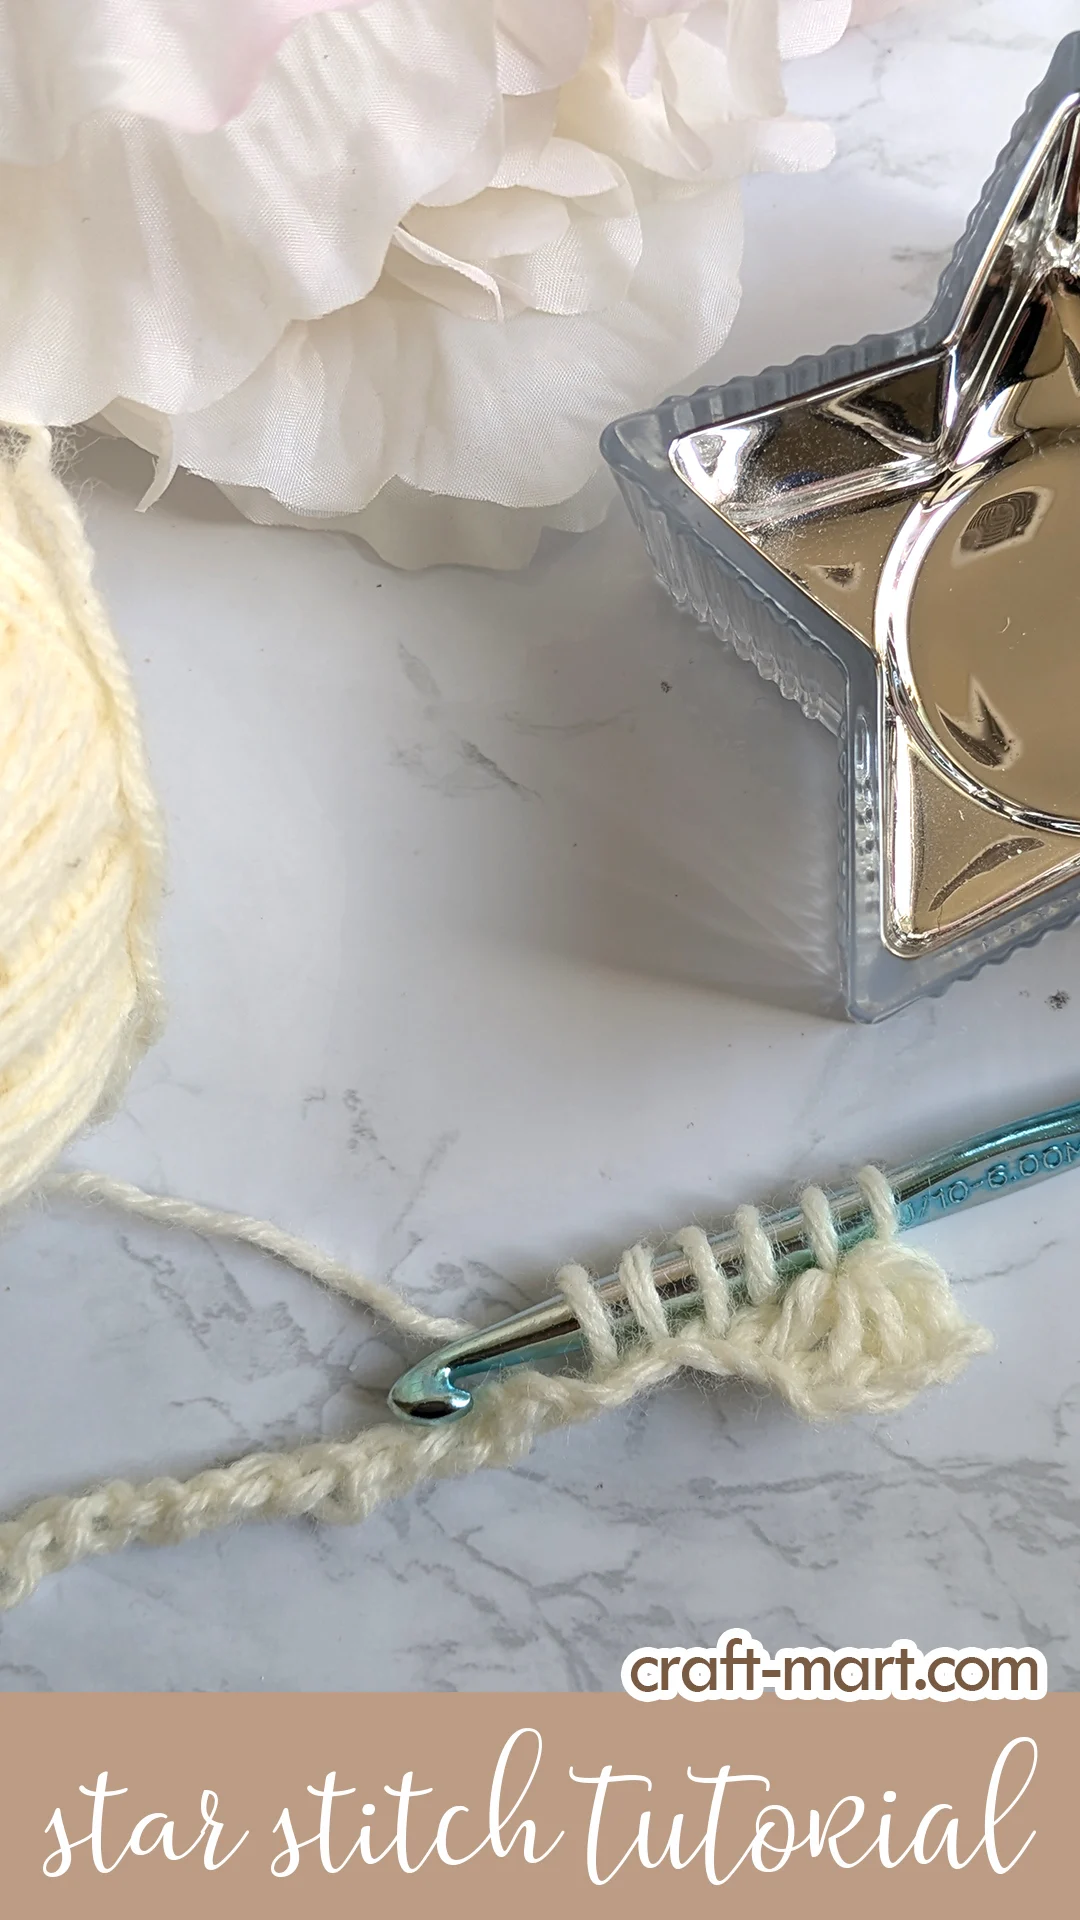
Now, yarn over and pull it through all 6 loops on the hook (5sctog). Lastly, chain one. The second star is done!
From now on, you will repeat the same sequence until you have one stitch left. Don’t worry, that’s correct as the row’s last star is always a partial one.
For the last star of the row, insert your hook into the center of the first star you just made, and pull up a loop. Next, insert the hook into the last leg (ray) of the same star and pull up a loop. Lastly, insert your hook into the base of the star and the last stitch and pull up the loops (5 loops on the hook). Yarn over and pull it through all 5 loops. Finally, complete the row by making a half-double crochet into the same last stitch.
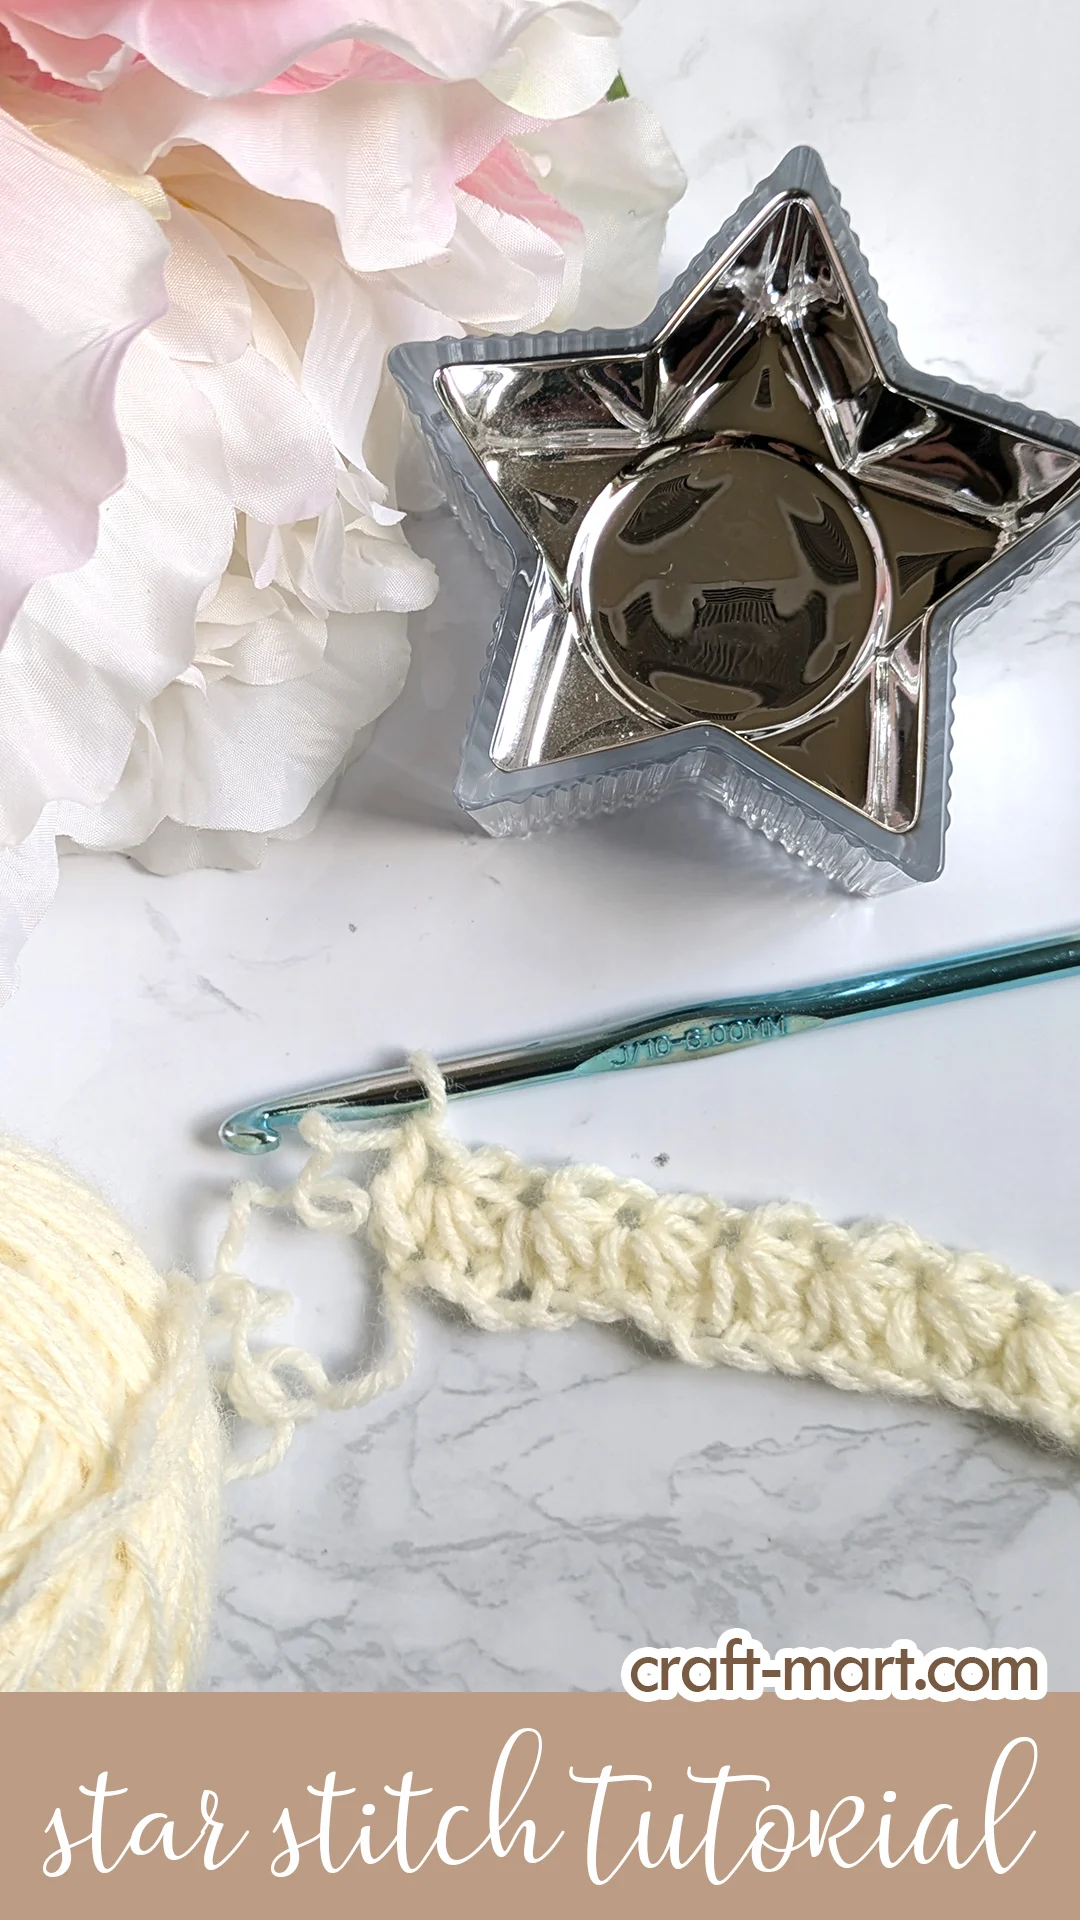
Row 2 (Sample Swatch)
Chain 2 and turn. Make a half-double crochet into the first stitch. Next, make 2 double crochet stitches into the center of each star. Lastly, make 1 half-double crochet stitch into the last stitch of the row.
Likewise, keep repeating rows 1 and 2 until you feel completely comfortable with the star stitch.
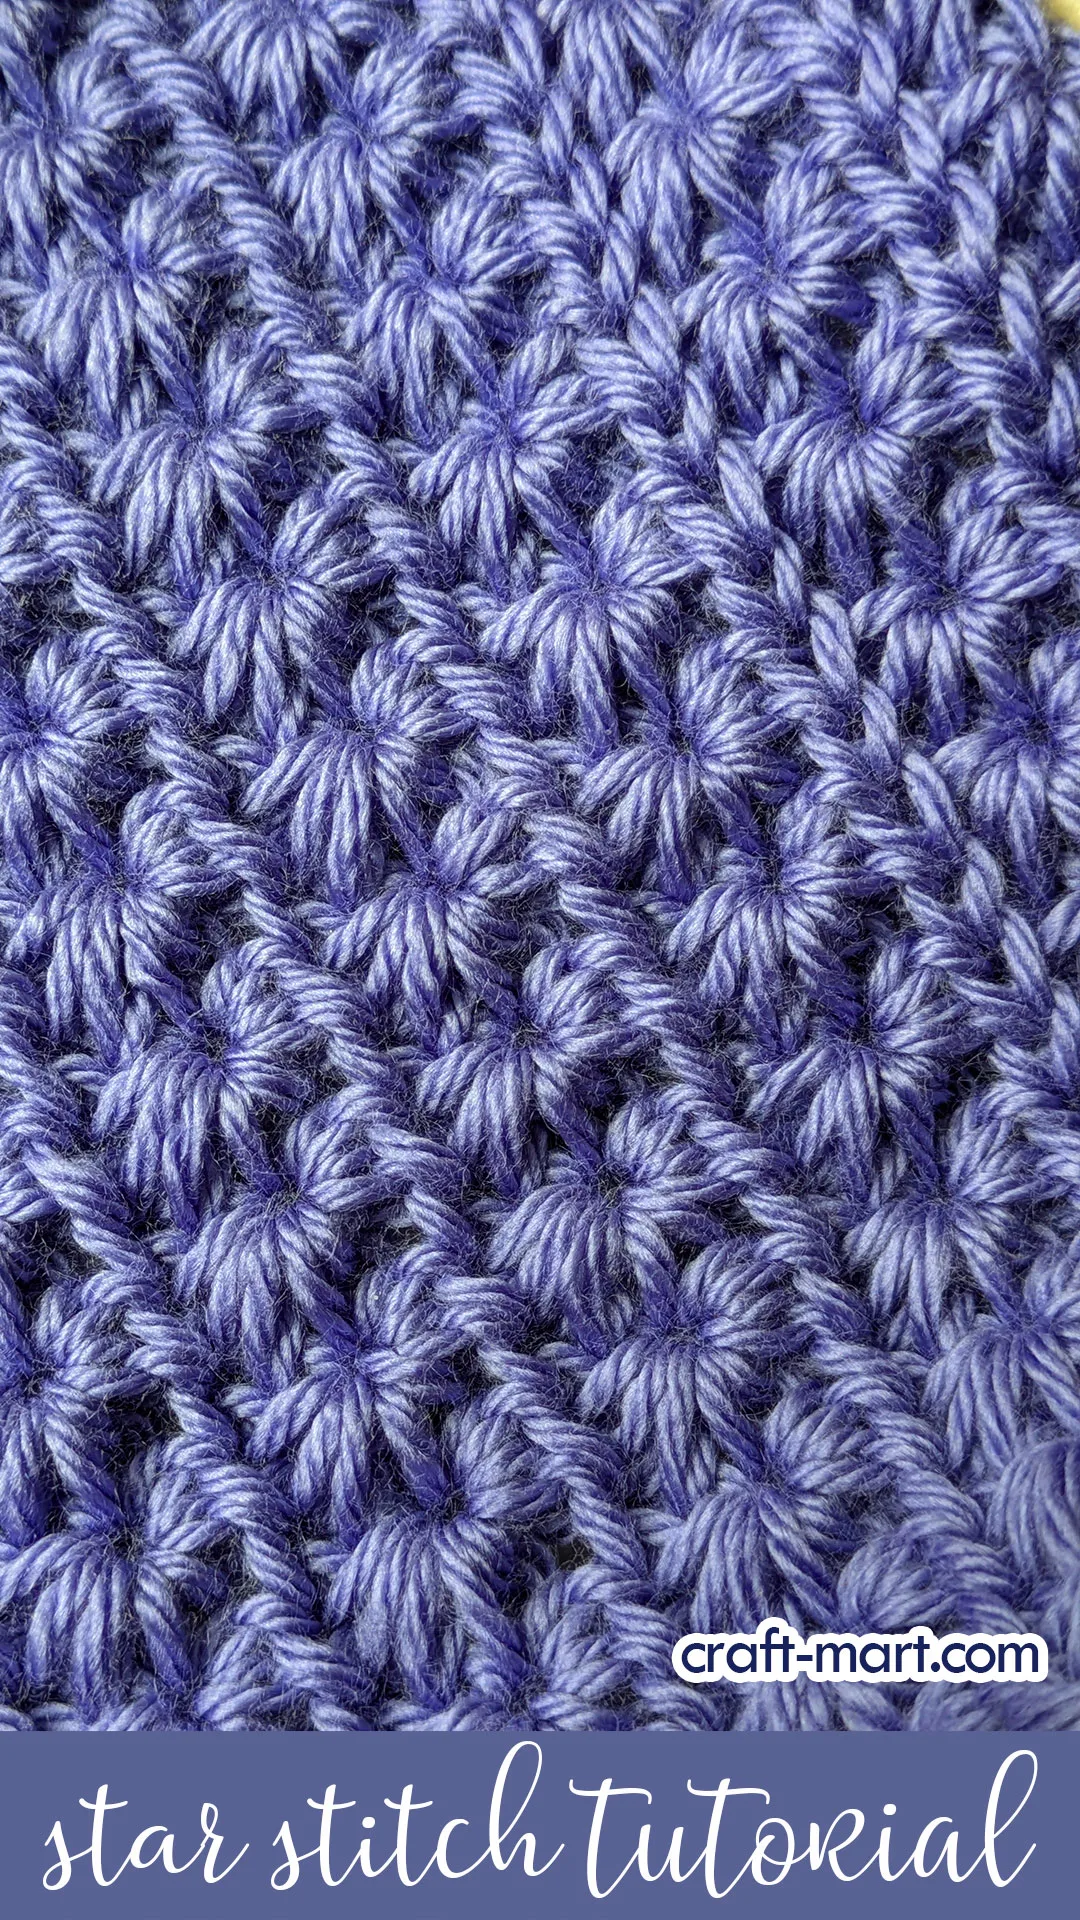
As illustrated, the star stitch is not reversible. In other words, it has a distinctive right and wrong side. The ‘wrong side’ is not as pretty as the ‘right side,’ which has rows of pretty little stars.
Variation of the Star Stitch for Newborn Crochet Baby Blanket
Note that there are different ways to crochet a star stitch. Notably, the classic way is to make your 5 single crochet together (5sctog) by inserting the hook under the V of a previous stitch (star stitches on the left bottom of the photo).
You can also insert your hook in the back loops only. As a result, the star stitches will have a pretty braid separating them. As an illustration, check out the star stitches on the top right portion of the photo. So, you can practice both ways and decide which way you prefer.
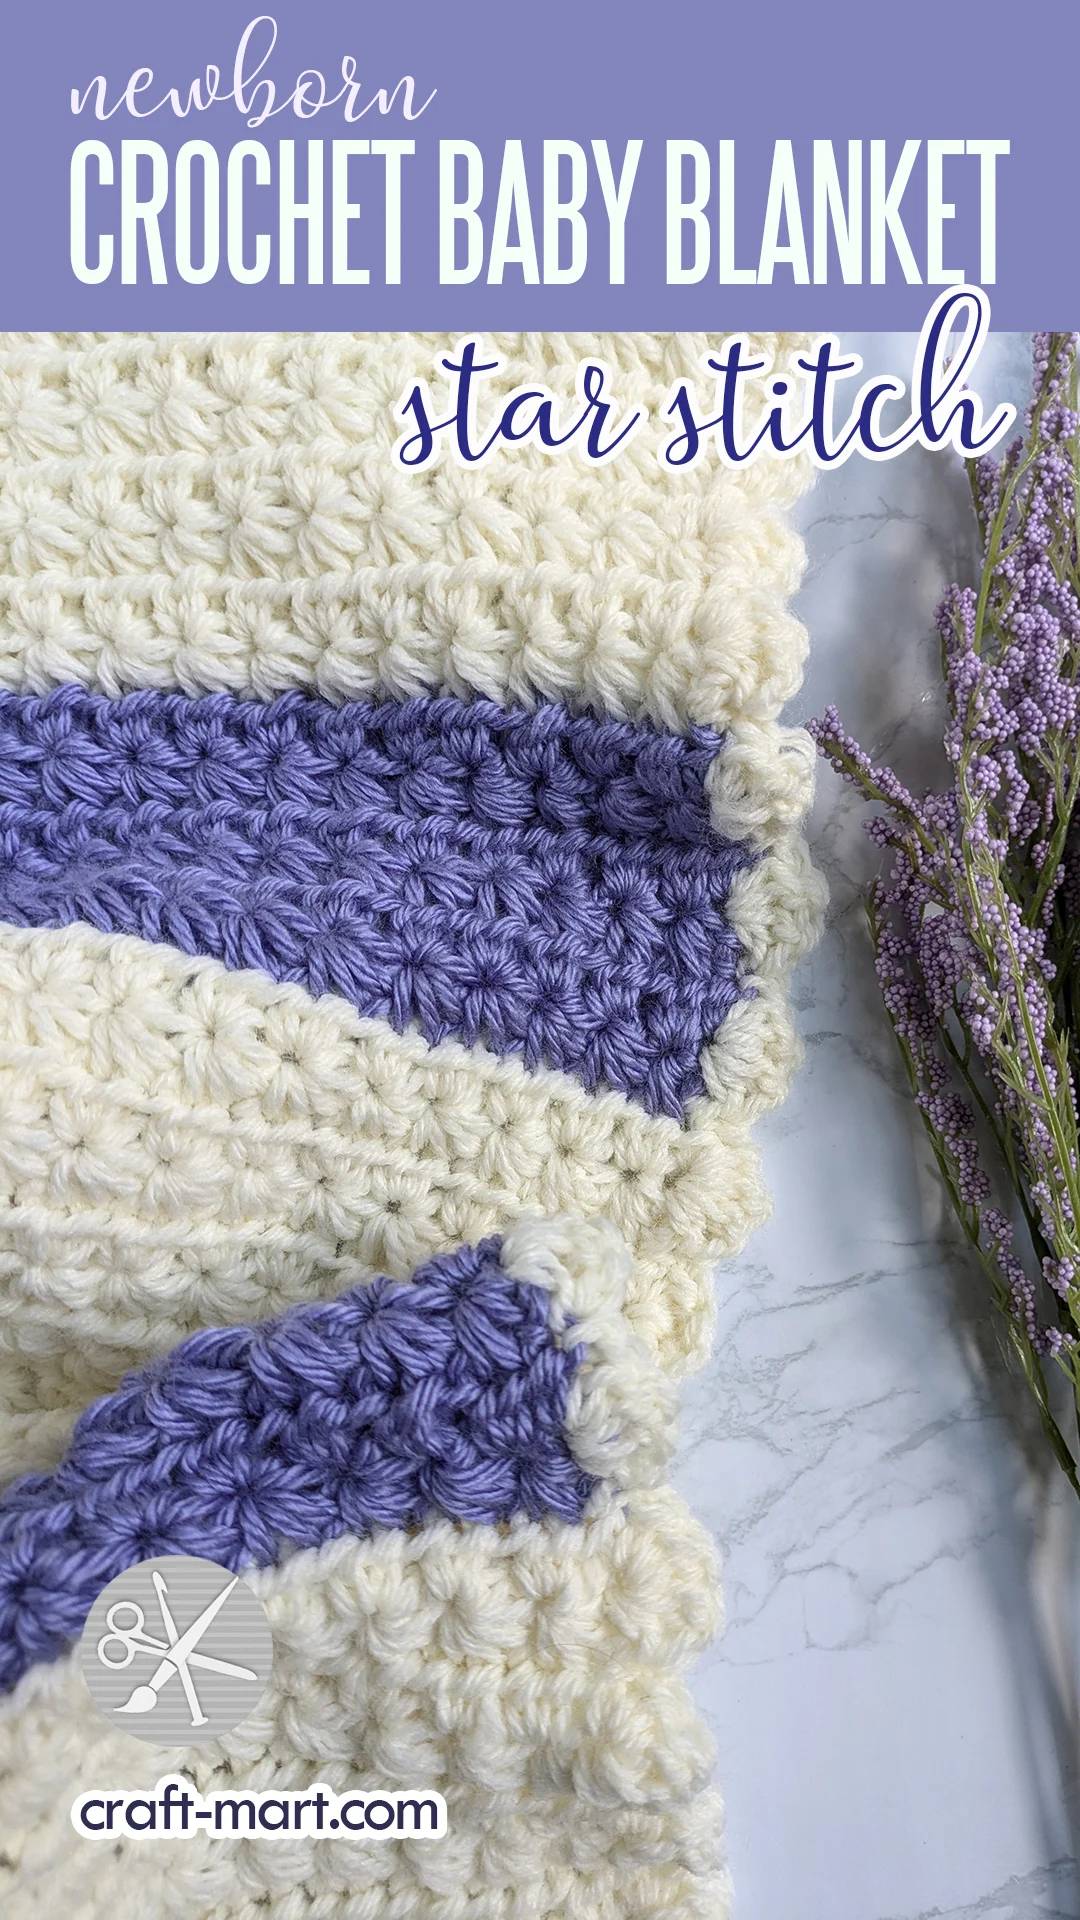
Newborn Crochet Baby Blanket – Free Pattern
When creating a star stitch crochet baby blanket, one of the most important considerations is choosing the right yarn and hook. The yarn you select will greatly impact the look and feel of your blanket, so be sure to choose a soft and durable yarn that is easy to work with.
For this reason, one of the best baby blanket yarns is Lyon Brand ‘Pound of Love’ yarn. It is versatile, washable, and comes in many great colors.
Materials for Newborn Crochet Baby Blanket
- Lyon Brand Yarn ‘Pound of Love’ in Antique White
- Caron H9700-9756 Simply Soft Solids Yarn, 6 oz, Lavender Blue
- Crochet Hook (size J / 6 mm)
- Retractable Measuring Tape
- Crafting Scissors
- Tapestry Needles and Stitch Markers Set
Abbreviations for Newborn Crochet Baby Blanket (Free Pattern)
(according to Craft Yarn Council)
- ch – chain
- sc – single crochet
- BL – back loops only
- sc5tog – single crochet 5 together
- sc4tog – single crochet 4 together
- hdc – half double crochet
- ehdc – extended half double crochet
- dc – double crochet
- sk – skip
- lp – loop
- yo – yarn over
- RS – right side
- WS – wrong side
Free Pattern for Newborn Crochet Baby Blanket (Star Stitch)
Finished Size: 30″ x 33″
Row 1 (RS)
Ch 100 + 3 (multiple of 2 + 3). Insert your hook into the 2nd ch from the hook, pull up a lp (2 lps on the hook), then repeat that for the next 4 ch (6 lps on the hook), sc5tog, ch 1. Insert your hook into the center of the first star, and pull up a lp, insert the hook into the last leg of the same star, and pull up a lp, insert your hook into the base of the star and the next 2 st and pull up the lps (6 lps on the hook). *sc5tog, ch 1*. Repeat between * * to the end of the row until there is 1 ch left.
For the last star of the row, insert your hook into the center of the first star you just made, and pull up a lp, insert the hook into the last leg of the same star and pull up a lp. Lastly, insert your hook into the base of the star and the last st and pull up the lps (5 loops on the hook). Yarn over and pull it through all 5 loops (sc4tog). Finally, complete the row by making a hdc (or ehdc, if it gives you a straighter edge) into the same last stitch. Ch 2, turn.
Row 2 (WS)
Row 2 (WS): hdc into the first st, 2 hdc into the center of each star across the row, hdc into the last st. 50 stars completed! Ch 3, turn.
Rows 3-14: Repeat rows 1 and 2 6 times (7 double rows of stars). Pull through with Lavender yarn.
Rows 15-20: Repeat rows 1 and 2 3 times with Lavender yarn. Pull through with Antique White yarn.
Rows 21-34: Repeat rows 1 and 2 6 times (7 double rows of stars) in Antique White. Change to Lavender.
Keep alternating colors until you have 4 stripes in Antique White and 3 stripes in Lavender, finishing with Antique White (total 74 rows).
Border for Newborn Crochet Baby Blanket
The border is worked around all 4 sides of the baby blanket using a simple cluster stitch: hdc, 2 dc, hdc, and connected with sc in between cluster stitches. Distribute them evenly so that the center of the cluster stitch aligns with the center of the stars on 2 sides.
Blocking Your Finished Blanket
Once you have completed your blanket, the next step is blocking your finished project to give it a polished and professional appearance. Blocking involves shaping and stretching the fabric to ensure it lays flat and all the stitches are even. This process can make a significant difference in the overall look of your blanket, smoothing out any bumps or irregularities.
By taking the time to block your blanket, you’ll create a beautiful, high-quality finished product that will be cherished for years to come. Plus, blocking can also help the blanket maintain its shape and size over time, ensuring it remains a cozy and comforting keepsake for the little one it is intended for.