Crochet Frog Amigurumi

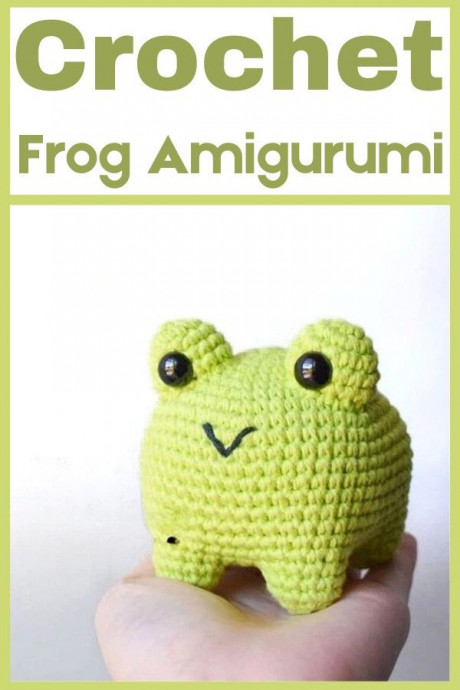
Creating a crochet frog amigurumi is such a delightful project to dive into! Frogs are not often seen in the world of crafting, which makes this creation even more special. With their big, sweet eyes and cute webbed feet, these little crocheted frogs are sure to bring a smile to anyone's face. Choosing bright green yarn and adding tiny details like a colorful belly or a little crown can make each frog unique and full of personality. So grab your crochet hook and let's hop into the enchanting world of amigurumi frogs!
Materials
- Cotton medium weight yarn
- Worsted yarn
- Green and black yarn
- Size C/2.75mm crochet hook
- 12mm safety eyes
- Polyester fiberfill
- Scissors
- Yarn needle
Abbreviations
- Rnd - Round
- Sc - Single crochet
- Sl st - Slip stitch
- Inc - Increase
- Dec - Decrease
- Ch - Chain
- (X sc, inc)*n:
X = 1 single crochet in the next x number of stitches.
n = number of times to repeat the pattern
Step By Step Pattern
Body
Rnd 1. 6 sc in magic ring (6)
Rnd 2. Inc in each st around (12)
Rnd 3. 1 sc, inc *6 (18)
Rnd 4. 2 sc, inc *6 (24)
Rnd 5. 3 sc, inc *6 (30)
Rnd 6. 4 sc, inc *6 (36)
Rnd 7. 5 sc, inc *6 (42)
Rnd 8. 6 sc, inc *6 (48)
Rnd 9. 7 sc, inc *6 (56)
Rnd 10-18. Sc in each st around(56)
Rnd 19. 3 sc, ch 5, skip 10 sts and then 5 sc, ch 4, skip 8 sts then 3 sc, ch 4, skip 8 sts then 5 sc, ch 5, skip 10 sts then 2 sc(36)
Rnd 20. 4 sc, dec *6(30)
Rnd 21. 3 sc, dec *6(24)
Rnd 22. 2 sc, dec *6(18)
Rnd 23. 1 sc, dec *6(12)
Rnd 24. Dec *6(6)
Cut a yarn tail and sew the body closed.
Stuff the body firmly through the leg holes.
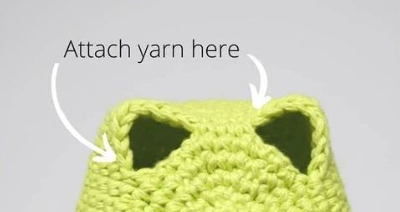
Front Legs
Attach yarn with a sl st to the starting points in the diagram. The photo is an underside view of the finished body, with the front of the frog shown at the top of the photo.
Rnd 1-3. Sc in each st around (12)
Stuff the leg with fiberfill before closing.
Rnd 4. Dec *6 (6)
Cut a yarn tail and sew the leg closed.
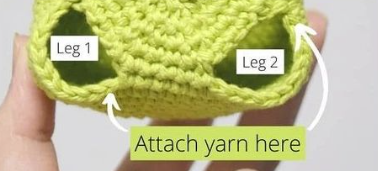
Back Legs
Attach yarn with a sl st to the starting points in the diagram. The photo is an underside view of the finished body, with the backside of the frog shown at the bottom of the photo.
Leg 1 starts off with (6) additional sc before the leg instructions below begin to help the finished frog stand evenly.
Rnd 1-2. Sc in each st around (15)
Rnd 3. 1 sc, dec *5 (10)
Stuff the leg with fiberfill before closing.
Rnd 4. Dec *5 (5)
Cut a yarn tail and sew the leg closed.
Eyes
Rnd 1. 6 sc in magic ring (6)
Rnd 2. Inc in each st around (12)
Rnd 3. 3 sc, inc *3 (15)
Rnd 4-5. Sc in each st around (15)
Finish off with a sl st and cut a yarn tail for sewing.
Add a safety eye between rnd 4 & 5.
Stuff the eye lightly with polyester fiberfill.
Mouth
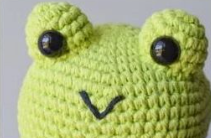
Attach black yarn to a yarn needle and embroider a smile on the frog. I place my mouth over rnds 10 & 11 (roughly 4 sts wide).