Crochet Rippling Waves Cowl

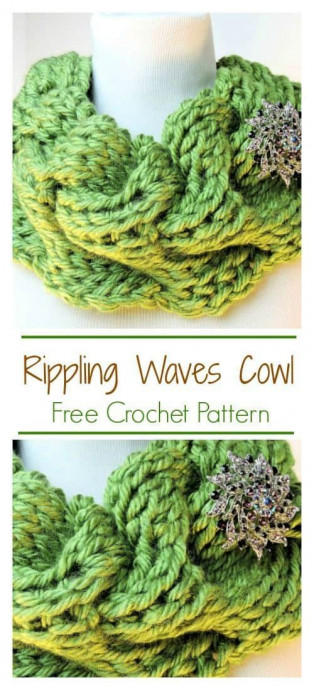
The Crochet Rippling Waves Cowl is an absolute delight! This cozy accessory brings a touch of warmth and style to any outfit, making it perfect for chilly days or adding a pop of color to your look. The rippling waves pattern creates a beautiful texture that is both eye-catching and fun to work up. Whether you are a seasoned crocheter or just starting out, this cowl is a fantastic project to dive into. So grab your favorite yarn and crochet hook, and enjoy the soothing rhythm of creating your very own Rippling Waves Cowl!
Finished Size
6 x 28″
Materials
- Lion Brand Hometown USA (super bulky acrylic; 81 yds per 5 oz): 2 skeins Oklahoma City Green used in model
- Tunisian Crochet Hook Suggested Size: 12mm (or size to meet gauge) This isn’t a standard size hook, but a size P hook will work for most people since my tension is rather on the loose side anyway.
- Cable Stitch Holder
- Yarn needle (for weaving ends)
Special Stitches
Tunisian Knit Stitch (tks)
: Insert hook from front to back, between front and back vertical bars of same stitch, yarn over, pull loop through.Left-Leaning Cable (llc)
: On closing, extend first loop (working loop) and remove from hook, with non-hook hand, pinch next six stitches and remove from hook, place cable holder through three stitches closest to hook, move cable holder to front of work, place remaining three stitches back on hook, place stitches on cable holder back on hook (stitches are now crossed), place working loop back on hook and tighten as necessary, [yarn over, pull through two loops on hook] 3 times, chain one, [yarn over, pull through two loops on hook] 3 times.Right-Leaning Cable (rlc)
: On closing, extend first loop (working loop) and remove from hook, with non-hook hand, pinch next six stitches and remove from hook, place cable holder through three stitches closest to hook, move cable holder to back of work, place remaining three stitches back on hook, place stitches on cable holder back on hook (stitches are now crossed), place working loop back on hook and tighten as necessary, [yarn over, pull through two loops on hook] 3 times, chain one, [yarn over, pull through two loops on hook] 3 times.
Notes
For left-handers, the instructions for the cable lean are mirrored for you. For instance, placing the stitch holder in the back will actually produce a left-leaning cable. You aren’t doing anything incorrectly. It’s just the nature of cables. For this project, left-handers will have to flip the instructions in order to duplicate this cable.
When pulling up loops (part A) of the row, always skip the first stitch of the row.
There is a chain in the middle of each cable which begins on the first crossing. It allows the cables to open up on the fabric. It is there solely to allow the cables to sit nicely, and you will ignore it when pulling up stitches. It’s there. Just ignore it.
Gauge
9 stitches x 8 rows equals 4″ square in stitch pattern (Gauge isn’t extremely crucial for this project since you can easily add more rows as desired.)
Tunisian Crochet Pattern Instructions
Row 1:
A: Ch 14, sk first ch, *insert hook in back horizontal bar of next ch, yo, pull lp through, rep from * across–14 lps on hook (here and throughout).
B: Ch 1, yo, pull through 2 lps on hook across–1 lp rem on hook (here and throughout).
Rows 2-5:
A: tks across.
B: Ch 1, yo, pull through 2 lps on hook across.
Row 6:
A: tks across.
B: Ch 1, llc, rlc, yo, pull through 2 lps on hook.
Rows 7-11:
A: tks across.
B: Ch 1, *[yo, pull through 2 lps on hook] 3 times, ch 1, [yo, pull through 2 lps on hook] 3 times, rep from * once more, yo, pull through 2 lps on hook.
Row 12:
Rep row 6.
Rows 13-60:
Rep rows 7-12 consecutively.
Row 61:
*Insert hook in next stitch as for tks, yo, pull lp through stitch AND through lp on hook (sl st made), rep from * across, fasten off.
Finishing
With yarn needle, seam together first and last rows of project, weave in all ends securely.