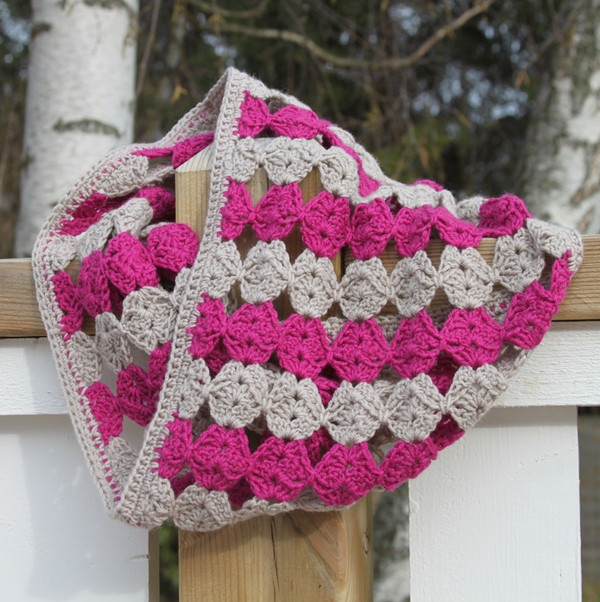
How to Crochet a Beautiful Cowl with Sublime Yarns Extra Fine Merino Wool

You’ll Need:
Sublime Yarns Extra Fine Merino Wool 4 ply (shades 173 and 006; 175m/191yds grey and 150m/164yds purple).
Crochet hook 3.5 mm.
Instructions
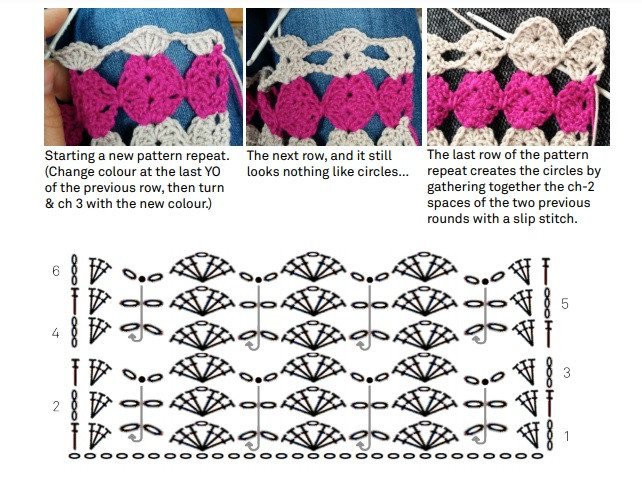
Each row of circles consists of three rows. When changing colors every three rows, you will have two loose ends at each color change. Don’t worry! You can work them into the edging stitches later. Along both sides as you work, you will have semicircles.
Foundation Chain (FC)
Chain multiples of 7 plus 5. For example:
- 21 + 5 ch will give you 2 circles and 2 semicircles on either side;
- 28 + 5 ch = 3 circles with 2 semicircles on either side;
- Chain 49 + 5 for 6 circles and 2 semicircles (24 cm/9.5 ins wide in fingering yarn).
Row Instructions
Row 1: 3 dc in 4th ch from hook, ch 2, sk nxt 6 ch, *(3 dc, ch 1, 3 dc) in nxt ch, ch 2, sk nxt 6 ch*; repeat from * to * across, ending with 3 dc in next to last ch, dc in last ch, turn.
Row 2: Ch 3 (counts as dc), sk 1st dc, 3 dc in nxt dc, ch 2, sk nxt ch-2 sp, *(3 dc, ch 1, 3 dc) in nxt ch-1 sp, ch 2, sk nxt ch-2 sp*; repeat from * to * across, ending with 3 dc in the last dc before the turning chs, dc in top of turning ch, turn.
Row 3: Ch 3 (counts as dc), sk 1st dc, 3 dc in nxt dc, ch 1, slst over nxt 2 ch-2 spaces in 2 rows below, ch 1, *(3 dc, ch 1, 3 dc) in nxt ch-1 sp; ch 1, slst over nxt 2 ch-2 spaces in 2 rows below, ch 1*; repeat from * to * across, ending with 3 dc in the last dc before the turning chs, dc in top of turning ch, turn.
Row 4: Ch 3 (counts as dc), sk 1st dc, 3 dc in nxt dc, ch 2, sk nxt 2 ch-1 spaces, *(3 dc, ch 1, 3 dc) in nxt ch-1 sp, ch 2, sk nxt 2 ch-1 spaces*; repeat from * to * across, ending with 3 dc in the last dc before the turning chs, dc in top of turning ch, turn.
Repeat rows 2-4 until you are happy with the size of your cowl.
Joining the Cowl
With the same color you worked for the FC and first row, slip stitch the cowl together by joining the FC to your final worked row. Work loosely, as slip stitches have less 'give' than other stitches—change to a larger hook if necessary. Match up the circles of your first and last row with wrong sides together. Where the tops of the circles meet, work 3 slip stitches through the top 3 stitches of the circles of the final row (purple in the picture below) and through the FC (grey). In the gaps between the circles, work 4 slip stitches into the FC. The exactness of the join is irrelevant; do what you think looks best—this is just a suggestion!
Creating a Scarf or Stole
If you wish to make a scarf or a stole, simply omit the join and work one more row.
Finishing & Edging
Work two rounds of edging around each side to tidy up, hide, and secure all those loose ends. The edging is worked into the sides of the semicircles, in rows back-and-forth on a scarf/stole or in joined rounds on a cowl. To make a scarf or stole, omit the join and replicate the FC across the top edge of the scarf/stole to achieve uniform ends. Do this by working one more row after your final pattern row, as follows:
- Scarf/Stole Final Row: Ch 1, sk 1st dc, slst in nxt dc, ch 5, sk nxt 2 ch-1 spaces, *slst into nxt ch-1 sp (at the top of the circle), ch 6, sk nxt 2 ch-1 spaces*; repeat * to * across, ending with ch 5, slst in last dc, slst in top of turning chains.
Create a fringed scarf by tying strands of yarn into the chain spaces at the ends.
Edging Rounds
Edging Round 1: Simply sc all along the side of the cowl/scarf/stole, working your loose ends into the stitches as you go. Work approximately 2 sc around the stem of each dc along the side (i.e., 6 sc into each semicircle). Join (or turn). The exact number of sc in this round (or row) doesn’t matter; the important thing is that the fabric doesn’t pucker and that the scs are evenly spaced out.
Edging Round 2: Hdc into each sc along/around. Join. Fasten off and weave in remaining ends, tidying up any ends that may be sticking out or showing through the edging rounds.