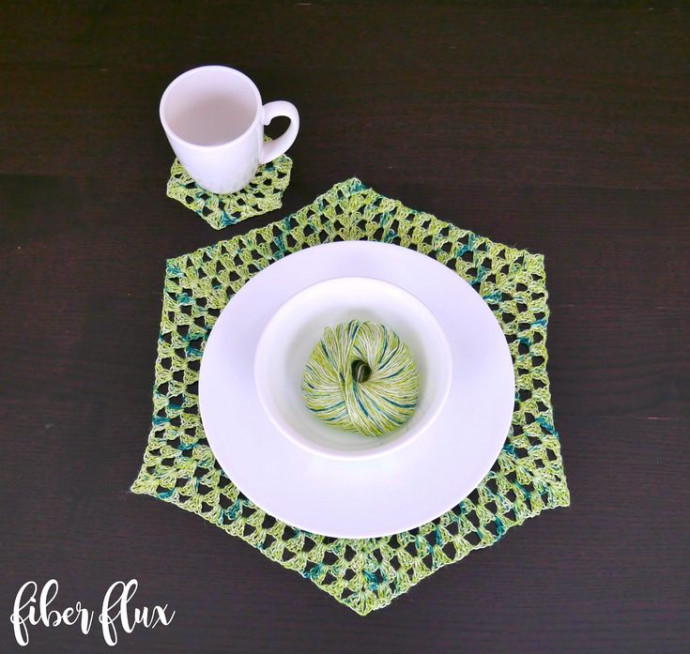
Crochet Placemat and Coasters

If you're looking to add a touch of charm to your dining table, crochet placemats and coasters are the way to go! These handmade pieces not only protect your table but also bring a cozy and inviting feel to your dining experience. Whether you're hosting a fancy dinner party or enjoying a casual family meal, these crochet creations are sure to impress your guests and make your table setting look effortlessly stylish. Plus, crafting them yourself can be a fun and rewarding activity, allowing you to customize the colors and patterns to match your personal style. So, grab your yarn and hook, and let's get crocheting some delightful placemats and coasters to elevate your dining decor in a friendly and creative way!
Materials
- 4.0 mm “G” crochet hook
- 2 balls of Twist by Mango Moon in the “Lime” colorway (I used one for the placemats, and another for the coasters)
- Tapestry Needle
- Scissors
Sizing
Placemat is 15 inches across at its widest points.
Coasters are 5 inches across at their widest points.
Abbreviations
- Chain (ch)
- Double Crochet (dc)
Beach Grass Crochet Placemat and Coasters
Instructions for Coasters
Creating the Coaster Base
Chain 4 and join into a ring with a slip stitch.
Round 1: Chain 4 (counts as a dc), then work (a dc into center of ring, chain 1) 11 times. Join to close with a slip stitch.
Note: If you want to make each round in the same color, simply slip stitch until you reach a ch 1 space and keep going. If you want to switch colors… cut yarn and join the new yarn at one of the ch 1 spaces and tie securely.
Building the Coaster Design
Round 2: Chain 3 and work a dc in the same space. Chain 1, then work two double crochet in the next (chain 1) space. Keep doing this all the way around, working 2 dc in each space, then a chain 1. Join to close with a slip stitch.
Round 3: Chain 4 and work 2 dc in the same space, then chain 1. In the next space, work three dc, then chain 1. Keep doing this all the way around the circle… 3 dc, then a chain 1 in each space. Join with a slip stitch to close.
Round 4 (circle becomes hexagon in this round): Chain 4, and in the first space work 2 dc, chain 1, then 3 dc all in the same space. This creates the first hexagon corner. In the next space, to work the hexagon side, chain 1, then work 3 dc in the next space. Keep going in this manner, working a corner of two “clusters” and a side of 1 cluster (each cluster being separated by a chain 1). Join with a slip stitch to close.
Fasten off and weave in ends.
Instructions for Placemat
Creating the Placemat Base
Chain 4 and join into a ring with a slip stitch.
Round 1: Chain 4 (counts as a dc), then work (a dc into center of ring, chain 1) 11 times. Join to close with a slip stitch.
Note: If you want to make each round in the same color, simply slip stitch until you reach a ch 1 space and keep going. If you want to switch colors… cut yarn and join the new yarn at one of the ch 1 spaces and tie securely.
Building the Placemat Design
Round 2: Chain 3 and work a dc in the same space. Chain 1, then work two double crochet in the next (chain 1) space. Keep doing this all the way around, working 2 dc in each space, then a chain 1. Join to close with a slip stitch.
Round 3: Chain 4 and work 2 dc in the same space, then chain 1. In the next space, work three dc, then chain 1. Keep doing this all the way around the circle… 3 dc, then a chain 1 in each space. Join with a slip stitch to close.
Round 4 (circle becomes hexagon in this round): Chain 4, and in the first space work 2 dc, chain 1, then 3 dc all in the same space. This creates the first hexagon corner. In the next space, to work the hexagon side, chain 1, then work 3 dc in the next space. Keep going in this manner, working a corner of two “clusters” and a side of 1 cluster (each cluster being separated by a chain 1). Join with a slip stitch to close.
Repeat round 4 until your hexagon has a total of 12 rounds or until placemat is desired size.
Fasten off and weave in any ends that remain.