Crochet Square Coasters

Introduction
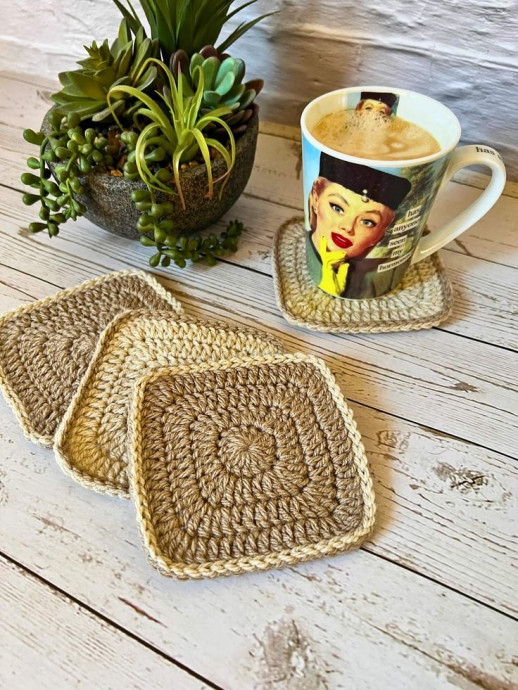
Crochet square coasters are the perfect addition to any home, adding a touch of charm and practicality to your living space. These adorable little squares not only protect your furniture from water rings and marks but also bring a cozy and handmade feel to your decor. Whether you're sipping on a hot cup of tea or enjoying a refreshing glass of lemonade, these charming coasters will be there to save the day. With endless possibilities for colors and patterns, they make for a fun and creative project that will surely brighten up your home and put a smile on your face.
Materials
Skill Level
Easy
Yarn
DK/8ply/Cat. 3 weight yarn recommended, ~5-8g/0.2-0.3oz per coaster. Worsted/10ply/Cat. 4 weight for larger sized coasters. Low-pill or non-pill, easy wash fibre (such as cotton, cotton blends, bamboo blends, and certain acrylics).
Hook
Use yarn label instructions as a guide for selecting hook size. Swatch to determine the optimal hook size for your tension.
Coaster Size
Varies with chosen yarn and number of completed rounds. ~11cm/4.5in square in DK for four rounds plus border round.
Gauge
Specific gauge not required.
Pattern Synopsis
Constructed in the round, using simple stitches only. Three border options provided.
Abbreviations
- ~ = Approximately.
- Beg = Beginning.
- Ch = Chain.
- DC = Double Crochet.
- DK = Double Knit yarn. Equivalent to an 8ply or light worsted weight yarn (slightly thicker than sport weight and slightly thinner than worsted weight).
- Fin = Finishing.
- HTR = Half Treble Crochet.
- Invis Join = Invisible Join. Refer to Special Stitch Instructions and YouTube tutorial.
- MC = Magic Circle.
- Prev = Previous.
- Rep = Repeat.
- Rnd = Round.
- Sl St = Slip Stitch.
- Spn St = Spin Stitch. Refer to Special Stitch Instructions and YouTube tutorial.
- St(s) = Stitch(es).
- TR = Treble Crochet. Refer to Special Stitch instructions.
- TRStndSt = Treble Crochet Standing Stitch. Refer to Special Stitch Instructions.
- WS = Wrong Side.
- Yo = Yarn over (hook).
Special Stitch Instructions
HTR
Yo twice, insert hook through st, yo, pull through a loop (four loops on hook), yo, pull yarn through first two loops on hook (three loops on hook), yo, pull yarn through all three loops on hook.
Invis Join
Note: This join is an optional and neater substitute for Sl St.
Remove loop from hook, insert hook from back to front (through BL and then FL) of st that join is to be made in, return yarn loop to hook, pull yarn through st (from front to back), gently pull yarn end to tighten join.
Spn St
Insert hook in st, yo, pull through a loop (two loops on hook), yo, pull yarn through first loop on hook (two loops on hook), spin hook 360° clockwise (a full rotation) on the horizontal plane, yo, pull yarn through both loops on hook.
TR
Yo twice, insert hook through st, yo, pull through a loop (four loops on hook), yo, pull yarn through first two loops on hook (three loops on hook), yo, pull yarn through first two loops on hook (two loops on hook), yo, pull yarn through both loops on hook.
TRStndSt
Note: Although TRStndSt will provide the best finish this can be substituted with (Ch 1, SC, Ch 3), any other chainless TR, or Ch 5.
Ch 1, SC in first st from prev rnd, Ch 1, SC in FLO of first SC (i.e. stacking second SC on top of first SC), Ch 1, SC in FLO of second SC (i.e. stacking third SC on top of second SC).
Pattern Instructions
Notes
- TRStndSt counts as a TR for st count purposes.
- Beg Ch 2, and fin Sl St do not count as a st.
- Work all sts in ( ) in same st from prev rnd.
- Rep st sequence in { } the number of times specified by the pattern instructions.
- If preferred, Invis Join can be substituted for Sl St.
- If making an optional border, work only one of the options (A or B or C).
- A st count follows each rnd instructions in ( ).
Beg Circle
Leaving a beg yarn tail of sufficient length to sew in, make a circle with either MC, or Ch 4 and Sl St into first ch.
Rnd 1
Ch 2, 16 DC in circle, Sl St into first DC. (16 DC)
Rnd 2
(TRStndSt, HTR) in first st, 2 DC in next st, DC in next st, 2 DC in next st, {(HTR, TR, HTR) in next st, 2 DC in next st, DC in next st, 2 DC in next st} rep three times in total, HTR in first st (alongside TRStndSt), Sl St into TRStndSt. (4 TR, 8 HTR, 20 DC)
Rnd 3
(TRStndSt, HTR) in first st, 2 DC in next st, DC in next five sts, 2 DC in next st, {(HTR, TR, HTR) in next st, 2 DC in next st, DC in next five sts, 2 DC in next st} rep three times in total, HTR in first st (alongside TRStndSt), Sl St into TRStndSt. (4 TR, 8 HTR, 36 DC)
If coaster is sufficient size, omit R4 and skip to Optional Border or Finishing instructions.
Rnd 4
(TRStndSt, HTR) in first st, 2 DC in next st, DC in next nine sts, 2 DC in next st, {(HTR, TR, HTR) in next st, 2 DC in next st, DC in next nine sts, 2 DC in next st} rep three times in total, HTR in first st (alongside TRStndSt), Sl St into TRStndSt. (4 TR, 8 HTR, 52 DC)
Optional Borders
Optional Border A – Surface Sl St
Note: Ensure all Sl St made with slightly looser than usual tension so there is no puckering of sides of coaster.
Sl St into every st around the square (fin in st that rnd commenced in). (St Count equals either Rnd 3 St Count or Rnd 4 St Count (depending on how many rnds completed prior to Border rnd))
Optional Border B – Zig Zag Sl St
(Ch 1, Sl St, Ch 1, Sl St) in first TR, (Ch 1, Sl St) in each st to next TR, {(Ch 1, Sl St, Ch 1, Sl St) in TR, (Ch 1, Sl St) in each st to next TR} rep three times in total, Sl St into first TR (that rnd commenced in). (St Count equals either Rnd 3 St Count plus 4 or Rnd 4 St Count plus 4 (depending on how many rnds completed prior to Border rnd))
Optional Border C – Spn St
Ch 1, 2 Spn St in first TR, Spn St in each st to next TR, {2 Spn St in TR, Spn St in each st to next TR} rep three times in total, Sl St into first TR (that rnd commenced in). (St Count equals either Rnd 3 Stitch Count plus 4 or Rnd 4 St Count plus 4 (depending on how many rnds completed prior to Border rnd))
Finishing
Fasten off yarn leaving a yarn tail of sufficient length to sew in. Sew in yarn ends securely on WS of coaster.
Thicker Coaster Variation
Make two squares by following instructions to either completion of Rnd 3 or Rnd 4.
With squares WS facing together, work an Optional Border rnd (using both loops of corresponding sts from each square) so that the squares are joined at each st around all sides.