Create Your Own Crochet Hook Case

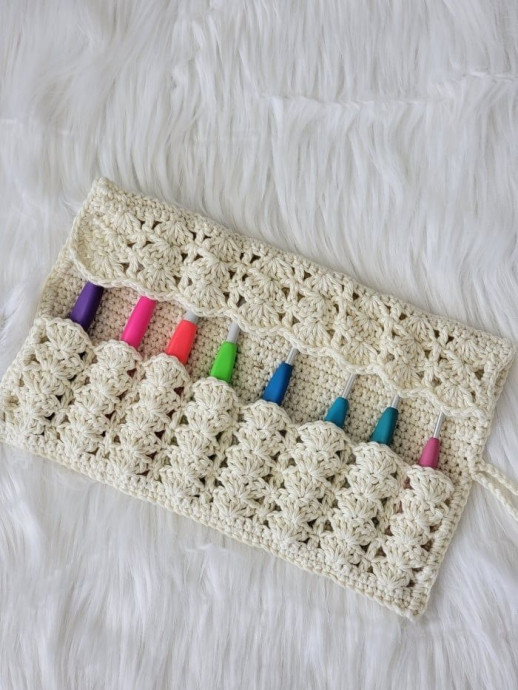
A crochet hook case is a must-have accessory for any crochet enthusiast! Not only does it keep your crochet hooks organized and easily accessible, but it also adds a touch of charm to your crafting supplies. With different compartments for various hook sizes and designs, you can say goodbye to rummaging through drawers and hello to a tidy and stylish storage solution. Whether you're working on a project at home or on the go, a crochet hook case will ensure that your hooks are always safely nestled in one convenient place. Happy crocheting!
Materials
- 1. Worsted weight, size 4 yarn. I Love this Cotton from Hobby Lobby in the color Ivory was used for this hook case. It is a soft 100% cotton yarn.
- 2. A G (4mm) hook
- 3. 1″ button for closure
- 4. Tapestry needle
- 5. Sewing needle and thread in the same Ivory color for attaching the buttons
Finished Size
12 inches wide and 7-1/4 inches tall
Yardage
1 skein of I Love this Cotton yarn or 175 yards of any other yarn of similar gauge
Stitch Abbreviations
- ch (chs): chain (chains)
- st (sts): stitch (stitches)
- sc: single crochet
- sl st: slip stitch
- dc: double crochet
Gauge
17 sc X 20 rows = 4 inches
Stitch Explanations
- shell: 5 dc sts worked into the same st.
- Back Loop Only(BLO): Work in the BLO (Back Loop only) means you should work your stitch inserting your hook just under the back loop of the st and leave the front loop free. See pic below.

Insert hook under the back loops only
Crochet Hook Holder Pattern
Ch 50 for a hook case that can hold 8 hooks. If you want it to hold more than 8 hooks, add chains in multiples of 6. For example, for 9 hooks, chain 56; for 10 hooks, chain 62, and so on.
Row Instructions
Row 1: 1 sc in 2nd ch from hook and each ch across to end, turn. (49 sc)
Row 2: Ch 1 (does not count as a st here and throughout), 1 sc in first st (same st as ch 1), 1 sc in each st across to end, turn. (49 sc)
Repeat Row 3 until your piece measures the same height as your tallest hook, then add 4 extra sc rows, but DO NOT fasten off.
Hook Pocket
Row 1: Ch 1, 1 sc in the BLO of first st, 1 sc in BLO of each st across to last st, 1 sc in last st (going under both the loops as usual), turn. (49 sc)
Notes
- You can now see a line of loops running on the surface. These are the front loops of the sts left free when we worked into the BLO. Working in the BLO will help our work fold neatly along this line.
- The next row is worked into both the loops as usual and NOT into BLO.
Row 2: Ch 1, 1 sc in first st, 1 sc in each st across to end, turn. (49 sc)
Row 3: Ch 3 (counts as a dc here and throughout), *(sk next 2 sts, shell in next st, sk next 2 sts, 1 dc in next st), repeat from * to end, turn. (8 shells)
Row Explanation
Note: The shells of the next row are worked into the middle dc of the shells from the previous row.
Row 4: Ch 3, *(sk next 2 sts, shell in next dc, sk next 2 sts, 1 dc in next dc between the shells), repeat from * and after working a shell on top of the last shell, 1 dc on top of beginning ch-3, turn. (8 shells)
Repeat Row 4 three times until you have 5 shell rows and fasten off.
Flap
We will now work a flap to keep the hooks from falling off.
Notes
- Lay your work flat and identify which side of the fabric has the free loops. This is the side where you should begin Row 1.
- Work Row 1 into the free loops on the foundation chain side, making sure to go under only one loop. This will help your work fold more easily.
Row 1: Sl st to the first free loop on the foundation ch side, 1 sc in first loop, 1 sc in each loop across to last loop, go under 2 loops in the corner and work your last sc, turn. (49 sc)
Row 2: Ch 1, 1 sc in first st, 1 sc in each st across to end, turn. (49 sc)
Row 3: Ch 3 (counts as a dc here and throughout), *(sk next 2 sts, shell in next st, sk next 2 sts, 1 dc in next st), repeat from * to end, turn. (8 shells)
Row Explanation
Note: The shells of the next row are worked into the middle dc of the shells from the previous row.
Row 4: Ch 3, *(sk next 2 sts, shell in next dc, sk next 2 sts, 1 dc in next dc between the shells), repeat from * and after working a shell on top of the last shell, 1 dc on top of beginning ch-3, turn. (8 shells)
Repeat Row 4 once more until you have 3 shell rows and fasten off.
Closing the Sides of the Hook Pocket

Fold the hook pocket with 5 shell rows and work a row of sc along the edge as shown
Now, fold the hook pocket with the five shell rows (see pic above). Starting from the corner of the fold, work sc, going through both layers at the hook pocket to close the side. Then, continue to sc through one layer of fabric until you reach the end of the flap, and fasten off at the corner.
On the opposite edge, start working sc from the corner of the flap. When you reach the middle of the hook case, ch 24 for the button loop. Continue working sc, and when you reach the hook pocket fold, work through both layers until you reach the bottom corner. Fasten off.
Dividing the Hook Pocket

3. Sew along the dc sts between the shells
The hook pocket now needs to be divided into smaller sections to hold individual hooks. To do this, use a 1.5-yard strand of yarn and a tapestry needle to sew along the dc stitches that run between the shells (see pic above). Remember to reinforce both the beginning and the end. While sewing, make sure to leave only tiny specks of yarn on the outer surface of the hook case by using very small stitches.
I used the same strand of yarn, and after sewing along one line of dc stitches, I ran my needle in and out through the sc sts to reach the next line of dc. Then I continued sewing along that line. I was able to finish 4 lines using 1 strand, and this helped me minimize the amount of weaving in.
Finishing
- Weave in any remaining tails along the inside of the fabric through the sc stitches.
- Place all your hooks inside the case, roll it up, pull the loop, and determine the position for your button. Mark this spot with a stitch marker, then sew the button in place.