Create Your Own Crochet Hook Case

Ah, the wonderful world of crochet hook cases! They are like cozy homes for our beloved crochet hooks, keeping them safe and organized. Not only do they prevent hooks from getting lost in the depths of our crafting supplies, but they also add a touch of charm to our creative space. With various styles, colors, and sizes to choose from, these cases are not just practical but also a fun way to express our personality. Whether you prefer a sleek and compact design for on-the-go crocheting or a larger one to store a whole collection, there's a crochet hook case out there just waiting to be your hooks' new best friend!
Crochet Hook Case Pattern
Skill Level: Beginner
Gauge: 21 sts x 28 rows of pattern = 4 inches
Finished Size: 6.5 x 7 inches
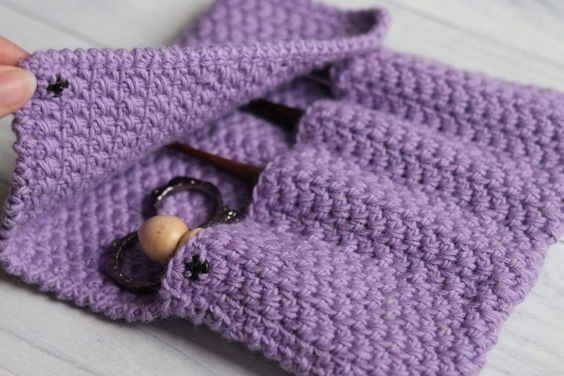
Yarn: Whims Merino by Furls Fiberarts (50% Fine Superwash Merino Wool, 50% nylon; Approx. 182 yds, 166 m). Light Weight (3). You will need 1 skein/case. Colour Shown: Lavender.
Hook: Size E/4 (3.5 mm) Hook. Adjust hook size if necessary to obtain correct gauge.
Notions: Yarn needle, 2 snap fasteners (I used a 9 mm), straight pins, personal tag or other embellishments.
Stitches and Abbreviations
- Ch – Chain
- Rpt – Repeat
- Rsc – Reverse Single Crochet
- Sc – Single Crochet
- Sk – Skip
- Sl St – Slip Stitch
- Spike – Spike Stitch (Single crochet inserting your hook into the next stitch 2 rows below)
- Yo – Yarn Over
Pattern Notes
- Pattern is written in American English terms.
- Weave in ends as needed.
- To adjust the size of your case, you will need an even number of stitches in your foundation chain.
Free Crochet Pattern
Ch 32.
Row 1: Sc in the 2nd ch from hook and in each stitch across. Ch 1, turn. (31 sts)
Row 2: Sc in the 1st stitch, *spike in the next stitch two rows below, sc in the next stitch; repeat from * across. Ch 1, turn.
Row 3: Sc in each of the first 2 stitches, *spike in the next stitch, sc in the next stitch; repeat from * across, sc in the final stitch. Ch 1, turn.
Continue to repeat rows 2 and 3 until work from the beginning measures approximately 14 inches. Fasten off and weave in your ends.
To Create the Case
Fold up the bottom of the case to approximately 4.5 inches. This will form the bottom pocket in which your hooks will sit. Pin in place.
Edging
Join your yarn with a slip stitch in the bottom right corner of your case. Working through both thicknesses, evenly work reverse single crochet stitches all the way along the side of your case. As there are no clear places to insert your hook, simply insert where comfortable and work the stitch. At the top, work 2 reverse single crochet stitches in the corner stitch, work a reverse single crochet in each stitch across the top, 2 more reverse single crochets in the corner, and then evenly along the final side, working through both thicknesses when you come to the pocket.
Fasten off and weave in your ends.
To Create the Hook Pockets
Each of my hook pockets is approximately 1.5 inches wide. You can adjust the size of these pockets if desired. At 1.5 inches, I was able to create spots for three crochet hooks and one for notions.
From the right edge of your case, measure 1.5 inches and mark with a straight pin. Do the same twice more from each pin. Next, join your yarn at the bottom of the case at the first pin through both thicknesses. Sew, working through both thicknesses a line following your pin up to the top of the pocket. Fasten off, weave in your ends. Repeat twice more.
Fasten your snaps to the top two corners of your hook case. Add any embellishments desired and enjoy!