Crochet Dorothy Doll Tutorial

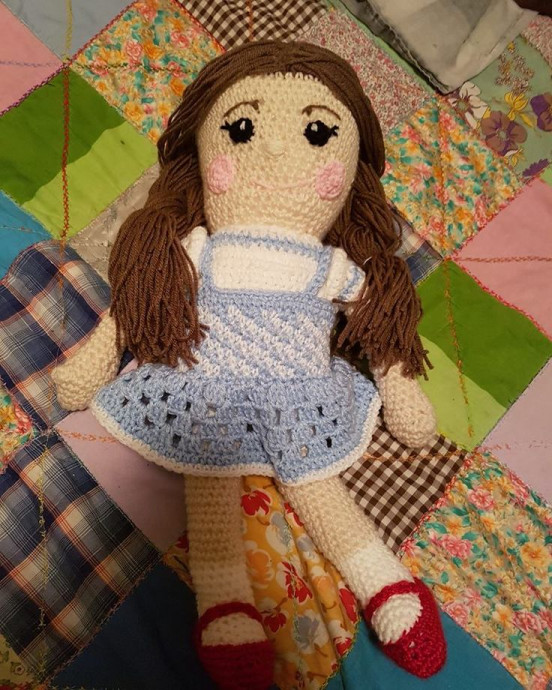
The crochet Dorothy Doll is an absolute delight to make! With its charming red shoes, blue gingham dress, and sweet braided hair, this little doll brings a touch of whimsy to any project. Whether you're a seasoned crocheter or just starting out, creating the Crochet Dorothy Doll is a fun and rewarding experience. So gather your yarn, crochet hook, and get ready to bring a piece of the Wizard of Oz magic to life with this adorable and friendly project.
Materials Required
- Crochet hook to gauge of yarn (I used 3.5)
- Yarn Needle
- Fiber Fill Stuffing
- Stitch marker – can be very helpful
- Medium worsted weight yarn in:
- brown
- skin tone
- black
- white
- light pink
- light blue
- red
Abbreviations
- rd – round
- hk – hook
- ch- chain
- sc – single crochet
- sc2tog – single crochet 2 stitches together (also known as a decrease)
- hdc – half double crochet
- dc – double crochet
- sl st – slip stitch
- 5dc-bobble – 5 double crochet bobble stitch
- fsc – foundation single crochet. Alternatively, ch 1 extra stitch and sc down the ch
- st – stitch
- ea – each
- fo – fasten off
- sk – skip
- sp – space
Creating the Head
Beginning with the Head in brown and working in continuous rounds:
RND 1: ch 2, 8sc in 2nd ch from hk (8)
RND 2: 2 sc around (16)
RND 3: (sc, 2sc) around (24)
RND 4: (sc in 2, 2sc) around (32)
RND 5: (sc in 3, 2sc) around (40)
RND 6: (sc in 4, 2sc) around (48)
RND 7: (sc in 5, 2sc) around (56)
RND 8-12: sc around (56)
FO brown, Attach skin tone.
RND 13-20: sc around (56)
RND 21: (sc in 5, sc2tog) around (48)
RND 22-24: sc around (48)
RND 25: (sc in 4, sc2tog) around (40)
RND 26: sc around (40)
RND 27: (sc in 3, sc2tog) around (32)
Continue Working to Create the Neck
RND 28: (sc in 2, sc2tog) around (24)
RND 29-30: sc around (24)
Note – if preferred, do the facial features now (pattern at bottom) or you can sew them on last like I did.
Creating the Body
RND 31: (sc in 2, 2sc) around (32)
RND 32: sc around (32)
RND 33: (sc in 3, 2sc) around (40)
RND 34-47: sc around (40)
(underwear) Switch to white, FO skin tone.
RND 48-50: sc around (40)
sl st, FO. Finish stuffing.
Creating the Legs and Feet
Set aside the top half of Dorothy and create the legs and feet:
White Socked Feet (Make 2)
RND 1: ch 2, 6 sc in 2nd ch from hk (6)
RND 2: 2 sc around (12)
RND 3: (sc, 2sc) around (18)
RND 4-7: sc around (18)
Switch to working in rows:
Row 1: sc in 16 (16)
Row 2-4: ch 1, turn, sc in 16 (16)
Heel
Now you will sl st down the side and work on creating the flap that will form the heel:
Row 1: ch 1, turn, sl st in 7, sc in 4
Row 2-5: ch 1, turn, sc in 4
Completing the Top of the Sock
Switch back to working in rounds:
RND 1: lift the heel flap to the top of the sock, ensuring the heights match. sc around (16)
RND 2-5: sc around (16).
sl st, FO. Sew the holes closed on either side of the heel flap.
Creating the Legs
Attach skin tone to the top of the sock (make 2)
RND 1-19: sc around (16)
(underpants) switch to white/ fo skin tone:
RND 20-23: sc around (16)
sl st, FO. Stuff socks and legs.
Sew to the bottom of the body, leaving the 4 center stitches unworked. Sew the stitches between both legs closed.
Creating the Arms
Arms in skin tone (make 2)
RND 1: ch 2, 6sc in 2nd ch from hk (6)
RND 2: 2sc around (12)
RND 3: sc around (12)
RND 4: (sc, 2sc) around (18)
RND 5: sc around (18)
RND 6: (creates thumb): sc, 5dc-bobble, sc in 16 (18)
RND 7: sc around (18)
RND 8: (sc, sc2tog) around (12)
RND 9-28: sc around (12)
Stuff, sl st, FO, and sew to body.
Ruby Red Slippers
In red (make 2)
RND 1: ch 12, sc in 10, 3 sc in last st, turn to work in the foundation of ch, sc in 9, 3sc in last st (25)
RND 2: sc in 5, hdc in 5, 2hdc, 3hdc, 2hdc, hdc in 5, sc in 5, 3sc in 2 (33)
RND 3: sc in 11, (2sc, sc)x3, sc in 11, 2sc, sc in 2, 2sc, sc (38)
RND 4: sc around (38)
RND 5: sc in 11, (sc2tog)x4, sc in 19 (34)
RND 6: sc in 10 (sc2tog)x4, sc in 16 (30)
RND 7: sc in 21, hdc in 9 (30)
sl st, FO, and sew onto the foot.
Shoe Strap in Red
Row 1: ch 13, sc in 2nd ch from hk and in next 11 ch. FO and sew across the foot to either side of the shoe.
Shirt Assembly
The shirt will be sewn directly onto Dorothy – in white:
RND 1: ch 49, sl st closed, sc around (49) (ensure fit around Dorothy)
RND 2-17: sc around (49) sl st, FO
Sew the shirt to the body so that the top of the shirt is directly beneath her arms and the bottom attaches to the underwear.
Shirt Collar
Row 1: In white: ch 40, sc in 2nd ch from hk and in next 38 ch (39)
Row 2: FO white, switch to blue: sc across (39)
Row 3: FO blue, switch to white: sc across (39) sl st FO
Sew the collar around the neck and to the shirt, sewing around the arms, so that the collar also acts as the beginning of a sleeve.
Sleeve Assembly
In white (make 2)
RND 1: fsc 14, sl st closed (make sure it does not twist)
RND 2: 2sc around (28)
RND 3: dc around (28)
RND 4: sc in 28
RND 5: sc2tog (14). sl st, FO
Edging
RND 1: Attach blue to the foundation ch of rd 1 and sc around (14)
RND 2: FO blue, switch to white, sc around (14).
sl st, FO. Sleeves should look puffed. Sew the puffed end around the arm to the shirt, so that the blue side is closest to the hand.
Dress Assembly
Begin with blue (note the dress is not sewn to Dorothy and can be removed)
RND 1: ch 51, sc in 50, sl st closed
If desired, use tapestry crochet to create a white and blue checkered appearance:
RND 2-9: sc around, alternating white in blue in 2 stitches (50)
RND 10: FO white. sc around (50)
RND 11: ch 3, 2dc, ch 1, (sk 1 sc, 3dc in next sc, ch 1) around, sl st to top of ch 3 sp
RND 12-14: ch 3, 2dc, ch 1, (3dc in ch 1-sp, ch 1) around (don’t worry about the number of stitches – we want the dress to flow out)
RND 15: hdc in each st and ch 1 sp around
RND 16: FO blue, reattach white, sc around
Top of Dress Edging
Reattach blue to the top of the dress and sc around (50). sl st, FO
Straps in Blue
fsc 20, sew to the front and back of dress, leaving approx 9 center stitches between straps.
Creating the Face
Eyes in Black (Make 2)
RND 1: ch 2, 6sc in 2nd ch form hk. sl st closed and FO. Sew on a white twinkle. Sew eyes to face and embroider lashes.
Eyebrows
Embroider with brown.
Smile
Embroider in pink.
Nose
Embroider in skin tone.
Cheeks in Pink (Make 2)
RND 1: ch 2, 5sc in 2nd ch form hk (5)
RND 2: 2sc around (10). sl st, FO, and sew to face.
Hair in Brown
Cut long strands of brown yarn. Attach hair by knotting it to the head. Work from the beginning of the brown part of her head to approx half way down the back of her head and give her a center part. Braid on either side of the part and tie with blue yarn.
Finishing
Ensure all your loose ends are weaved in.