Deprecated: Creation of dynamic property myadv::$cms_config is deprecated in /home/www/web/craftorator.com/public_html/system/core/controller.php on line 156
Deprecated: Creation of dynamic property myadv::$cms_user is deprecated in /home/www/web/craftorator.com/public_html/system/core/controller.php on line 156
Deprecated: Creation of dynamic property myadv::$cms_config is deprecated in /home/www/web/craftorator.com/public_html/system/core/controller.php on line 156
Deprecated: Creation of dynamic property subscribe::$cms_config is deprecated in /home/www/web/craftorator.com/public_html/system/core/controller.php on line 156
Deprecated: Creation of dynamic property tune::$cms_config is deprecated in /home/www/web/craftorator.com/public_html/system/core/controller.php on line 156
Deprecated: Creation of dynamic property myvotes::$cms_config is deprecated in /home/www/web/craftorator.com/public_html/system/core/controller.php on line 156
Deprecated: Creation of dynamic property mybookmarks::$cms_config is deprecated in /home/www/web/craftorator.com/public_html/system/core/controller.php on line 156
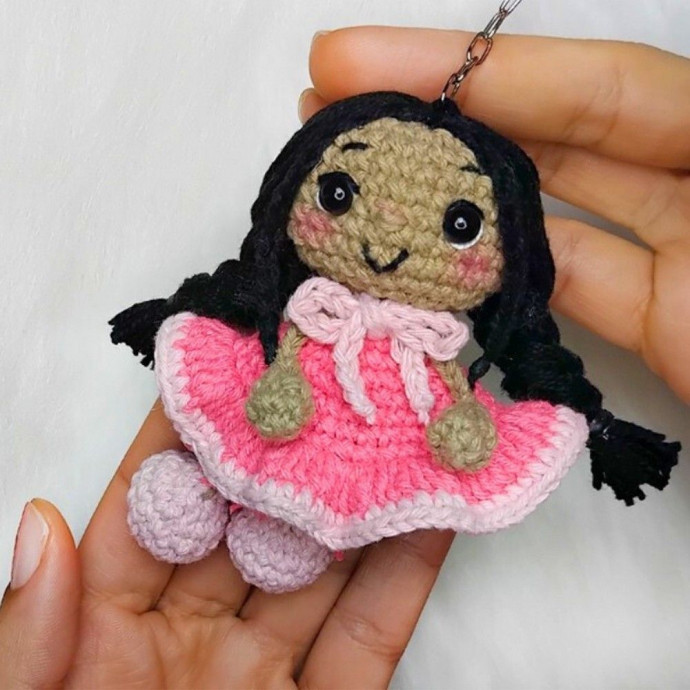
How to Crochet a Mini Doll Keychain
Deprecated: Creation of dynamic property cmsCore::$cats_by_ids is deprecated in /home/www/web/craftorator.com/public_html/system/controllers/tune/frontend.php on line 1521

Deprecated: Creation of dynamic property printview::$cms_config is deprecated in /home/www/web/craftorator.com/public_html/system/core/controller.php on line 156
Deprecated: Creation of dynamic property tune::$cms_config is deprecated in /home/www/web/craftorator.com/public_html/system/core/controller.php on line 156
Deprecated: Creation of dynamic property tune::$cms_config is deprecated in /home/www/web/craftorator.com/public_html/system/core/controller.php on line 156
Deprecated: Creation of dynamic property myadv::$cms_config is deprecated in /home/www/web/craftorator.com/public_html/system/core/controller.php on line 156
Deprecated: base64_decode(): Passing null to parameter #1 ($string) of type string is deprecated in /home/www/web/craftorator.com/public_html/system/controllers/myadv/model.php on line 30
Deprecated: base64_decode(): Passing null to parameter #1 ($string) of type string is deprecated in /home/www/web/craftorator.com/public_html/system/controllers/myadv/model.php on line 30
Deprecated: Creation of dynamic property myadv::$cms_config is deprecated in /home/www/web/craftorator.com/public_html/system/core/controller.php on line 156
Deprecated: Creation of dynamic property myadv::$cms_user is deprecated in /home/www/web/craftorator.com/public_html/system/core/controller.php on line 156
Deprecated: Creation of dynamic property myadv::$cms_config is deprecated in /home/www/web/craftorator.com/public_html/system/core/controller.php on line 156
Deprecated: Creation of dynamic property myadv::$cms_config is deprecated in /home/www/web/craftorator.com/public_html/system/core/controller.php on line 156
Deprecated: Creation of dynamic property myadv::$cms_user is deprecated in /home/www/web/craftorator.com/public_html/system/core/controller.php on line 156
Deprecated: Creation of dynamic property tune::$cms_user is deprecated in /home/www/web/craftorator.com/public_html/system/core/controller.php on line 156
Deprecated: Creation of dynamic property tune::$image_index_to_html is deprecated in /home/www/web/craftorator.com/public_html/system/controllers/tune/frontend.php on line 3176
Deprecated: Creation of dynamic property myadv::$cms_config is deprecated in /home/www/web/craftorator.com/public_html/system/core/controller.php on line 156
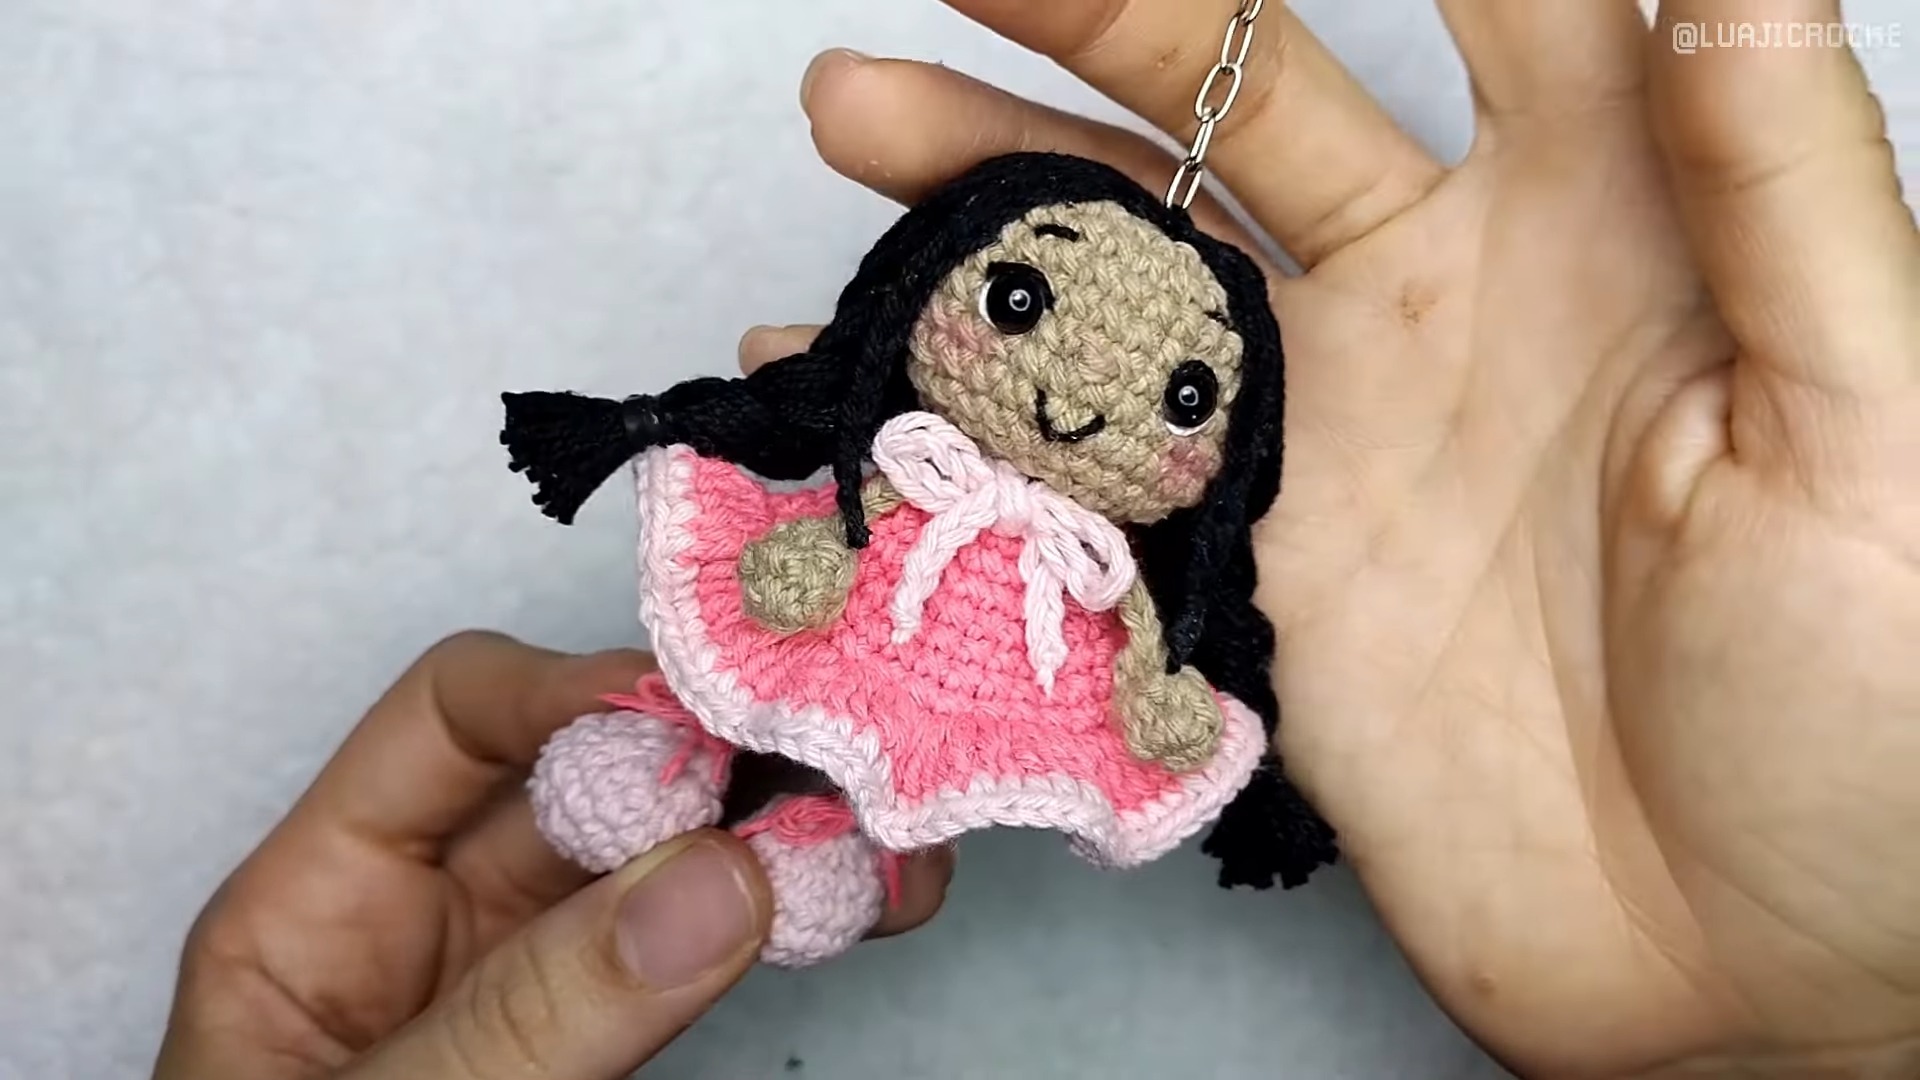
Crocheting a mini doll keychain can be such a delightful and fun project to work on! Not only does it give you the opportunity to unleash your creativity, but it also results in a cute and personalized accessory. You can choose your favorite colors, experiment with different stitches, and add tiny details to make your mini doll keychain truly unique. Whether you're a beginner or an experienced crocheter, this project is perfect for anyone looking for a quick and enjoyable craft to brighten up their day. So grab your crochet hook, pick out some yarn, and get ready to create a mini doll keychain that will bring a smile to your face every time you use it!
Materials and Techniques
To get started, gather the following materials:
- Yarn: Skin-colored yarn for the body, and two different colors for the dress, shoes, and hair. Light pink and black work great for classic styles.
- Crochet Hook: 2.5mm hook (or size appropriate for tightening your stitches).
- Stuffing: Small amount to fill the head, body, and feet.
- Optional Tools: Stitch marker, fabric glue, keyring (if making a keychain), and blush for finishing touches.
Key Techniques Used:
- Magic Ring
- Single Crochet (sc)
- Increase and Decrease (to shape parts of the doll like the head and dress)
- Making Chains (for arms and legs)
- Closing stitches or weaving in loose ends
Step-by-Step Instructions
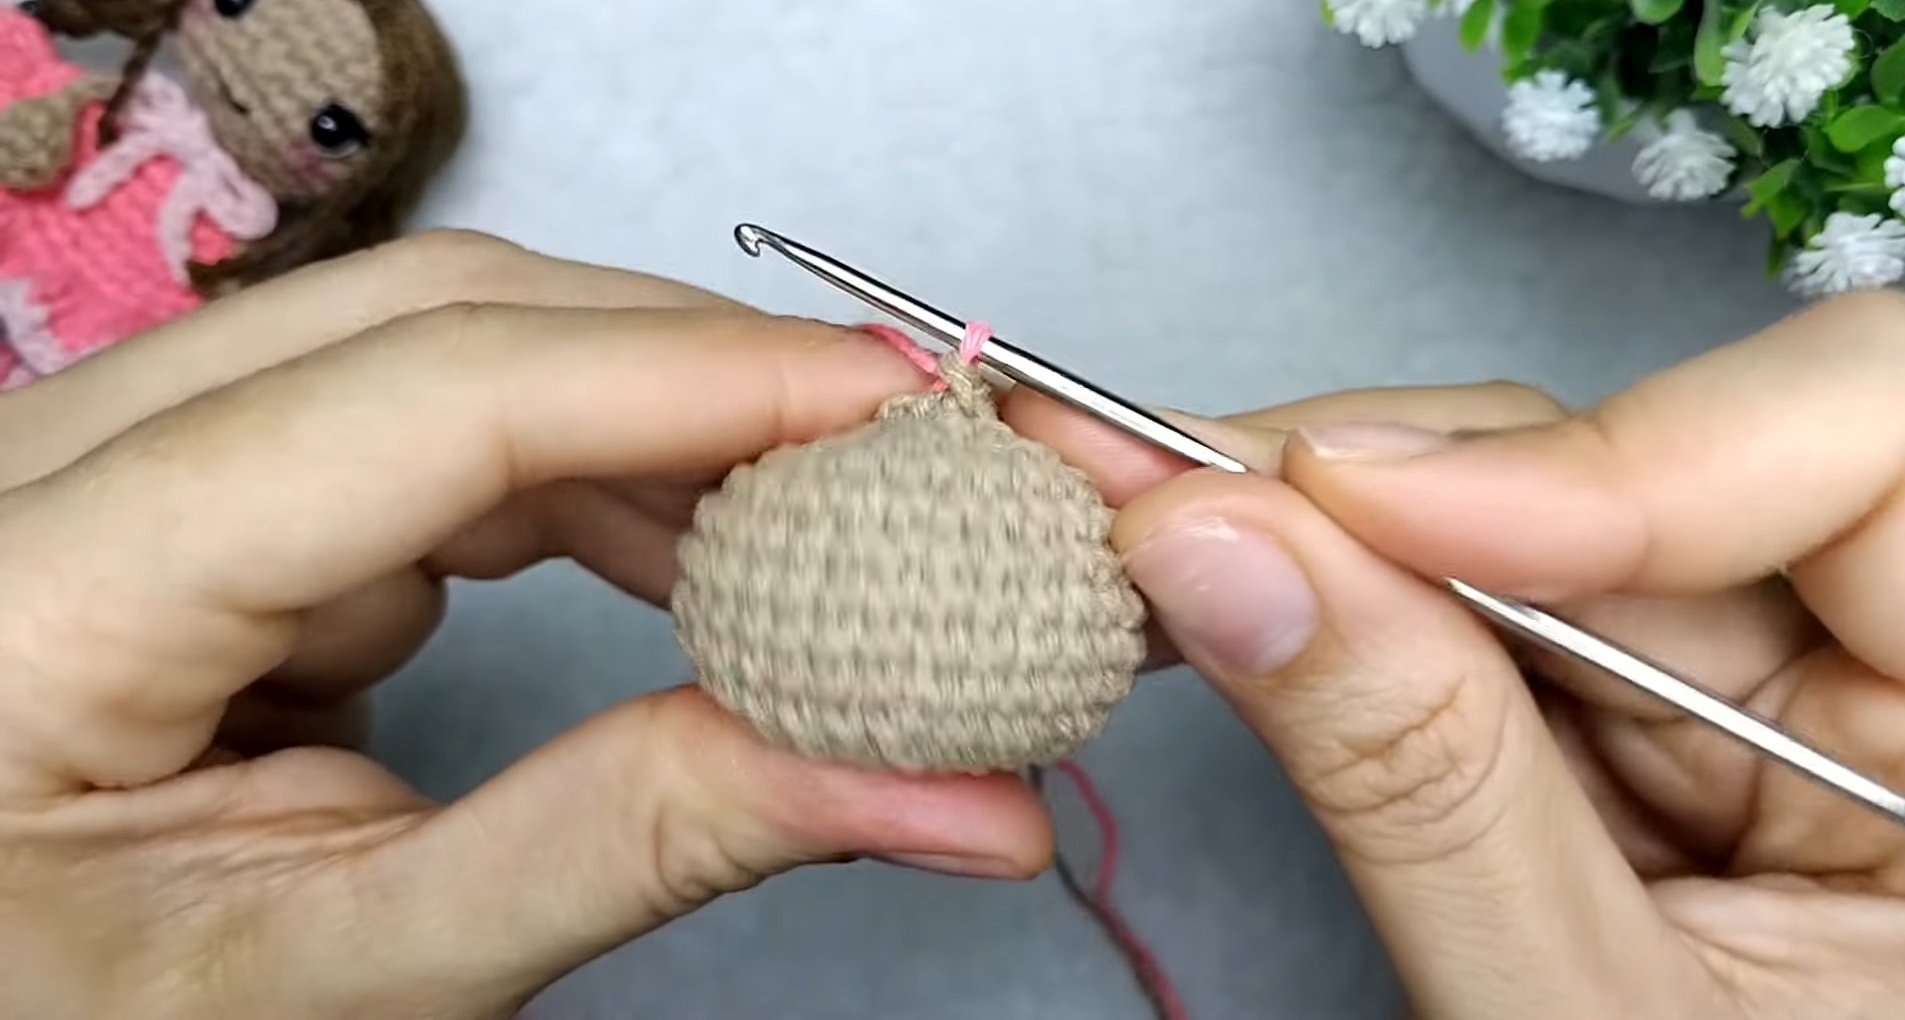
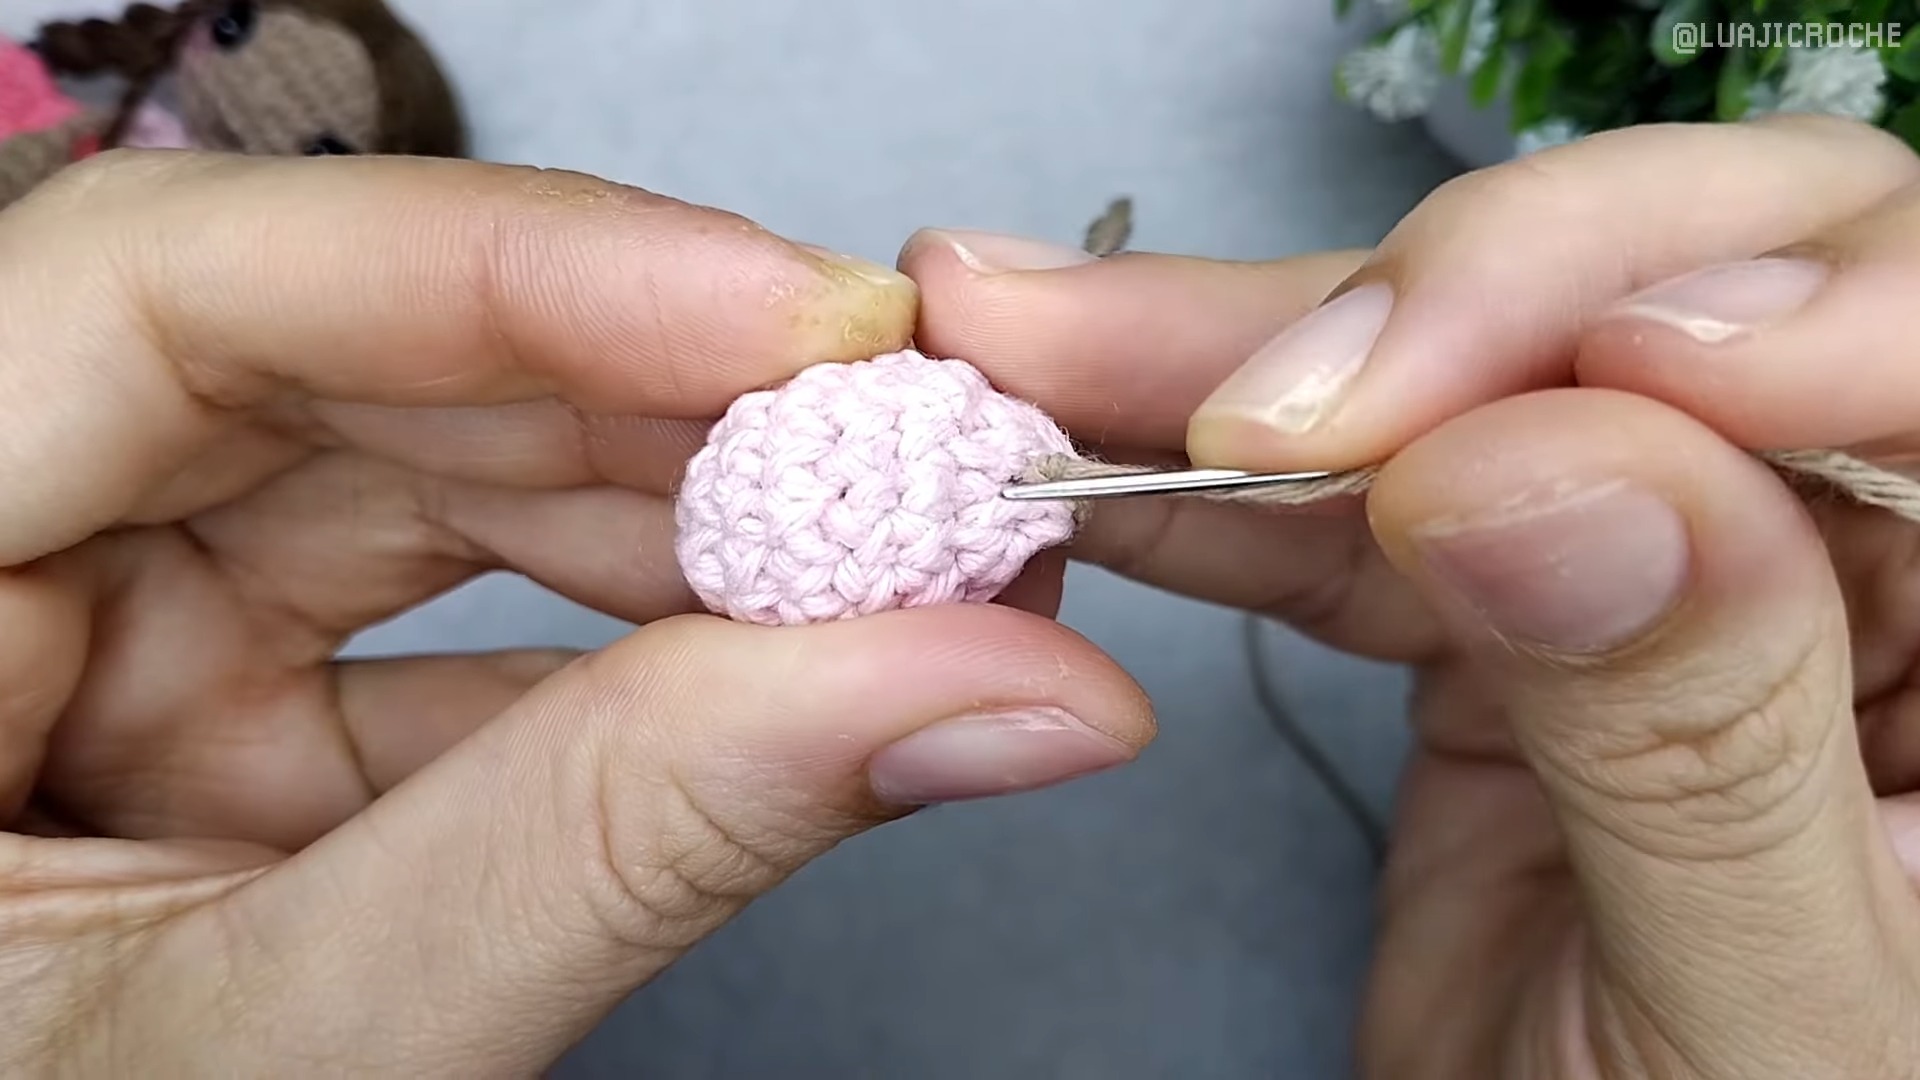
1. Making the Head
Round 1: Start with a magic ring. Crochet 6 single crochets (sc) into the ring.
Round 2: Make 2 single crochets in each stitch (6 increases) to end up with 12 stitches. Use a stitch marker if needed.
Rounds 3–5: Gradually increase by following the pattern: 1 sc + 1 increase, then 2 sc + 1 increase, etc., until there are 30 stitches.
Rounds 6–10: Work 30 sc for each round to build the head evenly.
Rounds 11–14: Gradually decrease (e.g., 3 sc + 1 decrease, 2 sc + 1 decrease, etc.) until the head is closed with 6 stitches. Change yarn to your dress color before completing the last decrease.
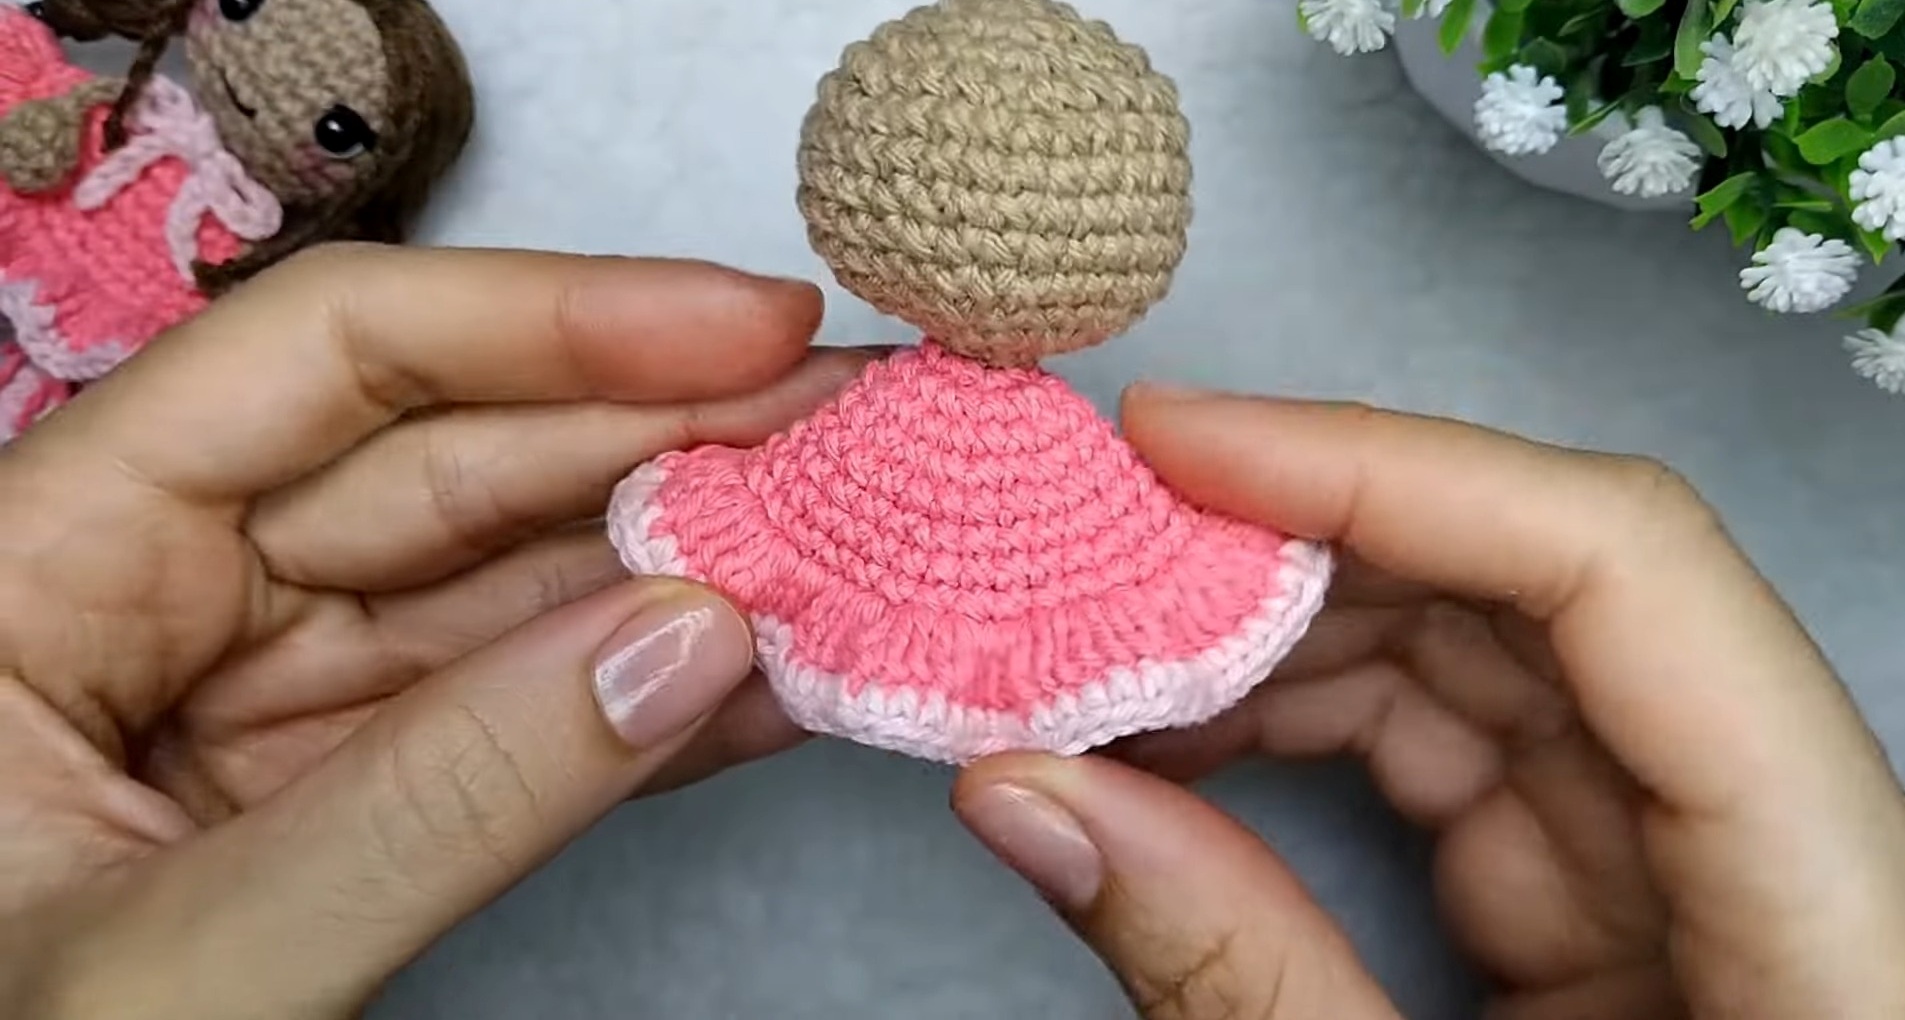
2. Crafting the Dress
Round 1: Make 6 increases into the front loops of the final head stitches to begin the dress ruffle (12 stitches). Tie the yarn securely and hide loose ends.
Rounds 2–8: Work in rounds, alternating between single crochets and increases, until you achieve 30 stitches and a more elaborate design.
Round 9: Add ruffles by crocheting 3 double crochets in each stitch (ending with 90 stitches). Finish with a slip stitch, switch to a second dress color, and add finishing single crochets for polish.
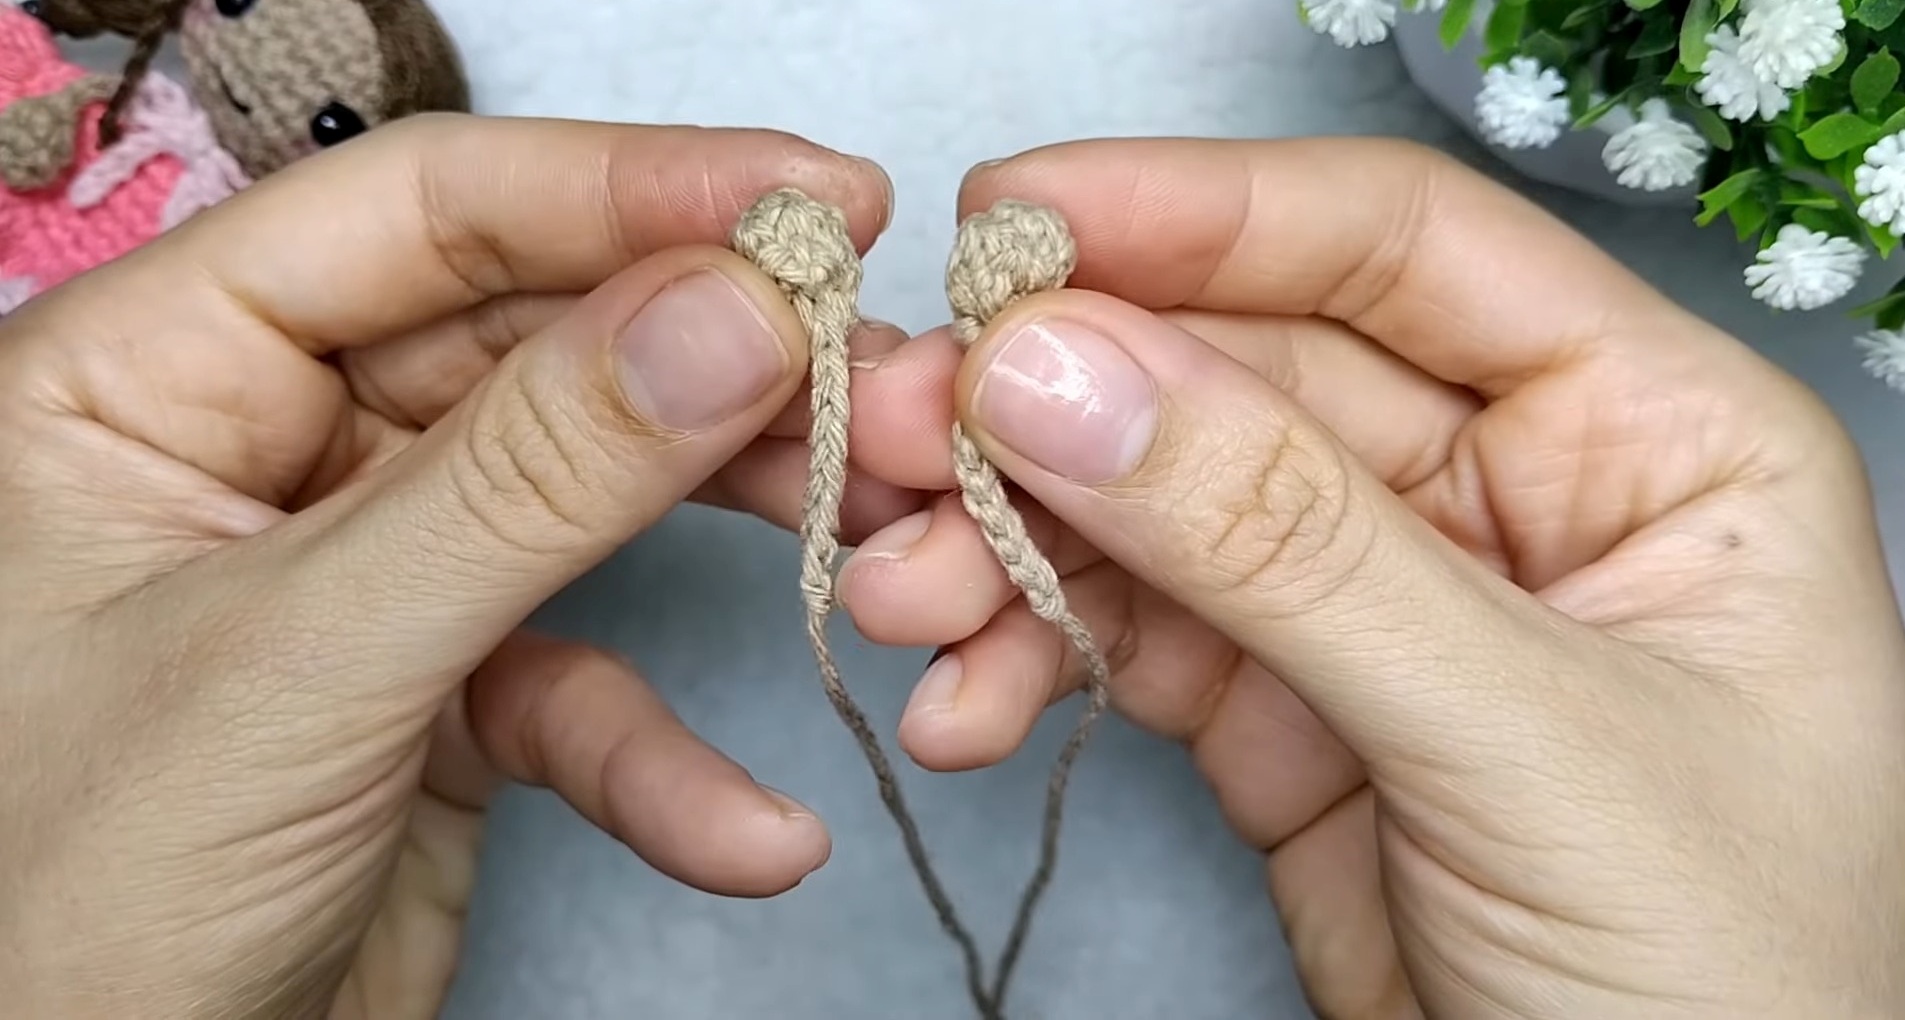
Creating the Arms
Start with a magic ring and crochet 5 sc.
Round 2: Add 5 increases (10 stitches).
Round 3: Make decreases to close the hand (5 stitches). Thread yarn through the front loops to close, then chain 9 stitches to form the arm. Repeat for the second hand.
Making the Legs
Follow similar decreases as the arms: Start with a magic ring, increase up to 15 stitches, and taper down. Add stuffing before closure. Finish by attaching 18 chains for the legs. Repeat for both legs.
Assembly and Details
Sew arms and legs securely to the body. Position arms at the dress-line and legs at the bottom of the body. Use careful placement to ensure symmetry.
Add hair by wrapping yarn around fingers for pigtails. Secure with fabric glue, braid loose strands, and tie using matching yarn.
Attach eyes on the 7th row with space between. Add a small embroidered nose and smile just below the eyes.
Size Adjustments
The Crochet Mini Doll can be customized easily:
- Larger Size: Use thicker yarn and a larger crochet hook.
- Smaller Size: Use finer yarn and a smaller hook.
- Dress Variations: Extend the skirt with more rows, or change the stitch type for different effects.
- Want shorter pigtails or different hairstyles? Adjust the hair length before braiding or experiment with curls using smaller yarn loops.
Deprecated: Creation of dynamic property tune::$cms_config is deprecated in /home/www/web/craftorator.com/public_html/system/core/controller.php on line 156
Deprecated: Creation of dynamic property myadv::$cms_config is deprecated in /home/www/web/craftorator.com/public_html/system/core/controller.php on line 156
Deprecated: Creation of dynamic property myadv::$cms_config is deprecated in /home/www/web/craftorator.com/public_html/system/core/controller.php on line 156
Deprecated: Creation of dynamic property myadv::$cms_user is deprecated in /home/www/web/craftorator.com/public_html/system/core/controller.php on line 156
Deprecated: Creation of dynamic property Myseo::$cms_config is deprecated in /home/www/web/craftorator.com/public_html/system/core/controller.php on line 156
Deprecated: Creation of dynamic property tune::$cms_config is deprecated in /home/www/web/craftorator.com/public_html/system/core/controller.php on line 156
Deprecated: Creation of dynamic property Myseo::$cms_template is deprecated in /home/www/web/craftorator.com/public_html/system/core/controller.php on line 156
Deprecated: Creation of dynamic property cmsCore::$renderedContentItem is deprecated in /home/www/web/craftorator.com/public_html/templates/m1/controllers/content/item_view.tpl.php on line 6
Deprecated: Creation of dynamic property tune::$cms_config is deprecated in /home/www/web/craftorator.com/public_html/system/core/controller.php on line 156
Deprecated: Creation of dynamic property myadv::$cms_config is deprecated in /home/www/web/craftorator.com/public_html/system/core/controller.php on line 156
Deprecated: Creation of dynamic property myadv::$cms_config is deprecated in /home/www/web/craftorator.com/public_html/system/core/controller.php on line 156
Deprecated: Creation of dynamic property myadv::$cms_user is deprecated in /home/www/web/craftorator.com/public_html/system/core/controller.php on line 156
Deprecated: Creation of dynamic property tune::$cms_config is deprecated in /home/www/web/craftorator.com/public_html/system/core/controller.php on line 156
Deprecated: Creation of dynamic property tune::$cms_config is deprecated in /home/www/web/craftorator.com/public_html/system/core/controller.php on line 156
Deprecated: Creation of dynamic property myreauth::$cms_config is deprecated in /home/www/web/craftorator.com/public_html/system/core/controller.php on line 156
Deprecated: Creation of dynamic property tune::$cms_config is deprecated in /home/www/web/craftorator.com/public_html/system/core/controller.php on line 156
Deprecated: Creation of dynamic property tune::$cms_config is deprecated in /home/www/web/craftorator.com/public_html/system/core/controller.php on line 156