How to Crochet Toad and Toadette Dolls

Crocheting a Toad and Toadette doll is a delightful project that brings whimsical characters to life through yarn and creativity. These charming creations make perfect companions for imaginative play or unique décor pieces for any space. With their cute details and vibrant colors, the crochet Toad and Toadette dolls are sure to bring smiles to both children and adults alike. So grab your hooks and yarn, and let's crochet these adorable characters that are bound to add a touch of whimsy to your world!
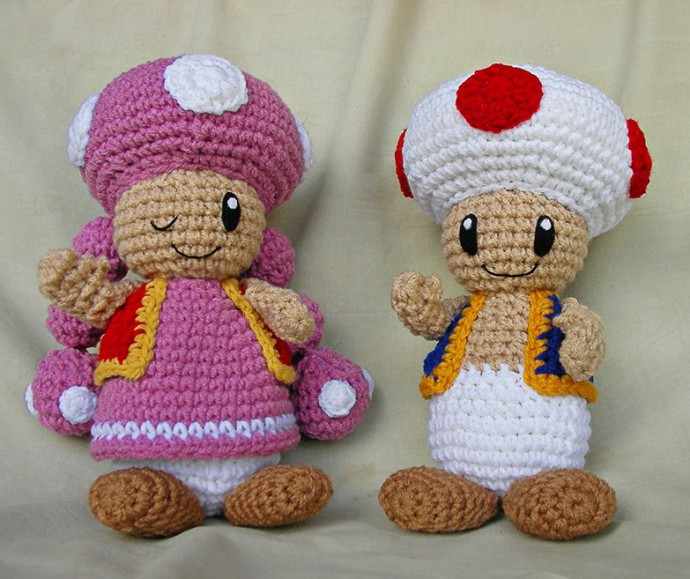
Toad and Toadette
Materials
To crochet these delightful dolls, you'll need the following materials:
- WW yarn in your choice of colors (used for these patterns was: White, violet, red, tan, warm brown, bright blue, gold)
- G Hook
- Fiberfill
- Sewing thread to match yarns and needle (optional)
- Yarn Needle
- Small bits of felt in black and white for eyes
Dolls made with materials and hook listed measure approx. 9 inches high.
Notes
The two dolls in this pattern are the same in the basic body, so there is only one pattern for that. Different parts such as vests, braids, etc., are included. If you are interested in the rest of the toad family, the basic head/body pattern here is the same for them; just make the extra features you need (mustache and cane for Toadsworth, etc.). You can make the entire group from the basic head/body pattern.
When sewing pieces together, I recommend using a matching sewing thread and needle rather than yarn. This helps to reduce unwanted and unnecessary bulk that may cause the doll to be misshapen. Yarn is perfectly fine if you prefer that, but if you can, opt for the sewing thread.
Gauge isn't important, as long as your hook and yarn choices result in a fairly tight stitch so that the stuffing won't show through. Hook and yarn choice will determine the finished size of the dolls.
Numbers at the end of each round/row indicate the total number of stitches that should be in each round or row.
Creating the Head
Lower Section/Face
Using tan:
Rnd 1: 6 sc in Magic ring (6)

Rnd 2: 2 sc in each sc around (12)

Rnd 3: sc in next sc, 2 sc in next sc around (18)

Rnd 4: sc in next 2 sc, 2 sc in next sc around (24)

Rnd 5: sc in next 3 sc, 2 sc in next sc around (30)

Rnd 6-9: sc in each sc around (30)

Rnd 10: sc in next 3 sc, dec over next 2 sc around (24)

Rnd 11: sc in next 2 sc, dec over next 2 sc around (18)

F/O. Stuff firmly and shape while stuffing. Do not close off open end.
Mushroom Cap/Top
Using base color for mushroom:
Rnd 1: 8 sc in Magic Ring (8)

Rnd 2: 2 sc in each sc around (16)

Rnd 3: sc in next sc, 2 sc in next sc around (24)

Rnd 4: sc in next 2 sc, 2 sc in next sc around (32)

Rnd 5: sc in next 3 sc, 2 sc in next sc around (40)

Rnd 6: sc in next 4 sc, 2 sc in next sc around (48)

Rnd 7: sc in next 5 sc, 2 sc in next sc around (56)

Rnd 8-13: sc in each sc around (56)

Rnd 14: sc in next 5 sc, dec over next 2 sc around (48)

Rnd 15: sc in next 4 sc, dec over next 2 sc around (40)

Rnd 16: sc in next 3 sc, dec over next 2 sc around (32)

F/O. Stuff firmly and shape. Place the open end of the cap over the open end of the 'face'. Adjust to angle desired and pin in place. Sew firmly and evenly around (either with matching sewing thread *recommended*, or matching yarn).
Spots for Top of Mushroom Cap
Using color of choice:
Make 5:
Rnd 1: 8 sc in Magic Ring (8)

Rnd 2: 2 HDC in each sc around (16)

F/O and secure and weave yarn.
The five spots are sewn to the cap with one at the very top/center and the remaining four spaced evenly around the side (see photo for assistance in placement).
Creating the Body
Using white:
Rnd 1: 8 sc in Magic Ring (8)

Rnd 2: 2 sc in each sc around (16)

Rnd 3: sc in next sc, 2 sc in next sc around (24)

Rnd 4: sc in next 2 sc, 2 sc in next sc around (32)

Rnd 5: sc in next 7 sc, 2 sc in next sc around (36)

Rnd 6-8: sc in each sc around (36)

Rnd 9: sc in next 4 sc, dec over next 2 sc around (30)

Rnd 10: sc in each sc around (30)

Rnd 11: sc in next 3 sc, dec over next 2 sc around. Change to tan color in the last stitch (24)

Rnd 12-13: sc in each sc around (24)

Rnd 14: sc in next 2 sc, dec over next 2 sc around (18)

Rnd 15-16: sc in each sc around (18)

Rnd 17: sc in next sc, dec over next 2 sc around (12)

Rnd 18: sc in each sc around (12)

F/O and stuff body firmly. Don't close the open end.
Creating the Arms
Without Thumb (Easier to Make)
Using tan:
Rnd 1: 8 sc in Magic Ring (8)

Rnd 2: sc in each sc around (8)

Rnd 3: sc in next 2 sc, dec over next 2 sc, sc next 2 sc, dec over next 2 sc (6)

Rnd 4-9: sc in each sc around (6)

F/O (arms are not stuffed).
Alternate Arm (With Thumb, as Shown in Pictures)
Rnd 1-2: same as above

Rnd 3: sc in next 2 sc, dec over next 2 sc, ch 2 sc in 2nd ch from hook, sl st in same sc as last sc made. sc in next 2 sc, dec over last 2 sc (6)

Rnd 4: sc in each sc around (pull 'thumb' forward and keep stitches behind it in this round) (6)

Rnd 5-9: sc in each sc around (6)
Creating the Feet
Using warm brown:
Rnd 1: 8 sc in Magic Ring (8)

Rnd 2: 2 sc in each sc around (16)

Rnd 3-8: sc in each sc around (16)

Rnd 9: dec over next 2 sc around (8)

F/O and VERY lightly stuff.
Creating the Vest
Using the main color of vest:
(Do not ch 1 before turning)
Row 1: Ch 13, sc in 2nd ch from hook and each ch across, turn (12)

Row 2: sc in first sc, * 2 sc in next sc, sc in next sc * repeat from * to * across (18)

Row 3: sc in each sc across (18)

Row 4: 2 sc in first sc, * sc in next 2 sc, 2 sc in next sc * repeat from * to * across (24)

Row 5: sc in each sc across (24)

Row 6: sc in first 3 sc, * 2 sc in next sc, sc in next 3 sc * repeat from * to * across (30)

Row 7: sc in each sc across (30)

Row 8: 2 sc in first sc, *sc in next 4 sc, 2 sc in next sc * repeat from * to * across (36)

F/O main color, attach gold. 3 sc in corner sc, sc evenly around the entire 'vest', putting 3 sc in each corner. F/O, weave in ends.
Creating Toadette's Dress
For Toadette:
Rnd 1: ch 12, join to form ring, sc in each ch around (12)

Rnd 2: sc in next sc, 2 sc in next sc around (18)

Rnd 3: sc in next 2 sc, 2 sc in next sc around (24)

Rnd 4: sc in next 3 sc, 2 sc in next sc around (30)

Rnd 5: sc in each sc around (30)

Rnd 6: sc in next 4 sc, 2 sc in next sc around (36)

Rnd 7-8: sc in each sc around (36)

Rnd 9: sc in next 5 sc, 2 sc in next sc around (42)

Rnd 10-11: sc in each sc around. Change to white yarn in the last stitch of round 11, don't fasten off the main color, drop the main color to pick up next round. (42)

Rnd 12: sc in each sc around. Change to first color in the last stitch of the round (42)

Rnd 13: sc in each sc around (42)

F/O and weave in all ends. Slip the 'dress' over the body so that the neck of the body and neck of the dress meet. Sew securely at the neck. The vest is fitted over the dress and sewn securely at the neckline and along the front opening (leaving the bottom unsewn as shown in pictures).
Creating Braids
Using the main color of the mushroom cap:
Make 2 of the following:
Rnd 1: 6 sc in Magic Ring (6)

Rnd 2: 2 sc in each sc around (12)

Rnd 3: sc in next sc, 2 sc in next sc around (18)

Rnd 4-5: sc in each sc around (18)

Rnd 6: sc in next sc, dec over next 2 sc around (12)

Begin stuffing FIRMLY, be sure to shape into a ball as you stuff.

Rnd 7: dec over next 2 sc around (6)

F/O and finish stuffing firmly and shaping. Weave the tail through the final round and pull to close. Secure end and weave in.
Make 4 of the Following
Rnd 1: 6 sc in Magic Ring (6)

Rnd 2: 2 sc in each sc around (12)

Rnd 3-4: sc in each sc around (12)

Rnd 5: dec over next 2 sc around (6)

Stuff Firmly and shape as you stuff. Weave tail through final round and pull to close. Weave in ends.
Using a yarn needle (or other sharp, large-eyed needle) and a long length of matching yarn, go through the center of the large 'ball', then through the center of the two small balls, keeping them as centered as possible. Leave length of yarn free at the top of the 'braid' to attach to the head later.
Spots for Braids
Using white, make 6:
Rnd 1: 5 sc in magic ring

Sew three spots on the largest ball of each braid (as shown), evenly spaced.
Final Assembly
I recommend pinning all pieces together before sewing to ensure that you have them in the placement you like. Remove pins as you sew to prevent the pieces from moving around too much during the sewing process.
Sew the head securely to the neck. Sew arms to sides as shown. Feet are sewn to the bottom of the body.
(Toadette) Braids are sewn to the back of the head on each side, just behind each arm (see photo).
I recommend cutting eye pieces from paper first and pinning to the face to check for size and shape before cutting from felt. Use the paper pieces as patterns for cutting. Two long ovals in black felt with tiny circles of white for 'catch lights' positioned as shown. Embroider remaining facial features as shown.