How to Make the Adorable Crochet Butter Bear

Penelope
Jan 10, 2025 08:22 AM
The Crochet Butter Bear Overview
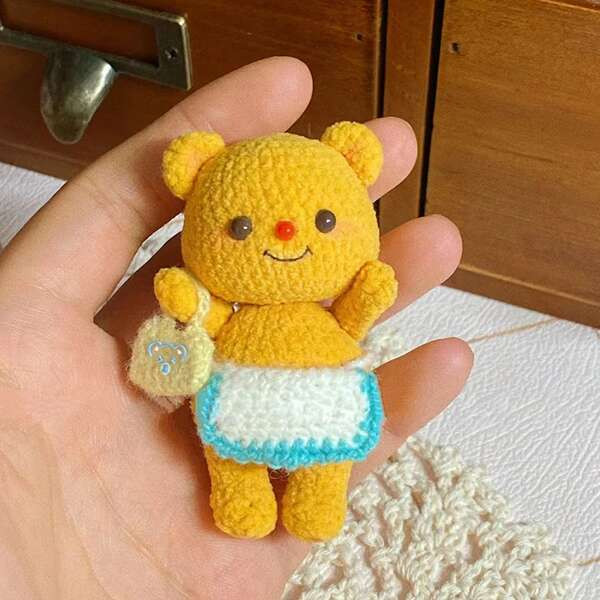
The Crochet Butter Bear is an adorable creation that exudes warmth and charm with its soft yarn and cute design. This huggable bear is perfect for snuggling or adding a touch of coziness to any room. Its sweet expression and buttery soft hues make it a delightful companion for both kids and adults. Whether you're a crochet enthusiast or simply a fan of cuddly creatures, the Crochet Butter Bear is sure to bring a smile to your face and brighten your day with its undeniable cuteness.
Materials Needed
- Yarn (colors: yellow, white, blue, black)
- Eye accessories - 4 mm
- Nose accessories - 3 mm
- Crochet hook - 1.1 mm
- Toy stuffing
- Needle
Abbreviations
- MR - Magic Ring
- sc - Single Crochet
- inc - Increase
- dec - Decrease
- ch - Chain Stitch
- hdc - Half Double Crochet
Head Instructions
Make with yellow color.
- R1: MR 8 sc
- R2: 8 inc
- R3: (1 sc, 1 inc) * 8
- R4: (3 sc, 1 inc) * 6
- R5: (2 sc, 1 inc, 2 sc) * 6
- R6-R9: 36 sc
- R10: 9 sc, (1 sc, 1 inc, 1 sc) * 6, 9 sc
- R11: 9 sc, 1 inc, 22 sc, 1 inc, 9 sc
- R12-R13: 44 sc
- R14: 9 sc, 1 dec, 22 sc, 1 dec, 9 sc
- R15: 9 sc, (1 sc, 1 dec, 1 sc) * 6, 9 sc
- R16: (2 sc, 1 dec, 2 sc) * 6
- R17: (3 sc, 1 dec) * 6
- R18: (1 sc, 1 dec, 1 sc) * 6
- Filling.
- R19: (1 sc, 1 dec) * 6
- R20: 6 dec
- Fasten off and weave in ends.
Ear Instructions
Make x 2 with yellow color.
- R1: MR 6 sc
- R2: 6 inc
- R3: 12 sc
- Fasten off and leave long ends for sewing.
Leg and Body Instructions
Make with yellow color.
- R1: 5 ch, start crocheting from the penultimate stitch, 3 sc, 4 hdc in one stitch, 3 sc
- R2: 3 sc, 4 hdc, 3 sc
- R3: 10 sc
- R4: 3 sc, 2 dec, 3 sc
- R5: 3 sc, 2 inc, 3 sc
- R6: 10 sc
- R7: 3 sc, 1 inc, 2 sc, 1 inc, 3 sc
- The first leg: Break the yarn.
- The second leg: Do not break the yarn.
- 2 ch, link two legs, continue to crochet the body.
- R8: 28 sc
- Filling.
- R9: 14 sc, 1 inc, 14 sc, 1 inc
- R10: (2 sc, 1 inc, 2 sc) * 6
- R11: 1 inc, 12 sc, 1 inc, 6 sc, 1 inc, 12 sc, 1 inc, 2 sc
- R12-R15: 40 sc
- R16: 1 dec, 12 sc, 1 dec, 6 sc, 1 dec, 12 sc, 1 dec, 2 sc
- R17: (2 sc, 1 dec, 2 sc) * 6
- R18: 30 sc
- R19: (3 sc, 1 dec) * 6
- R20: 24 sc
- R21: (1 sc, 1 dec, 1 sc) * 6
- Filling.
- R22: (1 sc, 1 dec) * 6
- Fasten off and weave in ends.
Hand Instructions
Make x 2 with yellow color.
- R1: 3 ch, start crocheting from the penultimate stitch, 1 sc, 3 sc in one stitch, 1 inc
- R2-R6: 6 sc
- Little filling.
- Fasten off and leave long ends for sewing.
Apron Instructions
Make with white and blue color.
- Start with white color.
- R1: 11 ch, start crocheting from the penultimate stitch, 10 hdc
- R2-R5: 1 ch, turn, 10 hdc
- Change to blue color.
- (2 ch, 1 sc) in one stitch. Repeat until you have crocheted 2 short sides and 1 long side.
- Continue crocheting the strips on both sides with blue. 40 ch.
Bag Instructions
Make with yellow color.
- R1: 8 ch, start crocheting from the penultimate stitch, 1 sc, 3 sc in one stitch, 1 inc
- R2-R3: 14 sc
- Crochet 14 ch as bag strap.
Assembly Instructions
- Sew the ears into place on the head.
- Sew the arms to the sides.
- Sew the head and body together.
- Glue the eyes and nose accessories to the appropriate positions on the head, and embroider the mouth with black thread.
- Tie the apron around your belly.
No comments
Write a comment