Crochet Little Volcano: A Unique DIY Project

Crochet Little Volcano is a charming and unique DIY project that will surely add a touch of whimsy to your home decor. The combination of vibrant yarn colors and intricate stitches creates a mini masterpiece that can brighten any room. By following the simple crochet patterns and using your creativity, you can craft a delightful volcano that will be a conversation starter and a fun conversation piece. So grab your crochet hooks and let's get crafting!
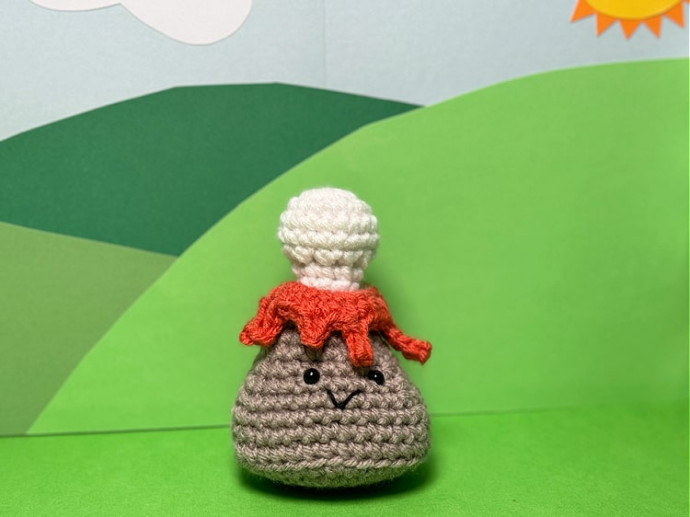
Finished Size: about 4.5" tall
You Will Need:
- Worsted weight yarn in brown, red or orange, and white (Sample made with Red Heart Super Saver in Oatmeal, Coral, and Soft White)
- G crochet hook (4/4.25 mm)
- 2-6mm safety eyes
- Black embroidery floss and needle
- Stuffing
- Yarn needle
- Stitch markers
- Scissors
Instructions:
The volcano and smoke are made beginning with a magic ring. The lava is created by making a ring of chain stitches, then crocheting around that and every few stitches making a chain coming off of the ring and working single crochet or slip stitches into those chains to create the drips. The lava is stitched around the opening at the top of the volcano and the smoke fits just inside the opening and is stitched in place to secure it.
Volcano (Mountain)
Make 1 with brown yarn, beginning with a magic ring (sample made in Oatmeal)
Round 1: in magic ring, ch 1, 6 sc (6 sc)
Round 2: 2 sc in each st (12 sc)
Round 3: [2 sc in first st, 1 sc in next st] repeat around (18 sc)
Round 4: [2 sc in first st, 1 sc in next 2 sts] repeat around (24 sc)
Round 5: [2 sc in first st, 1 sc in next 3 sts] repeat around (30 sc)
Round 6: [2 sc in first st, 1 sc in next 4 sts] repeat around (36 sc)
Round 7: 1 sc in blo of each st (36 sc)
Round 8: [sc2tog, 1 sc in next 10 sts] repeat around (33 sc)
Round 9: 1 sc in each st (30 sc)
Round 10: [sc2tog, 1 sc in next 9 sts] repeat around (30 sc)
Round 11: [sc2tog, 1 sc in next 8 sts] repeat around (27 sc)
Round 12: [sc2tog, 1 sc in next 7 sts] repeat around (24 sc)
Round 13: [sc2tog, 1 sc in next 6 sts] repeat around (21 sc)
Add safety eyes between rounds 11 and 12 with a few (3-4) stitches in between.
Begin stuffing and continue stuffing as you work.
Round 14: [sc2tog, 1 sc in next 5 sts] repeat around (18 sc)
Round 15: 1 sc in each st (18 sc)
Finish off, cut yarn leaving a long tail for sewing (it will be better to use the brown tail to attach the smoke in the next step because it will blend in on the outside).
Embroider a smile below the eyes.
Smoke
Make 1 with white yarn, beginning with a magic ring (sample made in Soft White)
Round 1: in magic ring, ch 1, 6 sc (6 sc)
Round 2: 2 sc in each st (12 sc)
Round 3: [2 sc in first st, 1 sc in next st] repeat around (18 sc)
Rounds 4-5: 1 sc in each st (18 sc)
Begin stuffing and continue stuffing as you work.
Round 6: sc2tog around (9 sc)
Rounds 7-8: 1 sc in each st (9 sc)
Finish off, cut yarn.
Lava
Make 1 with orange or red yarn, beginning with a chain (sample made in Coral)
The instructions in parentheses are each individual "drip" of lava. You will work sc sts around the ring that you create with the beginning chain, but every few sts you will make a short chain and work sl sts or sc into that short chain to make each drip.
ch 18, sl st to first ch to join in a ring.
Round 1: sc in first ch, (ch 4, working back along that ch sk 1st ch, sl st in next 3), sc in next 2 sts on original ch, (ch 4, working back along that ch sk 1st ch, sc in next 3), sc in next 3 sts on original ch, (ch 3, working back along that ch sk 1st ch, sl st in next 2), sc in next 2 sts on original ch, (ch 4, working back along that ch sk 1st ch, sl st in next 3), sc in next 3 sts on original ch, (ch 5, working back along that ch sk 1st ch, sc in next 4), sc in next 3 sts on original ch, (ch 3, working back along that ch sk 1st ch, sl st in next 2), sc in next 3 sts on original ch, (ch 2, working back along that ch sk 1st ch, sl st in next 1), sc in the last st of the original ch.
Finish off, leaving a long tail for sewing.
Place the lava ring around the opening of the volcano and stitch in place. You may want to play around with the placement a little to decide which drips you want on the face side and ensure none of them are covering the eyes (unless that is the look you want).
Stuff the smoke cloud completely, then stick the open end of the smoke just inside the opening of the volcano (which should also be fully stuffed) and stitch in place using the tail left from the end of the volcano or you can use the tail from the lava that you just used to stitch the lava in place.