Crochet Little Turkey Craft Project for Thanksgiving

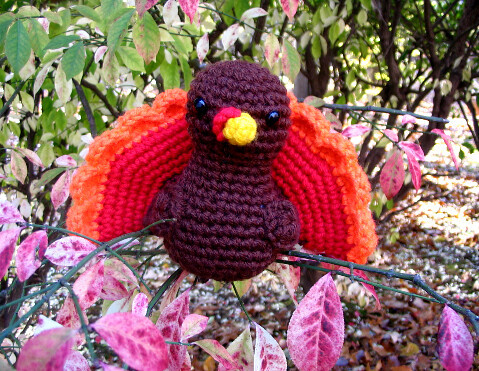
If you're looking for a charming craft project that brings a touch of whimsy to your Thanksgiving decorations, consider making a Crochet Little Turkey! This adorable crochet creation is not only cute but also a fun and engaging way to get into the holiday spirit. With a few skeins of yarn, a crochet hook, and a bit of patience, you can bring this little turkey to life with its warm colors and playful design. Whether you're a seasoned crocheter or just starting out, creating a Crochet Little Turkey can be an enjoyable and rewarding experience. So, grab your supplies, follow a pattern, and let yourself be swept away by the joy of crafting your very own festive feathered friend!
Materials Needed
- Worsted weight yarn in dark brown, rust, red, and orange
- Crochet hook (size F)
- Stuffing
- Safety eyes
- Yarn needle
Instructions
Head and Body
Using an F hook and dark brown worsted weight, sc 5 into a circle.
Sc twice into each stitch.
Sc1, sc twice into next stitch* around.
Sc2, sc twice into next stitch* around.
Sc3, sc twice into next stitch* around.
Sc even for 4 rounds.
Sc3, sc 2tog* around.
Sc2, sc 2tog* around.
- Insert eyes -
Sc even for 1 round.
Sc2, sc twice into next stitch* around.
Sc even for 1 rounds.
Sc3, sc twice into next stitch* around.
Sc even for 1 rounds.
Sc4, sc twice into next stitch* around.
Sc even for 5 rounds.
Sc4, sc 2tog* around.
Sc3, sc 2tog* around.
Sc2, sc 2tog* around.
Sc1, sc 2tog* around.
Sc 2tog* around.
Break yarn, stuff, and secure the bottom.
Wing (Make 2)
With the same colored yarn as the body, ch 6.
In the second ch from the hook, sc 1.
Sc 1 into the next ch.
Dc 1 into each of the next 2 ch.
Into the final ch, tc 6 times.
Dc into the back of 2 sc.
Sc once more into the next stitch.
Beak
In yellow yarn, sc 3 into a circle.
Sc 2 into 1 stitch, 2 sc, 2 sc into 1 stitch (5).
Sc 2, sc 2 into 1 stitch, 2 sc (6).
Leave a couple of inches of yarn for sewing.
Snood
For the snood, simply ch 4 in red and attach.
Tail
Beginning with the same dark brown yarn, sc 5 into a circle.
Sc twice in each stitch.
Sc 1, sc twice into next stitch* around.
Sc 2, sc twice into next stitch* around.
Sc 3, sc twice into next stitch* around.
- Switch to rust-colored yarn -
Sc 4, sc twice into next stitch* around.
Sc 5, sc twice into next stitch* around.
Sc 6, sc twice into next stitch* around.
Sc 7, sc twice into next stitch* around.
Sc 8, sc twice into next stitch* around.
- Switch to red yarn -
Sc 9, sc twice into next stitch* around.
Sc 10, sc twice into next stitch* around.
Sc 5, sc twice into next stitch* around.
Sc 6, sc twice into next stitch* around.
Sc 7, sc twice into next stitch* around.
- Switch to orange yarn -
Sc 8, sc twice into next stitch* around.
Sk 1, tc 5 into the next stitch, sk 1, sl st (Halfway around, or 12 x).
Break yarn, leaving a very long tail.
Assembly
Determine proper placement and sew both wings to the sides, and the beak between the two safety eyes. The only semi-challenging part is the tail, which is to be folded in half so that all of the scalloped edge is in front. Sew the two sides together so that the second to last row matches up on both pieces and the scallops protrude. Sew to the back using matching yarn.
Bury in ends and start preparing for Thanksgiving!