Craft Your Own Unique Crochet SpongeBob Dolls

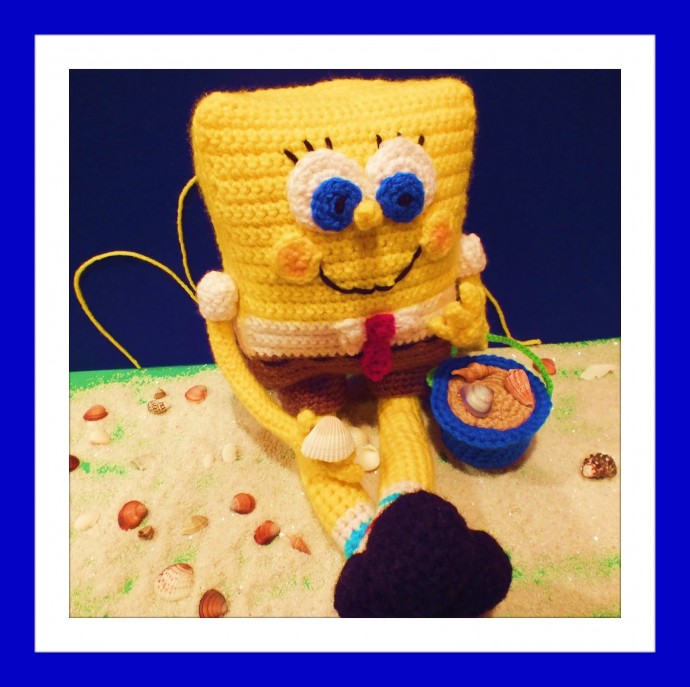
Crochet SpongeBob Dolls are a delightful and creative way to bring everyone's favorite sea sponge to life in a fun and huggable form. These handmade creations capture the whimsical spirit of SpongeBob SquarePants with their vibrant colors and intricate details. Crafted with care and attention to detail, each doll is a unique piece of art that makes for a perfect gift or a charming addition to any SpongeBob fan's collection. Whether displayed on a shelf or used as a cuddly companion, a Crochet SpongeBob Doll is sure to bring joy and nostalgia to anyone who lays eyes on it. So why not add a touch of SpongeBob magic to your home with one of these adorable crochet creations?
Yarn Colors Used
Red Heart Yarns used:
- Bright Yellow
- Brown
- White
- Light Blue
- Black
- Spring Green
- Blue
- Red
- Tan
Materials
- Poly-Fil
- Needle & Matching Threads
- Daring Needle
- Small Amount of Plastic Canvas
- Stitch Marker
Hook Sizes Used
- G, D, C
Abbreviations Used in Pattern
- Ch - chain
- wk - work
- sc - single crochet
- hdc - half double crochet
- st - stitch
- sts - stitches
- BLO - back loops only
- FLO - front loops only
- FO - fasten off
- sl st - slip stitch
Instructions for Crochet SpongeBob Doll
For Head and Body with Bright Yellow Yarn and a G Hook (Make 2)
Ch 27
Row 1. 1 sc in each st across, ch 1 and turn.
Rows 2-20. Repeat row 1
Row 21. Change to white and wk 1 sc in each st. ch 1 and turn.
Rows 22-26. Repeat row 21
Row 27. Change to brown, 1 sc in each st, ch 1 and turn.
Rows 28-33. Repeat row 27, do not FO.
Working now along the sides, ch 1 and wk 1 sc in 5 or 6 sts, change to white and wk 1 sc in 4 or 5 sts, change to yellow and wk 1 sc in 20 sts, ch 1 at each corner, 1 sc in 26 sts. Continue this all the way around, with a sl st in the last st. To make the sides of SpongeBob, ch 1, wk brown, white, and yellow in the appropriate sts. Wk 1 sc in the BLO all the way around, sk 1 st in each corner. Now working under both loops wk 1 sc in each st around, changing colors where need be. Continue working 1 sc in each st around, sk 1 st in each corner for a total of 4 rows, FO.
For the second panel repeat rows 1 through 27 and FO.
Before attaching the 2 panels together, sew on all the facial details first. Lightly stuff, making sure to get into each corner. Be careful not to over stuff, so it doesn’t lose its shape. When done, sl st the two panels together.
For the Eyes with White Yarn and a G Hook (Make 2)
Ch 2
Row 1. Wk 6 sc in the second ch st from the hook - 6 sts.
Row 2. Wk 2 sc in each st - 12 sts.
Row 3. Wk 1 sc, 2 sc in the next, FO - 18 sts.
The Blue Center Part of the Eye with a D Hook (Make 2)
Ch 2
Row 1. Wk 5 sc in the second st from the hook - 5 sts.
Row 2. Wk 2 sc in 5 sts, and FO. You can add a little black yarn to make a pupil.
For the Nose with Yellow Yarn and a G Hook
Ch 6
Row 1. Wk 1 sc in 5 sts, ch 1 and turn.
Rows 2-3. Repeat row 1 and FO. Roll up the nose and sew closed. Attach to face and whip st a smile.
With Yellow Yarn and a D Hook Make the Cheeks (Make 2)
Ch 2
Row 1. Wk 6 sc in the second ch st from the hook - 6 sts.
Row 2. 2 sc in each st around and FO - 13 sts.
For the Tie with Red Yarn and a D Hook
Ch 2
Row 1. Wk 2 sc in st, turn and ch 1.
Rows 2-6. 1 sc in 2 sts, turn and ch 1.
Row 7. 1 sc in st, turn and ch 1.
Row 8. Wk 2 sc in st, turn and ch 1.
Row 9. Wk 2 sc in each st, turn and ch 1.
Row 10. 1 sc in each st and FO.
For the Collars with White Yarn and a G Hook (Make 2)
Ch 4
Row 1. 1 sc in each st, ch 1 and turn.
Row 2. Dec 2, 1 sc in the next st, ch 1 and turn.
Row 3. Dec 2, FO.
For the Sleeves with White Yarn and a G Hook (Make 2)
Ch 2
Row 1. Wk 6 sc in the second ch from the hook.
Row 2. Wk 2 sc in each st around.
Rows 3-6. Repeat row 2 and FO. Slip over the top part of the arm and sew in place.
For the Arms with Yellow Yarn and a G Hook (Make 2)
Ch 2
Row 1. Wk 6 sc in the second st from the hook.
Row 2. 1 sc in the next 6 sts (you can use a st marker if you need one; you don’t want to lose any sts). Repeat row 2 until the arm measures about 6 ½ inches and FO.
For the Hand with Yellow Yarn and a D Hook (Make 2)
Ch 2
Row 1. Wk 5 sc in the second st from the hook.
Row 2. Wk 2 sc in each st - 10 sts.
Rows 3-7. 1 sc in each st; the last row, FO. Put one end of the arm inside the hand and sew in place.
For the Thumbs with Yellow Yarn and a D Hook (Make 2)
Ch 4
Wk 1 sc in the next 2 sts, sl st in the last st and FO.
For the Fingers with Yellow Yarn and a D Hook (Make 6)
Ch 6
Wk 1 sc in the next 4 sts, sl st in the last st and FO. Sew all the fingers in place.
For the Legs with Yellow Yarn and a G Hook (Make 2)
Ch 2
Row 1. Wk 6 sc in the second st from the hook.
Row 2. 2 sc in each st around.
Row 3. 1 sc in each st around - 12 sts.
Rows 4-14. Repeat row 3.
Rows 15-16. Wk 1 hdc in the next 3 sts, 1 sc in the next 9 sts.
Row 17. 1 sc in each st around.
Rows 18-19. 1 sc in 8 sts, change to white. I only used 8 sts so the color change would be in the back.
Rows 20-21. 1 sc in each st around, change to blue.
Row 22. Wk 1 sc in each st, change to white.
Rows 23-24. 1 sc in each st around, change to red.
Row 25. 1 sc in each st, change to white.
Rows 26-32. 1 sc in each st around and FO.
For the Toe of the Shoes with Black Yarn and a G Hook (Make 2)
Ch 2
Row 1. Wk 1 sc in the second st from the hook - 6 sts.
Row 2. Wk 2 sc in each st around - 12 sts.
Row 3. 1 sc in the first st, 2 sc in the next, all the way around - 18 sts.
Rows 4-6. 1 sc in each st - 18 sts.
Row 7. 1 sc, dec 2, all the way around.
Row 8. 1 sc in each st, stuff, and sl st the rest of the way closed and FO.
For the Heel with Black Yarn and a G Hook (Make 2)
Ch 2
Row 1. Wk 6 sc in the second st from the hook - 6 sts.
Row 2. Wk 2 sc in each st - 12 sts.
Row 3. Wk 1 sc, 2 sc in the next st, ch 1 and turn.
Row 4. 1 sc in the next 15 sts, ch 1 and turn.
Rows 5-6. Repeat row 4 and FO. Place leg inside the heel and sew in place. Hold toe to the front part of the leg and sew that into place.
For the Pant Legs with Brown Yarn and a G Hook (Make 2)
Ch 2
Row 1. Wk 6 sc in the second st from the hook - 6 sts.
Row 2. Wk 2 sc in each st - 12 sts.
Row 3. Wk 1 sc, 2 sc in the next st, repeat all the way around - 18 sts.
Row 4. Wk 1 sc in the next 2 sts, 2 sc in the next st, repeat all the way around - 24 sts.
Row 5. Wk 1 sc in the BLO - 24 sts.
Rows 6-9. Wk 1 sc under both loops all the way around, FO in the last round - 24 sts. Place one pant leg over the leg and sew in place. Then sew the pant leg to the body.
With a daring needle run some black yarn through it and make his belt, skipping a few stitches all the way around.
For the Sand Bucket with Blue Yarn and a G Hook
Ch 2
Row 1. Wk 6 sc in the second st from the hook - 6 sts.
Row 2. Wk 2 sc in each st - 12 sts.
Row 3. Wk 1 sc, 2 sc in the next st, repeat all the way around - 18 sts.
Row 4. Wk 1 sc in the next 2 sts, 2 sc in the next st, repeat all the way around - 24 sts.
Row 5. 1 sc in the BLO - 24 sts.
Rows 6-12. 1 sc under both loops, all the way around - 24 sts.
Row 13. In the FLO, wk 1 hdc in one st, 2 hdc in the next st, all the way around and FO. I used a piece of plastic canvas in the bottom and along the sides. Stuff.
For the Top Sand Piece with Tan Yarn and a G Hook
Ch 2
Repeat rows 1 through 4 and FO. Sew in place on top of the bucket.
For the Handle with Spring Green and a C Hook
Ch 40 and FO. Sew onto the sides of bucket.
The finished Doll is 15” tall.
All that’s left to do now is enjoy your Spongy!