Adorable Crochet Tree Coasters for a Whimsical Table Decor

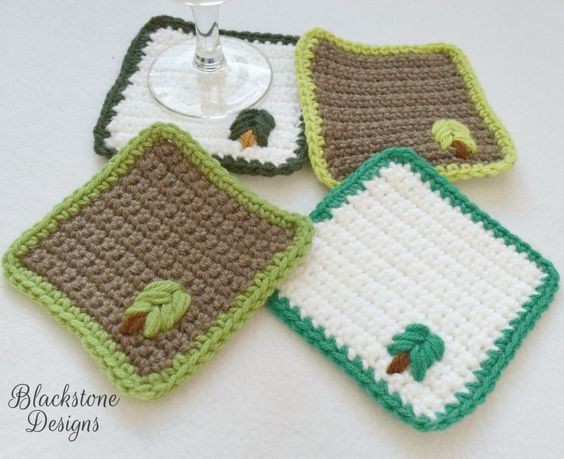
If you're looking to spruce up your table decor with a touch of charm, crochet little tree coasters are an adorable way to do just that. These cute coasters not only protect your surfaces but also add a festive and playful vibe to your home. Imagine setting down your hot cup of tea on a tiny crochet tree – it's like having a mini forest right at your fingertips! Whether you're a crochet enthusiast or just starting out, the satisfaction of creating these delightful coasters is sure to bring a smile to your face. So grab your crochet hook and yarn, and get ready to craft your way to a cozy and whimsical tabletop experience!
Materials
Worsted Weight Yarn (#4)
- Neutral – 25 yards
- Green – 10 yards
- Brown – 20 inches
H/8/5.00mm Hook
Yarn Needle
Scissors
Optional Materials
Grip Liner
Hot Glue Gun & Sticks
Gauge
Not important for this project
Size
4.5” x 4.5” [11.4 cm x 11.4 cm]
Stitch Guide
arnd = around
ch = chain
sc = single crochet
sl st(s) = slip stitch(es)
st(s) = stitch(es)
Skill Level
Easy
Written in U.S. Terms
Notes
- Beginning chains do not count as stitches
Instructions
PANEL
With Neutral:
1. Ch 15, sc in 2nd ch from hook and in each ch across, turn (14)
2. Ch 1, sc across, turn (14)
3-16. Repeat row 2
With Green:
17. Ch 1, sc in end of each row and in each st arnd; Fasten. (60)
TREE
With Green:
*Thread needle with green yarn and insert from the back into the space between the 3rd & 4th stitches and 6th & 7th rows. Bring green diagonally down and insert from the front through the space between the 2nd & 3rd stitch and 4th and 5th rows. Repeat this step 2 more times.
Insert needle from the back through the same beginning space and work diagonally down to the space between the 5th & 6th stitch and 4th and 5th rows. Repeat 2 more times.
*Insert needle from the back through the space between the tree ‘branches’ just created. Bring it diagonally down to the space between the 2nd & 3rd stitch and 3rd & 4th rows. Repeat 2 more times.
Insert needle from the back through the same space this branch set started and work diagonally down to the space between the 5th & 6th stitch and 3rd & 4th rows. Repeat 2 more times.
*Insert needle from the back through the space between the 2nd set of tree ‘branches’ (just created). Bring it diagonally down to the space between the 2nd & 3rd stitch and 2nd & 3rd rows. Repeat 2 more times.
Insert needle from the back through the same space this branch set started and work diagonally down to the space between the 5th & 6th stitch and 2nd & 3rd rows. Repeat 2 more times.
With Brown:
*Insert needle from the back through the space between the 3rd set of tree ‘branches’ (which is the space between 3rd & 4th stitch and 3rd & 4th rows). Bring straight down and insert from the top through the space between the 3rd & 4th stitches and the 1st & 2nd rows. Repeat 2 more times.
Finishing
- Hide all strings.
- Optional: Add grip liner to back – Lay coaster onto grip liner, trace around the outside of the coaster, cut it out and trim off ¼” from each side. Hot glue to the back of the coaster.