Crochet Little Fir Christmas Tree Tutorial


The Crochet Little Fir Christmas Tree is the perfect festive craft project to add a touch of Christmas cheer to your home decor. With its charming design and cozy vibes, this little tree is a heartwarming addition to any space. Whether you're an experienced crocheter or just starting out, this pattern is fun and easy to follow. The versatility of this crochet tree allows you to customize it with different yarn colors and embellishments to match your personal style and existing holiday decorations. Get ready to spread joy and create lasting memories as you crochet your very own Little Fir Christmas Tree this holiday season!
Materials Needed
3oz Green Worsted weight acrylic yarn. Red Heart Super Saver was used, use your favorite green shade!
Scrap yellow Red Heart Sport acrylic yarn
2oz Red Heart Super Saver Multicolor in ArtE300 Color: 0967 Holly & Ivy
113 Gold metallic pony beads or some other festive large pony beads
1 piece CPVC pipe ½" diam by 10" long
Gold or green craft spray paint
1 ½" CPVC coupler
Yarn Needle for Weaving in Ends
2 pieces corrugated cardboard, 5½" x 5½"
1 piece of cereal box type cardboard 3" x 17½" long*
1.88" wide Shipping Tape
Double Sided Tape
Pebbles or ¾" crushed rock, about 2 cups, for weight inside your base
5" long ¼" diameter dowel.
Yarn Details
Yarn Thickness: 4mm
Gauge: 9dc = 2"
Finished Size: 6" x 13½"
Skill Level: Advanced
Instructions
Step 1: Spray paint your CPVC pipe and allow to dry. I spray painted it gold because I used gold beads and I did not want the ugly yellowish color of the CPVC pipe to show through the stitches. You might want to spray paint it a green color that is close to the yarn you are using.
Step 2: Prepare Your Base then set it aside.
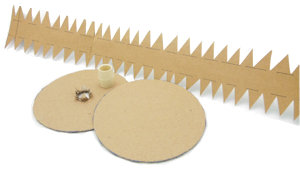
- Cut out 2 5 1/8" circles from the corrugated Cardboard.
- Cut a 7/8" hole in the center of one circle only. The way I did this is I found the center and then with a sharp box cutter, I cut 6 pizza-style slices without cutting all the way through the wide end of each slice so the wedges can fold in when the coupler is pushed through the hole later. You need the friction of the wedges to help hold the coupler in straight. Set the circles aside for now.
- Cut a 3" x 17" piece of cardboard from the pizza box.
- Draw 2 dashed lines down the length of the cardboard on the printed side one inch apart from each other so you have 2 long sides that are about 1" wide.
- Score the dashed lines you just marked from one end to the other. These scores will be fold lines. Make sure to score it on the printed side.
- Cut wedges from each side up to the scored, dashed lines down the whole length of the long piece of cardboard. This will make it easier to curl the strip around your cardboard circles to form the side of your base.
- Pick up your solid circle, the one without the hole, and put some double stick tape around the perimeter, no more than 1" in from the edge.
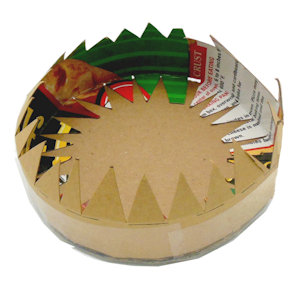
- Join the circle to the long strip securing the wedges to the taped edge to form the wall of your base. The strip will be too long so you will need to cut some of the wedges off of one end. Leave the center 1" wide section intact to overlap your seam. Use shipping tape to tape your circle to the cardboard strip on the outside. I would put a piece of tape on, cut slits in the tape, then secure the tape down on the bottom from the side. I used short pieces of tape all the way around instead of one long piece of tape.
- At this point, you should have the bottom of your base complete. Fill it with rocks, leaving the center empty. You may need to put a few pieces of cardboard on the bottom center to build up the height a little. The coupler is going to be used in the center of the base through the hole you cut in the other circle, and I had to put a rock under the coupler to lift it up a bit so it would not fall completely in the base. You might want to build up 2 or 3 layers of corrugated cardboard at the bottom center before adding your rocks so the coupler will stick through the top circle of your base.

- Fold down the top wedges to prepare them for placing the top cardboard circle on them.
- Apply double-faced tape on the other circle, on the same side as the wedges sticking up, which is the bottom of the top circle. Apply it the same way you applied it for the bottom circle.
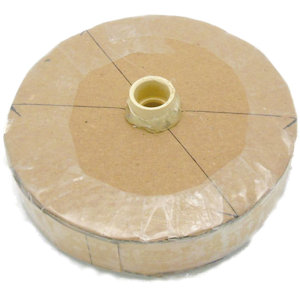
- Push the top circle down onto your rock-filled base and tape as you did for the bottom, all the way around with the shipping tape to secure it in place.
- Put some hot glue down in the center of the hole and apply it to the bottom half of the coupler on the outside. Push the coupler down into the hole and make sure it is straight. There will be hot glue that oozes out of the sides of the hole. That is ok. It will help to hold the coupler in place. In fact, you might want to add more just in case. This coupler will not show once the tree is finished. You are now done with the base. You can set it aside and start crocheting! Allow the hot glue to cool completely before touching it again.
Tree Trunk
RND 1: Starting at the top of the tree trunk with green. Ch4. Join w/slst to first ch to form a ring. Ch1. 8sc in the ring. Join w/slst to the first sc. (8sts)
RND 2: Work in back loops only. Ch3. Dc in each st around. Join w/slst to the top of ch3.
RND 3: Work through both loops. Ch3. Dc in each st around. Join w/slst to the top of ch3.
RND 4-13: Repeat RNDs 2 & 3 consecutively.
RND 14 & 15: Repeat RND 3. Fasten off and weave ends into work.
Branches of Tree
Branch 1
RND 1: String on 8 beads. Join yarn onto the front loop at the top of the tree on the base of RND 2. Work with RND 1 facing you at all times for each branch. Ch3. Dc in the same front loop as joining. 2dc in each front loop around. Join w/slst to the top of ch3.
RND 2: Ch1. Sc in the same st as slst. 2dc, pull up a bead, 2dc in the next st. *Sc in the next st. 2dc, pull up a bead, 2dc in the next st. Rep from * around. Join w/slst to the first sc. Fasten off and weave ends into work. Branch 1 is now done.
Branch 2
RND 1: String on 12 beads. Join yarn to the next RND of front loops then repeat RND 1 of Branch 1.
RND 2: Ch3. Dc in the same st as slst. Dc in the next st. *2dc in the next st. Dc in the next st. Rep from * around. Join w/slst to the top of ch3.
RND 3: Rep RND 2 of Branch 1.
Branch 3
RND 1: String on 16 beads. Join yarn to the next RND of front loops then repeat RND 1 of Branch 1.
RND 2: Rep RND 2 of Branch 2.
RND 3: Ch3. Dc in the same st as slst. Dc in each of the next 2 sts. *2dc in the next st. Dc in each of the next 2 sts. Rep from * around. Join w/slst to the top of ch3.
RND 4: Rep RND 2 of Branch 1.
Branch 4
RND 1: String on 20 beads. Join yarn to the next RND of front loops then repeat RND 1 of Branch 1.
RND 2: Rep RND 2 of Branch 2.
RND 3: Rep RND 3 of Branch 3.
RND 4: Ch3. Dc in the same st as slst. Dc in each of the next 3 sts. *2dc in the next st. Dc in each of the next 3 sts. Rep from * around. Join w/slst to the top of ch3.
RND 5: Rep RND 2 of Branch 1.
Branch 5
RND 1: String on 24 beads. Join yarn to the next RND of front loops then Rep RND 1 of Branch 1.
RND 2: Rep RND 2 of Branch 2.
RND 3: Rep RND 3 of Branch 3.
RND 4: Rep RND 4 of Branch 4.
RND 5: Ch3. Dc in the same st as slst. Dc in each of the next 4 sts. *2dc in the next st. Dc in each of the next 4 sts. Rep from * around. Join w/slst to the top of ch3.
RND 6: Rep RND 2 of Branch 1.
Branch 6
RND 1: String on 28 beads. Join yarn to the next RND of front loops then Rep RND 1 of Branch 1.
RND 2: Rep RND 2 of Branch 2.
RND 3: Rep RND 3 of Branch 3.
RND 4: Rep RND 4 of Branch 4.
RND 5: Rep RND 5 of Branch 5.
RND 6: Ch3. Dc in the same st as slst. Dc in each of the next 5 sts. *2dc in the next st. Dc in each of the next 5 sts. Rep from * around. Join w/slst to the top of ch3.
RND 7: Rep RND 2 of Branch 1.
Tree Top Star
Back of Star
RND 1: With Yellow Sport Weight. Ch5. Join w/slst to first ch to form a ring. Ch1. 10sc in the ring. Join w/slst to first sc. Fasten off and weave both ends into the back of work.
Front of Star
RND 1: String on 5 beads. Repeat as for back. Do not fasten off.
RND 2: Ch1. Sc in the same st as slst. 2dc, pull up a bead, 2dc in the next st. *Sc in the next st. 2dc, pull up a bead, 2dc in the next st. Rep from * around. Do not Join! Fasten off and weave ends into work. The next thing is you need to poke a hole in the bottom center of the star.
The way to do this is to use the 5" dowel. Sharpen one end of the dowel to a sharp point and sharpen the other end just so it is beveled enough to poke through RND 1 of the tree trunk when you are done assembling the tree. Poke the hole with the sharp end of the dowel to form a hole. Make sure you are going between the front and back circles. Once you have your hole, take the dowel out, apply hot glue to the sharp end, and stick it back into the hole you just made. Hold it there until the hot glue cools a bit. Set the star aside for now.
Crochet Cover for Base of Tree
Top of Cover
RND 1: With Multicolor. Ch10. Join w/slst to first ch to form a ring. Ch3. 19dc in the ring. Join w/slst to the top of ch3. (20sts)
RND 2: Ch3. Dc in the same st as slst. 2dc in each st around. Join w/slst to the top of ch3. (40sts)
RND 3: Ch3. Dc in the same st as slst. Dc in the next st. *2dc in the next st. Dc in the next st. Rep from * around. Join w/slst to the top of ch3. (60 sts)
RND 4: Ch3. In back loops only. Dc in each dc around. Join w/slst to the top of ch3.
RND 5: Ch3. Through both loops. Dc in each dc around. Join w/slst to the top of ch3. Fasten off and weave ends into the back of work.
Bottom of Cover
RND 1: Ch5. Join w/slst to first ch to form a ring. Ch3. 19dc in the ring. Join w/slst to the top of ch3. (20sts)
RND 2: Ch3. Dc in the same st as slst. 2dc in each st around. Join w/slst to the top of ch3. (40sts)
RND 3: Ch3. Dc in the same st as slst. Dc in the next st. *2dc in the next st. Dc in the next st. Rep from * around. Join w/slst to the top of ch3. (60sts)
RND 4: Ch3. Dc in each dc around. Join w/slst to the top of ch3. Fasten off and weave ends into the back of work.
Final Assembly of Base
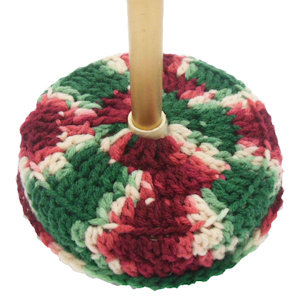
Join the top and bottom together by putting them together wrong sides facing each other so the top is facing you. Work a sc in each st around working through both layers. When you get a little bit more than halfway around, slip the cardboard base into work making sure the coupler is poking through the center hole of RND 1 of the top. Finish stitching around to close. Fasten off and weave the end into work.
Final Assembly of Little Fir Christmas Tree!
Step 1: Set the crochet covered base in front of you.
Step 2: Slip the trunk of the tree over the prepared CPVC pipe.
Step 3: Insert the tree covered pipe into the coupler in the center of the base.
Step 4: Insert the prepared star in the top of the tree.
Step 5: Now stand back and enjoy your work!
*I used cardboard from a frozen self-rising crust pizza box, opened up all the way. There were folds in the piece I used, but it did not make any difference in the final base.
In case you did not know, there are two types of PVC pipe you can use. CPVC and regular PVC. The ½" CPVC pipe is the one that I used. It is smaller than the white ½" PVC pipe. I believe the "c" in CPVC stands for Copper sizing and the other PVC pipe sizing is the same as steel pipes.