Crochet Trilogy Doily: A Beautiful and Intricate Home Accent

Introduction to the Crochet Trilogy Doily
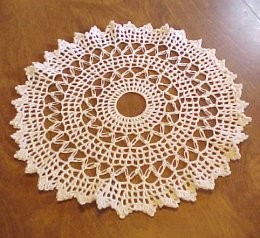
The Crochet Trilogy Doily is a beautiful and intricate piece that adds a touch of charm to any home decor. With its delicate patterns and exquisite craftsmanship, this doily is the perfect way to showcase your love for handmade pieces. Whether you're a seasoned crocheter or just starting out, creating this doily can be a fun and rewarding experience. So, grab your crochet hook and your favorite yarn, and get ready to embark on a creative journey filled with loops and stitches that will result in a stunning centerpiece for your coffee table or side table. Crocheting the Trilogy Doily is not only a delightful project to work on but also a wonderful way to add a personal touch to your living space.
Materials Needed
- America's Best Crochet Cotton in white, Size 10 crochet cotton
- Size 6 steel crochet hook
- Tapestry needle for weaving in ends
Yarn Thickness and Gauge
- Yarn Thickness: 10 thread
- Gauge: 8 sc = 1"
- Finished Size: 11" diameter
- Skill Level: Intermediate
Instructions for Crocheting the Trilogy Doily
RND 1: Ch36. Being careful not to twist chain, join with slst to first ch to form ring. Ch5. *Dc in next ch. Ch2. Rep from * around. Join with slst to 3rd ch of ch5.
RND 2-3: Ch5. *Dc in next dc. Ch2. Rep from * around. Join with slst to 3rd ch of ch5.
Lover's Knot Technique
This may not be the correct way of doing the lover's knot, but it is the way I did it for this pattern.
RND 4: Ch1, sc in same st as slst. (Now pull the thread that is on the hook so that it is about ½" long. Yo, pull through loop. Ch1. Sc in the long loop you made over just one strand. The center strand that is to the left of the loop.) This completes the first part of the whole stitch. Then repeat one more time between parentheses to complete the stitch. This is how you will do each lovers knot around.
Start each lovers knot as a sc. *Sk next dc, lovers knot in next dc. Rep from * around. Join with slst to first sc of first lover's knot, then make that loop ½" long and slst to the next sc of the first lover's knot to start your next row. Yes, this will double up this spot but it will not show much.
RND 5: On this round, you will be working on the center sc of each lovers knot. Ch6. *Sc in center of next lover's knot. Ch6. Rep from * around. Join with slst to first sc.
RND 6: Ch5. Sk next 2 ch. Dc in next ch. Ch2. Dc in next ch. Ch2. Sk next 2 chs. *Dc in next dc. Sk next 2 ch. Dc in next ch. Ch2. Dc in next ch. Ch2. Sk next 2 chs. Rep from * around. Join with slst to 3rd ch of ch5.
RND 7: Ch5. Dc in same st as slst. Ch2. Dc in next dc. Ch2. Dc in next dc. Ch2. *Dc, ch2, dc in next dc. Ch2. Dc in next dc. Ch2. Dc in next dc. Ch2. Rep from * around. Join with slst to 3rd ch of ch5.
RND 8: Ch5. *Dc in next dc. Ch2. Rep from * around. Join with slst to 3rd ch of ch5.
RND 9: Rep rnd 4.
RND 10-13: Rep rnds 5-8.
RND 14: Ch5. Work the following in the first ch2 sp: Dc, ch3, dc, ch5, dc, ch3, dc, ch2. Dc in next dc. Ch3. Sk next ch2 sp and the next dc. Sc in next ch2 sp. Ch4, slst in 4th ch from hook. Sc in same ch2 sp. Ch3. *Sk next dc and ch2 sp. Dc in next dc. Work the following in the next ch2 sp: Dc, ch3, dc, ch5, dc, ch3, dc, ch2. Dc in next dc. Ch3. Sk next ch2 sp and the next dc. Sc in next ch2 sp. Ch4, slst in 4th ch from hook. Sc in the same ch2 sp. Ch3. Rep from * around. Join with slst to 3rd ch of ch5. Fasten off and weave ends into work.
Iron and starch as needed until you reach the desired effect. I let the edges be a little wavy.