Crochet Heavenly Angel: A Delightful Project for All Skill Levels

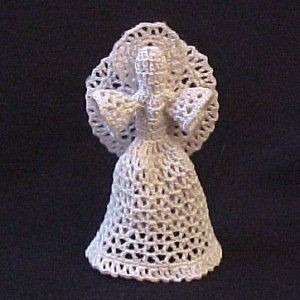
Crafting a Crochet Heavenly Angel can be a delightful and heartwarming experience, perfect for spreading holiday cheer or creating a beautiful handmade gift for a loved one. With its intricate stitches and elegant design, this crochet project allows you to add a touch of whimsy and magic to any space. The soft yarn and gentle hues used to create the angel's delicate wings and flowing gown truly make it a heavenly addition to your festive decor. Whether you're an experienced crocheter or new to the craft, working on this project is sure to bring joy and a sense of accomplishment as you bring your own little piece of heaven to life with every stitch.
Materials Needed
Size 10 crochet cotton in ecru
Size 7 steel crochet hook
Hot glue and gun
Tapestry needle for weaving in ends
Polyester fiber fill
Yarn and Project Details
- Yarn Thickness: 10 thread
- Gauge: 10 sc = 1"
- Finished Size: 5½" tall
- Skill Level: Intermediate
Instructions
Head
RND 1: Ch 3. 12 dc in 3rd ch from hook. Join with slst to top of ch 3.
RND 2: Ch 3. Dc in each dc around. Join with slst to top of ch 3.
RND 3: Ch 3. Yo, insert hook in next st, yo, pull up a lp, yo, pull through 2 lps on hook, twice, yo, pull through all lps on hook. (Dec made)* Dc in next st. Dec. Rep from * around. Join with slst to top of ch 3.
RND 4: Ch 3. Dc in each st around. Join with slst to top of ch 3.
RND 5: Ch 3. 2 dc in same st as slst. 3 dc in each st around. Join with slst to top of ch 3. (24 sts)
RND 6: Ch 3. Dc in each of the next 7 dc. (Dc, ch 2, dc in next dc, ch 2, 3 times. Dc, ch 2, dc in next dc.) Dc in each of the next 8 dc. Rep bet () once. Join with slst to top of ch 3.
RND 7: Ch 1. Sc in each of the next 7 dc. Sk next dc, each of the next 7 ch 2 sps, & next dc. Sc in each of the next 8 dc. Sk next dc, each of the next 7 ch 2 sps & next dc. Join with slst to ch 1.
RND 8: Ch 3. Dc in each sc around. Join with slst to top of ch 3.
RND 9: Ch 3. Dec. *Dc in each of the next 2 dc. Dec. Rep from * around. Dc in last dc. Join with slst to top of ch 3. (12 sts)
RND 10: Ch 5. Dc in same st as slst. (Ch 2. Dc, ch 2, dc in next dc 5 times.) Ch 2, dc in next dc, 6 times. Ch 2. Join with slst to 3rd ch of ch 5. This makes the front of the skirt flatter than the back. It will make the back look like it has a bustle.
RND 11-19: Slst into the first ch 2 sp. Ch 5, dc in same sp. Dc, ch 2, dc in each ch 2 sp around. Join with slst to 3rd ch of ch 5.
RND 20: Ch 1. 2 sc in next ch 2 sp. Sc in next dc. *Sc in next dc. 2 sc in next ch 2 sp. Sc in next dc. Rep from * around. Join with slst to top of ch 1.
RND 21: Ch 5. Dc in same st as slst. Sk 1st. *Dc, ch 2, dc in next st. Sk 1 st. Rep from * around. Join with slst to 3rd ch of ch 5. Fasten off. Weave ends into back of work. Stuff head.
Arms
RND 1: Rejoin thread on first ch 2 sp on round 6. Ch 5. Dc in same sp. Dc, ch 2, dc in each of the next 6 ch 2 sps. Join with slst to 3rd ch of ch 5.
RND 2: Slst into the first ch 2 sp. Ch 5. Dc in same sp. Dc, ch 2, dc in each ch 2 sp around. Join with slst to 3rd ch of ch 5.
RND 3: Ch 1. 2 sc in next ch 2 sp. Sc in next dc. *Sc in next dc. 2 sc in next ch 2 sp. Sc in next dc. Rep from * around. Join with slst to ch 1. Fasten off. Repeat with other side.
Wings
RND 1: Ch 1 12. Join with slst to first ch to form ring. Ch 5. *Dc in ring. Ch 2. Rep from * 12 times more. Join with slst to 3rd ch of ch 5. (14 ch 2 sps)
ROW 1 First side: Slst into the first ch 2 sp. Ch 5, dc in same sp. Dc, ch 2, dc in each of the next 6 ch 2 sps. Ch 1, turn.
ROW 2 & 3: Slst into the first ch 2 sp. Ch 5, dc in same sp. Dc, ch 2, dc in each of the next 6 ch 2 sps. Ch 1, turn.
ROW 4: 2 sc in first ch 2 sp. *Sc in each of the next 2 dc. *2 sc in next ch 2 sp. Sc in each of the next 2 dc. Rep from * 4 times more. 3 sc in last ch 2 sp. Ch 5, turn.
ROW 5: Dc in first sc. *Sk 1 st. Dc, ch 2, dc in next sc. Rep from * 12 times more. Dc, ch 2, dc in last sc. Fasten off.
ROW 1-4 2nd side: Rejoin thread in next unworked ch 2 sp on round 1. Rep rows 1-4.
ROW 5: Ch 5, dc in same sp. Dc, ch 2, dc in next sc. *Sk 1 sc. Dc, ch 2, dc in next sc. Rep from * 12 times more. Fasten off. Weave ends into back of work.
Halo
RND 1: Ch 4. Join with slst to first ch to form ring. Ch 5. *Dc in ring. Ch 2. Rep from * 6 times more. Join with slst to 3rd ch of ch 5.
RND 2: Ch 1. 2 sc in next ch 2 sp. *Sc in next dc. 2 sc in next ch 2 sp. Rep from * around. Join with slst to ch 1.
RND 3: Ch 5, dc in same st as slst. Sk 1 st. *Dc, ch 2, dc in next st. Sk 1 st. Rep from * around. Join with slst to 3rd ch of ch 5. Fasten off. Weave all ends into back of work.
Finishing Touches
Stiffening
Stiffen all parts with fabric stiffener and allow to dry completely. Shape as needed while they are drying.
Assembly
Using hot glue, glue the wings to the back and the halo to the back of the head.