How to Make a Stylish Crochet Earwarmer Headband

Introduction
Crochet earwarmer headbands are the perfect blend of fashion and functionality, keeping you warm and stylish all at once! These versatile accessories come in a wide range of colors and patterns, making it easy to find one that suits your personal style. Whether you're heading out for a brisk morning walk or just want to add a cute touch to your outfit, a crochet earwarmer headband is a must-have accessory.
Plus, they're great for all ages and can be a fun DIY project for those crafty individuals looking to add a personal touch to their winter wardrobe. Stay cozy and on-trend with a crochet earwarmer headband this season!
Materials Needed
- Hook - 5.5mm (I)
- Yarn - 4 ply worsted
Stitches Used
Here are the stitches you will use:
- ch - chain
- st - stitch
- sc - single crochet
- hdc - half double crochet
- dec - decrease
Pattern Instructions
To begin, follow these steps:
- Ch 4 and sc in the second chain from the hook and in the next two chains. Ch 1 and turn.
- 2 sc in the first st, sc in the next st, 2 sc in the last st (= 5 sc), ch 1 and turn.
- Sc in each st across, ch 1 and turn.
- 2 sc in the first st, sc in the next 3 st, 2 sc in the last st (= 7 sc), ch 1 and turn.
- Sc in each st across, ch 1 and turn.
- 2 sc in the first st, sc in the next 5 st, 2 sc in the last st (= 9 sc), ch 1 and turn.
- Sc in each st across, ch 1 and turn.
- 2 sc in the first st, sc in the next 7 st, 2 sc in the last st (= 11 sc), ch 1 and turn.
- Sc in each st across, ch 1 and turn.
- 2 sc in the first st, sc in the next 9 st, 2 sc in the last st (= 13 sc), ch 1 and turn.
- Sc in each st across, ch 1 and turn.
- Hdc in each st across, ch 1 and turn. Repeat for 39 more rows for a total of 40 rows.
- After 40th row, ch 1 and turn. Sc in each st across. Ch 1 and turn.
- Dec sc in the first 2 st, sc in the next 9 st, dec sc in the last 2 st (= 11 sc), ch 1 and turn.
- Sc in each st across, ch 1 and turn.
- Dec sc in the first 2 st, sc in the next 7 st, dec sc in the last 2 st (= 9 sc), ch 1 and turn.
- Sc in each st across, ch 1 and turn.
- Dec sc in the first 2 st, sc in the next 5 st, dec sc in the last 2 st (= 7 sc), ch 1 and turn.
- Sc in each st across, ch 1 and turn.
- Dec sc in the first 2 st, sc in the next 3 st, dec sc in the last 2 st (= 5 sc), ch 1 and turn.
- Sc in the first 2 st, chain 2, skip 1 sc and sc in the last 2 st. Ch 1 and turn - this is your button hole row.
- Dec sc in the first 2 st, sc in chain 2 space, dec sc in the last 2 st (= 3 sc), ch 1 and turn.
- Sc in each st across, fasten off and weave in tail.
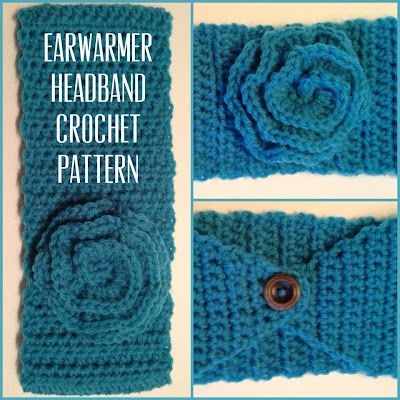
- On the end without the button hole, sew on a button in the 2nd row of stitches (this is about 21" from the button hole). The button I used was 3/4 inch. Use the tail from the start row to sew on the button, then just weave in.
Finishing Touches
When the headband is finished, it should be about 22" long end to end unstretched. Need it smaller or bigger? Just add or subtract rows in the hdc section of the pattern.
Flower Placement
For flower placement, I fold the headband in half, then place the flower just near the crease and sew.