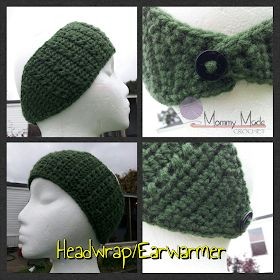
Crochet Headwrap/Earwarmer Pattern

Introduction
Crochet headwraps/earwarmers are not only stylish but also practical accessories for colder weather. These versatile pieces keep your head and ears warm while adding a touch of charm to any outfit. They come in a variety of colors, patterns, and designs, making it easy to find one that suits your style. Whether you prefer a simple and classic look or a bold and trendy statement piece, there is a crochet headwrap/earwarmer out there for everyone. Plus, they are perfect for those days when you want to keep your hair out of your face while still looking effortlessly chic. So, next time you're looking to stay cozy and fashionable, consider adding a crochet headwrap/earwarmer to your accessory collection!
Materials
- WW yarn - I used Red Heart Super Saver in medium thyme as an example
- I hook
- 3/4" button
- Tapestry/sewing needle for weaving in yarn ends and attaching button
Abbreviations
- Ch: chain
- Sl st: slip stitch
- Sk: skip
- Sc: single crochet
- Hdc: half double crochet
- Sc2tog: single crochet 2 stitches together (decrease)
- F.o.: finish off
Notes
If the pattern reads "sc4, 2sc x2", it would be read as: single crochet in the next 4 stitches, 2 single crochet in each of the next two stitches (increases). The asterisks (*) show areas of the pattern to be repeated.
Gauge
4 sts approx. 1" (not terribly important; you can change hook size up or down to suit your needs).
Pattern
- Ch 3
- 1: Sc in 2nd chain from hook and in next ch (2); ch 1, turn at end of every row
- 2: Sc (2)
- 3: 2sc (4)
- 4: Sc (4)
- 5: 2sc, sc2, 2sc (6)
- 6: Sc (6)
- 7: 2sc, sc4, 2sc (8)
- 8: Sc (8)
- 9: 2sc, sc6, 2sc (10)
- 10: Sc (10)
- 11: 2sc, sc8, 2sc (12)
- 12: Sc (12)
- 13: 2sc, sc10, 2sc (14); now we begin the pattern rows
- 14: Hdc, *sk st, hdc, hdc in sk st* hdc in last st (14)
- 15: Hdc (14)
- 16-46: Repeat rows 14/15; finish the pattern with a row 14. If you find this is too large or too small you can add or subtract pattern rows :) Note: we will be adding a tapered end that mimics our beginning
- 47: Sc2tog, sc10, sc2tog (12)
- 48: Sc (12)
- 49: Sc2tog, sc8, sc2tog (10)
- 50: Sc (10)
- 51: Sc2tog, sc6, sc2tog (8)
- 52: Sc (8)
- 53: Sc2tog, sc4, sc2tog (6)
- 54: Sc (6)
- 55: Sc2tog, sc2, sc2tog (4)
- 56: Sc (4)
- 57: Sc2tog x2 (2); do not finish off!
Finishing
Sc evenly around the entire piece. When you get to the beginning end of the headwrap (1st 2 sts), sl st in the first st, ch 3 (or more if you need; this forms the button loop), sl st in the next st, continue to sc around evenly to row 57. Finish off and weave in ends. Position the button and sew it in place (opposite from ch 3 end).
