Scare-Less-Crow Towel Holder: A Whimsical and Functional Home Accessory

Introducing the Scare-Less-Crow Towel Holder, a delightful and practical addition to your kitchen or bathroom! This unique crochet creation combines functionality with a touch of whimsy, making it the perfect accessory for any home.
Crafted with love and attention to detail, this towel holder features a charming scarecrow design that will bring a smile to your face every time you reach for a towel. The carefully chosen colors and intricate stitching bring the scarecrow to life, making it a delightful addition to any farmhouse or country-themed decor.
Hang it in your kitchen to keep your dish towels within easy reach or place it in your bathroom for a touch of whimsy. With its sturdy construction and attention to detail, this towel holder is not only charming but also functional, ensuring your towels stay securely in place. Say goodbye to boring towel holders and welcome the Scare-Less-Crow Towel Holder into your home for a touch of handmade charm!
Supplies Needed
Size:
Hook: H/5.0mm
Yarn: Worsted Weight in 3 colors: MC= .8oz, Hat color (B)=.4oz, Yellow (straw color) (C)=.1oz.
Optional: Buttons, facial features.
Abbreviations & Stitches Used
Beg=Beginning, Ch=Chain, Slst=Slip stitch, Sc=Single crochet, Sp(s)=Space(s), Sk=Skip, W/=With, Dc=Double crochet, St(s)=Stitches, Lps=Loops, Fp=Front Post, Rs=Right Side, Ws=Wrong Side, Dec=Decrease.
Notes
Join: W/slst in beg st.
Back: W/MC
Instructions
Back
RND 1: Ch4, 11dc in 4th ch from hook, join. (12dc)
RND 2: Ch3, dc in same st, 2dc in each st around, join. (24dc)
RND 3: Ch3, dc in same st, 2dc in each st around, join. (48dc)
RND 4: Ch3, dc in same st. [Dc in 3sts, 2dc in next st] Repeat around, ending w/dc in last 3sts, join. (60dc) Fasten off, weave in ends.
Front
Work the same as back, but DO NOT fasten off at end of rnd 3.
Place wrong sides of both pieces together, with the right side of the front circle facing you, work through both pieces. This is now the Rs, and the back piece is the Ws.
RND 5: (Rs) Slst in joining st on both circles, Ch1, sc in same st and each st around, join. (60sc) Fasten off, weave in ends.
Hat
With Color B
Row 1: (Brim) With back side (ws) facing you, join B in any back lp, (this is the lp away from you). Ch3, dc in same st, 2dc in next 11lps, turn work around so front (rs) is now facing you. (24dc)
We are now working the hat, which is worked behind the brim.
Row 2: Sc in the unused lp behind brim, sc in next 11lps, ch1, turn. (12sc)
Row 3: Ch1, sc in first st, and next 11sts, ch1, turn. (12sc)
Row 4: Scdec in first 2sts, sc in 8sts, scdec over last 2sts, ch1, turn. (10sc)
Row 5: Scdec in first 2sts, sc in 6sts, scdec over last 2sts, ch1, turn. (8sc)
Row 6: Scdec in first 2sts, sc in 4sts, scdec over last 2sts, ch1, turn. (6sc)
Row 7: Scdec in first 2sts, sc in 2sts, scdec over last 2sts, ch1, turn. (4sc)
Row 8: Scdec twice, ch1, turn. (2sc)
Row 9: Scdec, slst in same st. Fasten off, weave in ends.
Hair
(Rs)
With rs facing you, join C w/sc around post of first sc under brim. [Ch6, fpsc in next st] 11x. Ch6, slst around next st, fasten off, weave in ends. (12 lps)
Neck Straw
(Rs)
With front facing you and scarecrow upside down, join B w/sc in 18th st. [Ch10, sc in next st] 13x, ch10, slst in next st, fasten off, weave in ends. (14 lps)
Hanger Options
3 options, 1st and 2nd options are done while doing the border for the hat.
Hat Border
(Rs) W/B, join in right side of hat, (row2) with a sc, sc evenly up right side of hat, 3sc in top of hat, sc evenly down left side of hat. Ch1, turn, slst up left side of hat, in 2nd sc of the tip (top) of hat, work your choice of hanging options below. If using button closure, see “Hanger w/button” below.
Tie Option
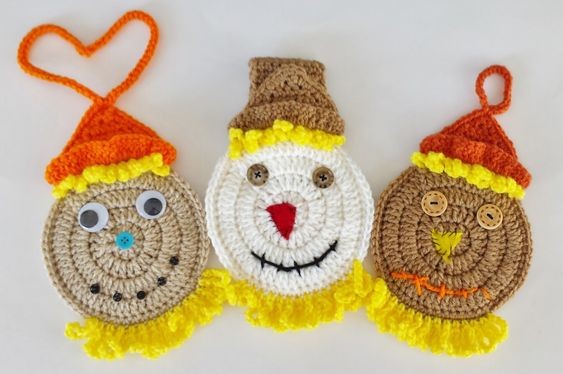
(As shown in 1st scarecrow of picture above)
[Ch40, slst in 2nd ch from hook, and next 38chs, slst in same st of hat] 2x, fasten off, weave in ends.
Hanging Loop
(As shown in 3rd scarecrow of picture above)
Ch20, join in same st of hat. If you want to reinforce your loop, slst around the lp, fasten off, weave in your ends.
Hanger with Button
(As shown in 2nd scarecrow of picture above)
Start row 1 w/long tail to sew onto scarecrow.
Row 1: W/Green, Ch10, sc in 2nd ch from hook and each ch across, ch1, turn. (9sc)
Rows 2-26: Sc in each st across, ch1, turn. (9sc)
Row 27: Scdec, sc in next 5sts, scdec in last 2sts, ch1, turn. (7sc)
Row 28: Scdec, sc in next st, ch2, sk-1, sc in next st, scdec in last 2sts, ch1, turn (4sc)
Row 29: Sc in all sts, including chsp. (5sc) Fasten off, weave in ends.
Attachment
Sew your button where you want it, I placed mine over rows 4-6, then decide on your placement, I sewed rows 1-7, with row 1 at the top of rnd 2 on back of Scarecrow. I also sewed part of the hanger onto the hat to give more stability.