Create a Charming Farmhouse Nautical Pillow Using Crochet

Introduction
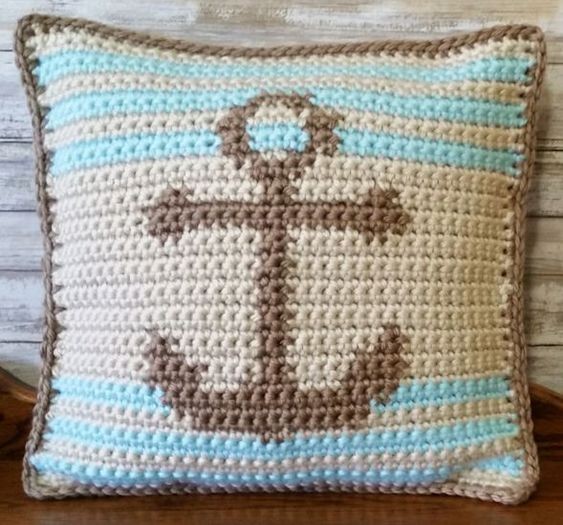
Create a charming farmhouse nautical pillow using the art of crochet. This unique piece will add a touch of rustic elegance to any room in your home. The farmhouse theme brings a cozy and inviting feel, while the nautical elements add a touch of seaside charm. The intricate crochet work will showcase your crafting skills and make this pillow a standout piece in your decor. The farmhouse aesthetic brings in elements of simplicity and warmth, while the nautical theme adds a sense of adventure and wanderlust. The handmade nature of the crochet work adds a personal touch to the pillow, making it a special piece that will be cherished for years to come. Add this crochet farmhouse nautical pillow to your home decor for a unique and stylish accent that will impress all who see it.
Materials Needed
- 2 skeins Lion Brand Hometown – Los Angeles Tan
- 2 skeins Lion Brand Hometown – Hoboken Honey
- 1 skein Lion Brand Hometown – Louisville Julep
- 9.00 mm crochet hook
- 16″ x 16″ pillow form
- Tapestry needle
Abbreviations
ch(s) = chain(s)
st(s) = stitch(es)
sc = single crochet
sl st = slip stitch
American crochet terms used throughout
Gauge
4″ x 4″ = 9 sc, 11 rows
Finished Size Approximately
16″ x 16″
Instructions
To Make the Front Panel
Row 1:
With Los Angeles Tan, chain 37. Sc in the 2nd ch from the hook and in each ch across, turn.
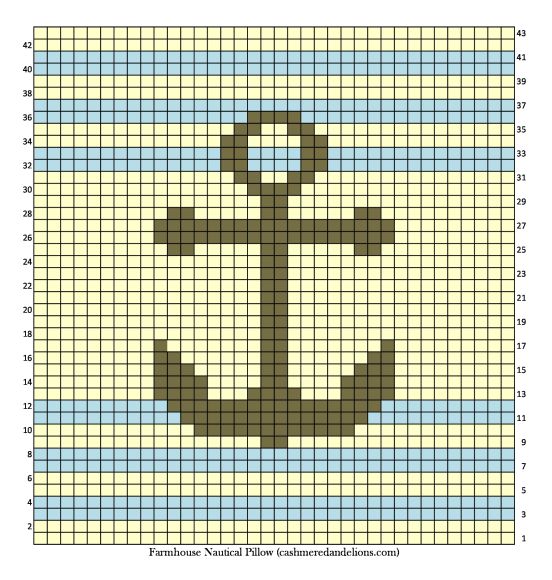
Rows 2 – 43:
Follow the graph below. Each square on the graph represents 1 sc. Work the odd rows by reading the graph from right-to-left, the even rows by reading the graph from left-to-right, and so forth. Change colors as indicated by the graph. Any color not in use will be dropped and picked back up when needed. Make sure you always drop the yarn to the back side (wrong side) of the panel. The back side of this panel will look quite messy, but it does not matter because it will not be seen once the pillow is assembled. When you have completed the pattern on the graph, fasten off and weave in all ends.
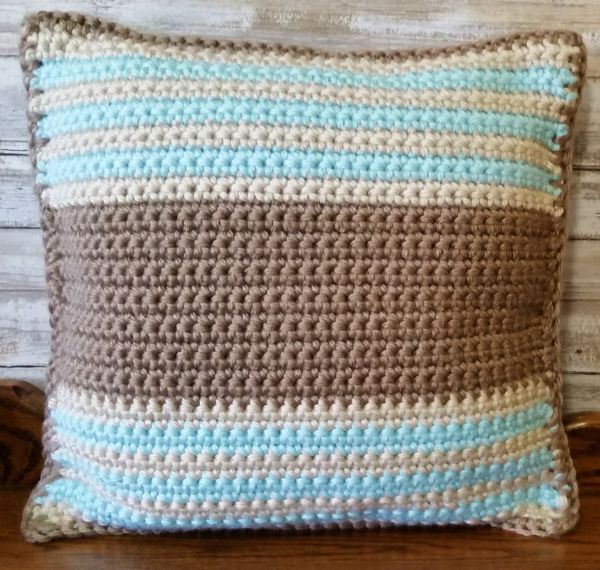
To Make the Back Panel
Row 1:
With Los Angeles Tan, ch 37. Sc in the 2nd ch from the hook and in each ch across, turn.
Row 2:
Ch 1, sc in each st across, turn.
Rows 3-4:
With Louisville Julep, ch 1, sc in each st across, turn.
Rows 5-6:
With Los Angeles Tan, ch 1, sc in each st across, turn.
Rows 7-8:
With Louisville Julep, ch 1, sc in each st across, turn.
Rows 9-10:
With Los Angeles Tan, ch 1, sc in each st across, turn.
Rows 11-12:
With Louisville Julep, ch 1, sc in each st across, turn.
Rows 13-14:
With Los Angeles Tan, ch 1, sc in each st across, turn.
Rows 15-29:
With Hoboken Honey, ch 1, sc in each st across, turn.
Rows 30-31:
With Los Angeles Tan, ch 1, sc in each st across, turn.
Rows 32-33:
With Louisville Julep, ch 1, sc in each st across, turn.
Rows 34-35:
With Los Angeles Tan, ch 1, sc in each st across, turn.
Rows 36-37:
With Louisville Julep, ch 1, sc in each st across, turn.
Rows 38-39:
With Los Angeles Tan, ch 1, sc in each st across, turn.
Rows 40-41:
With Louisville Julep, ch 1, sc in each st across, turn.
Rows 42-43:
With Los Angeles Tan, ch 1, sc in each st across, turn.
Fasten off and weave in all ends.
To Attach the Front and Back Panels
With right sides facing out, line up the front and back panels. Attach Hoboken Honey to any corner and work a round of sc through both layers, around three of the edges, working a [sc, ch 1, sc] into each corner. Insert pillow form. Continue working sc until you have worked around the entire perimeter of the pillow, sl st to beginning and fasten off. Weave in ends.