Complete Bloom Scarf Crochet Pattern
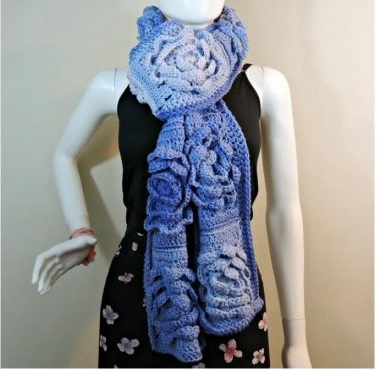
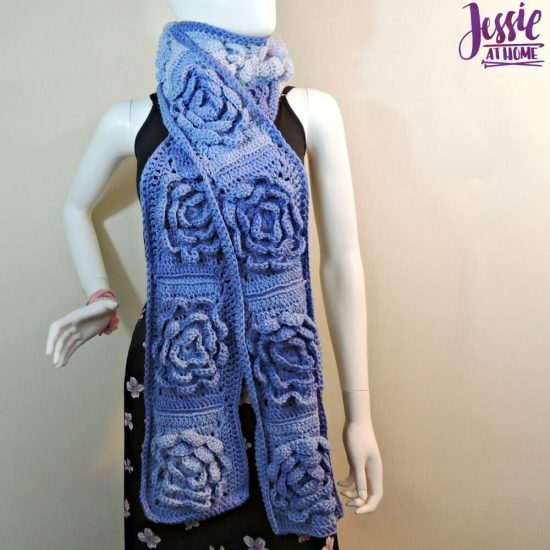
Size
8” x 88”
Yarn
Red Heart Super Saver Ombre in Baja Blue 3963 – 2 skeins
Hook
US-J/10 (6.0 mm)
Gauge
13 sts and 6 rows = 4” [10 cm] in double crochet
Other Supplies
Yarn needle
Stitches and Abbreviations
Click on highlighted stitches for tutorials:
- ch – chain
- dc – double crochet
- hdc – half double crochet
- sc – single crochet
- sl st – slip stitch
- sp(s) – space(s)
- st(s) – stitch(es)
Getting Started
Round/Row counts are at the end of each row if it has changed from the previous round. They are indicated after the period. – {count here}
Chains and slip stitches are not included in Round/Row counts unless specified.
Pattern
Bloom Scarf
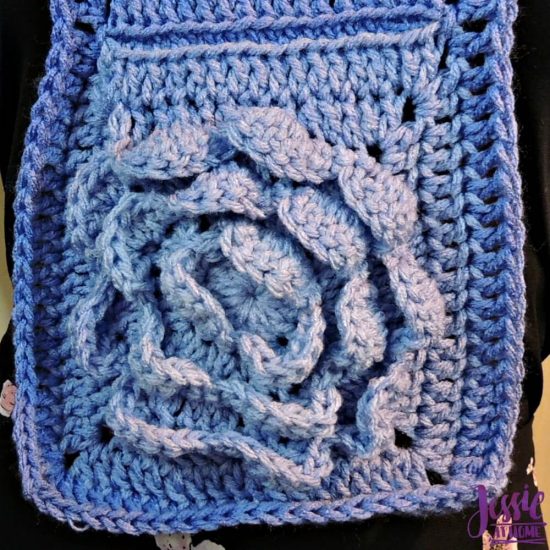
Flower Granny Squares (Make 12)
RND 1: Ch 3, join with a sl st to form a loop, ch 3 (counts as first dc here and throughout) 14 dc into loop, sl st to top of ch 3. – {15 dc}
RND 2 Front: Work entire round in front loops only. Sc in first st, *hdc in next st, 5 dc in next st, hdc in next st, sc in next 2 sts; repeat from * once more, hdc in next st, 5 dc in next st, hdc in next st, sc in next st, sl st to first sc. – {3 petals}
RND 2 Back: Work entire round in back loops only. Sl st into a back loop behind last st of previous round, ch 3, dc in same st, 2 dc in each of the next 14 sts, sl st to top of beginning ch 3. – {30 dc}
RND 3 Front: Work entire round in front loops only. Sc in first st of round 2 back, *hdc in next st, 5 dc in next st, hdc in next st, sc in next 2 sts; repeat from * until there are only 4 sts left, hdc in next st, 5 dc in next st, hdc in next st, sc in next st, sl st to first sc. – {6 petals}
RND 3 Back: Work entire round in back loops only. Sl st into a back loop behind last st of previous round, ch 3, dc in same st as sl st, *dc in next st, 2 dc in next st, repeat from * 13 more times, dc in next st, sl st to top of beginning ch 3. – {45 dc}
RND 4 Front: Work entire round in front loops only. Sc in next first stitch of round 3 back, *hdc in next st, 5 dc in next st, hdc in next st, sc in next 2 sts, repeat from * until there are only 4 sts left, hdc in next st, 5 dc in next st, hdc in next st, sc in next st, sl st to first sc. – {9 petals}
RND 4 Back: Work entire round in back loops only. Sl st into a back loop behind last st of previous round, ch 5 (counts as first dc and ch 2), 2 dc in same st, *dc in next 2 sts, hdc in next 2 sts, sc in next 2 sts, hdc in next 2 sts, dc in next 2 sts, (2 dc, ch 2, 2 dc) in next st; repeat from * 2 more times, dc in next 2 sts, hdc in next 2 sts, sc in next 2 sts, hdc in next 2 sts, dc in next 2 sts, dc in last st, sl st to 3rd ch of beginning ch 5. – {14 sts on each side, ch-2 on each corner}
RND 5: Work in both loops. Sl st into ch-2 space, ch 5 (counts as first dc and ch 2), 2 dc in same space, *dc in each st to next corner, (2 dc, ch 2, 2 dc) in ch-2 corner; repeat from * 2 more times, dc in each st to next corner, dc in ch-2 corner space, sl st to 3rd ch of beginning ch 5. – {18 sts on each side, ch-2 on each corner}
Fasten off and then weave in all ends.
Joining
Lay out all flower granny squares in preferred order. Whip stitch (sew) squares together through the back loop of the last round. Fasten off and then weave in all ends.
Border
RND 1: Join yarn to any corner, ch 5 (counts as first dc, ch 2) 2 dc in same corner, *dc in each st to next corner, (2 dc, ch 2, 2 dc) in corner; repeat from * 2 more times, dc in each st to first corner worked, dc in corner, sl st to 3rd ch of beginning ch 5.
Fasten off and then weave in all ends.


