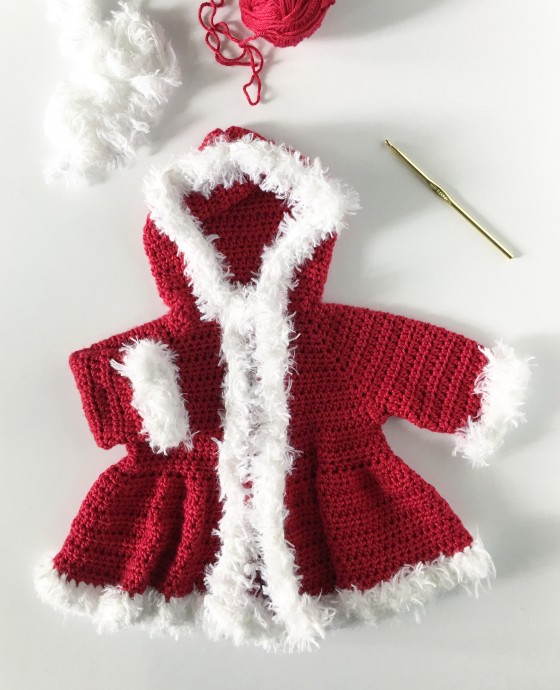
How to Crochet a Hooded Baby Sweater with Fur Edging


Materials You’ll Need
2 skeins of Autumn Red Caron Simply Soft;
1 skein of white fur;
Crochet hook 5 mm;
Tapestry needle;
Scissors;
Clasp.
Stitches Control
4 HDC per 1 inch.
Size
9 -12 months (Suggestions are provided to size it down to 3-6 months or size up to 18-24 months. Please refer to the chart above for sweater sizing suggestions.)
Instructions
Chain 46
Row 1: Work 1 HDC in the third chain from the hook. Work 1 HDC in each chain across. (Total: 44 HDC)
Chain 2 and turn; note that the chain 2 does not count as a stitch now and throughout the pattern.
Body of the Sweater
Row 2: Work 1 HDC in each of the next 8 sts. Work 3 HDC into the next st, 1 HDC in each of the next 5 sts, 3 HDC in the next st, 1 HDC in each of the next 14 sts, 3 HDC in the next st, 1 HDC in each of the next 5 sts, and finally 3 HDC in the final 8 spaces. Chain 2 and turn.
Tip: If you prefer to mark your corners ahead of time, you will be marking the 9th, 15th, 30th, and 36th stitches (sts.)
Another tip: After working 3 HDC into one stitch, mark the second HDC; this will be the corner stitch that you will work 3 HDC into in rows 3-8.
Row Instructions for Sweater Body
Row 3-8: Work 1 HDC into each stitch and 3 HDC into the center HDC of each corner. Increase in this manner for 8 rows for the 6-9 month size. For a smaller size, work 7 rows, and for a larger size work 10 rows or even more. Refer to the Baby Size Chart for shoulder-to-shoulder measurements and adjust your increases accordingly. The starting chain should be sufficient for up to 18-24 months.
On the 9th row (or after you have reached the desired size), work 1 HDC in each st to the corner. Work 1 HDC into the corner st, chain 4, and then work 1 HDC in the next corner, skipping over all the stitches in between to form the armhole.
After completing the two armholes, work 1 HDC in each st to the end of the row, chain 2, and turn.
Bodice
Work 1 HDC in each stitch, including each of the 4 chains that joined for the armholes. If they have pulled too tight, working around them is acceptable instead of into them. Chain 2 and turn.
Repeat instructions for the bodice for 8 rows or as many as needed if you adjusted the size.
Skirt
Row 1: Work 1 HDC in each of the first 5 sts, work 2 HDC in each stitch except the last 5 sts of the row. Finish with 1 HDC in each of the last 5 sts. Chain 2 and turn.
Row 2 - Until Desired Length: Work 1 HDC in each stitch, chain 2, and turn.
Sleeves
Round 1: Pull up a loop in the center of the armhole chains. Chain 1 and then HDC into the same space.
Tip: Make sure you are working in the right direction. You want to work into stitches flowing in the opposite direction as if you had chained and turned.
Work 1 HDC into each stitch, including each chain used to create the bottom of the armhole. Join with a slip stitch to the first HDC of the round, chain 1, and turn.
Tip: Count the number of stitches you have made, so you can replicate this quantity for the next sleeve.
Round 2 - Until Desired Length: Work 1 HDC in each stitch, join with a slip stitch to the first HDC of the round, chain 1, and turn.
Wrist Cuff
Round 1: Chain 1 and turn, work 1 SC into the stitch, *SC2tog over the next 2 stitches, SC in the next 3 stitches. Repeat around. This will bring the wrist part in a little before adding the fur. Finish with one additional SC into the last space, join with a slip stitch into the first SC, chain 1, and turn.
Rounds 2 - 3 for the Wrist: Work SC into each stitch, joining with a slip stitch to the first st. Chain 1 and turn. Repeat for two more rows. On the last round, slip stitch and change to the fur.
Fur Edging
Chain 2. Work 1 DC in each stitch around. Tie off and weave in ends.
Hood
Row 1: Pull up a loop in the front corner of the sweater at the neck and chain 2 (either side works). Work HDC into that first stitch and each stitch to the first corner. *HDC3tog over the corner space. Work HDC in each stitch to the next corner and repeat from * to the end of the neck edge. Chain 2 and turn.
Row 2 - 21: Work 1 HDC in each stitch, chain 2, and turn after each row.
Sewing the Hood Together
Fold the top edge of the hood in half, matching the two corners to form the hood. Use your tapestry needle to sew it closed. Weave in all the ends before you begin the fur.
Final Fur Edging
In the bottom front corner of the sweater, either side, pull up a loop and chain 3. Work DC up one side, around the hood, down the other, and around the bottom of the sweater. Join with the starting chains, tie off, and weave in all ends.
