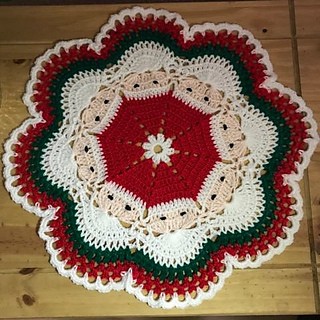
Craft Your Own Santa Face Doily

You’ll Need:
DK Yarn (50g balls), 4 colours: Red, White, Green and Flesh/Tan;
Small amount of Black yarn or Embroidery Thread;
Crochet hook 4.00mm;
Scissors;
Darning Needle.
Stitches:
Note:
How to complete a tr3tog: *yo twice, insert hook into next st, yo, pull up a loop, (yo, draw through 2 loops) twice, repeat from * two more times, yo, draw through all loops on hook.
How to complete a tr4tog: *yo twice, insert hook into next st, yo, pull up a loop, (yo, draw through 2 loops) twice, repeat from * three more times, yo, draw through all loops on hook.
The ch 3 or ch 4 worked at the beginning of a row, counts as the first stitch.
Instructions:
Using White yarn, start by making a magic ring and chain up 1.
Round 1:
Into the magic ring work (2dc, ch1) 8 times, sl st to the starting dc. (16 sts & 8 ch1).
FO white yarn.
Round 2:
Join Red yarn into any ch1 space, Ch3, 2dc in the same ch space, ch2, (3dc in the next st, ch2) repeat to end, sl st to the top of the starting ch3.
Round 3:
Ch3, dc in the same st (at the base of the ch3 just made), dc in the next st, 2dc in the last st, ch2, (2dc in the next st, dc in the next st, 2dc in the last st, ch2) repeat to end, sl st to the top of the starting ch3.
Round 4:
Ch3, dc in the same st, 1dc in the next 3 sts, 2dc in the last st, ch2, (2dc in the next st, 1dc in the next 3 sts, 2dc in the last st, ch2) repeat to end, sl st to the top of the starting ch3.
Round 5:
Ch3, dc in the same st, 1dc in the next 5 sts, 2dc in the last st, ch2, (2dc in the next st, 1dc in the next 5 sts, 2dc in the last st) repeat to end, sl st to the top of the starting ch3.
Round 6:
Ch3, dc in the same st, 1dc in the next 7 sts, 2dc in the last st, ch2, (2dc in the next st, 1dc in the next 7 sts, 2dc in the last st, ch2) repeat to end, sl st to the top of the starting ch3.
Round 7:
Join in White yarn, ch3, dc in the next 10 sts, ch5, (dc in the next 11 sts, ch5) repeat to end, sl st to the top of the starting ch3.
Round 8:
Join in Flesh/Tan yarn, ch3, dc into the next 10 sts, ch2, sc into ch5 space, ch2, (dc in the next 11 sts, ch2, sc into ch5 space, ch2) repeat to end, sl st to the top of the starting ch3.
Round 9:
Ch4, work tr3tog over the next 3 sts, tr3tog over the next 3 sts, tr4tog over the remaining 4 sts, ch10, (tr4tog, tr3tog, tr4tog, ch10) repeat to end, sl st to the top of the starting ch4.
FO yarn.
This shapes Santa’s face, giving him 2 cheeks and a nose!
Round 10:
Join White yarn to the top of any tr3tog st (this is the middle section of the group, ‘Santa’s nose’), ch4, work 10tr into the same st, ch1, now working over the top of the ch10 of the previous round, place a dc into 1st ch5 space of row 8 (underneath ch10), ch5, sc into ch10 space, ch5, dc over ch10 into 2nd ch5 space of row 8, ch1, tr11 into tr3tog st, ch1, (dc into 1st ch5 on row 8, ch5, sc into ch10 space, ch5, dc into 2nd ch5 space on row 8, ch1, tr11 into tr3tog st) repeat to last fan, dc into 1st ch5 on row 8, ch5, sc into ch10 space, ch5, dc into 2nd ch5 space on row 8, ch1, sl st to the top of the starting ch4.
Round 11:
Ch3, dc in the next 10 sts, dc into ch1 space, ch5, dc into the next ch1 space, (dc into the next 11 sts, dc in ch1 space, ch5, dc into ch1 space) repeat to end, sl st to the top of the starting ch3.
Round 12:
Ch4 (counts as 1dc, 1ch), dc, ch1 12 times, now working over the top of ch5 of previous round, place a dc into the sc of round 10, ch1, (dc, ch1 13 times, dc into sc of round 10, ch1) repeat 5 more times, dc, ch1 13 times, dc into sc of round 10, ch1, dc into the next st, sl st to the 3rd ch of starting ch4.
FO yarn.
Round 13:
Join Green yarn to the top of the first dc in any fan, ch1, sc into the same st, ch1, sc 12 times, ch4, skip the next ch1, dc, ch1, (sc, ch1 12 times, sc, ch4, skip next ch1, dc, ch1) repeat to end, sl st to the top of the starting sc.
Round 14:
Ch1, sc into the same st, ch4, sc into the next st 11 times, sc into the last st, ch1, sc into the next ch4 space, ch1, (sc into the next st, ch4 11 times, sc into the last st, ch4, sc into the next ch4 space, ch1) repeat to end, sl st to the top of the starting sc.
FO yarn.
Round 15:
Join Red yarn into ch4 space at the beginning of fan, ch1, sc into the same space, ch4, [sc into the next ch space, ch4] 10 times, sc into the last ch space, ch1, sc into the next st, ch1, ([sc into the next ch space, ch4] 10 times, sc into the last ch space, ch1, sc into the next st, ch1) repeat to end, sl st to the top of the starting sc.
Round 16:
Sl st into ch space, ch1, sc into the same space, ch4, (sc into the next ch4 space, ch4, sc into the next ch space, repeat ch4, sc to last ch on fan ending with sc, ch1, skip first sc and place sc into the next st, ch1) repeat to end, sl st to the top of the starting sc.
FO yarn.
Round 17:
Join White yarn into ch4 space at the beginning of fan, ch1, sc into the same space, (ch4, sc into the next ch space, repeat to last ch space, ch1, skip first sc and place sc into the next st, ch1, sc into the next ch4 space) repeat to end, sl st to the top of the starting sc. Your work may still be a little wavy at this point. It will even out and lay flat after blocking.
Round 18:
Sl st into ch space, ch1, 5sc into the same ch space, 5sc into the next ch space, continue to last ch space, 5sc into the last ch space, ch1, skip the next st, sc into the next st, ch1, (5sc into the next ch4 space, continue to last ch space, 5sc into the last ch space, ch1, skip the next st, sc into the next st, ch1) repeat to end, sl st to the top of the starting sc.
FO yarn.
Using your Darning Needle, weave in any loose ends.
Santa’s Eyes:
With Black yarn and a needle, sew Santa some eyes! Place them in the top of the sts of row 9 (the tr4tog groups) working over 2 sts for each eye. Your Santa faced doily is now ready to be blocked or shaped by your preferred method.
greatrockbulldogs052@gmail.com
just a question, if I wanted to use size 10 cotton thread what size steel crochet hook would I need
Maria, you can use hook # 7 or # 8
thank you my next project